News and notes from the bleeding edge of Revelation Software development
Category Archives: Presentation Server
Contains posts about the OpenInsight Presentation Server, which is the module responsible for managing GUI windows and controls on the Windows Desktop.
We recently noticed a new bug in the IDE where a dialog that hadn’t been updated for quite some time suddenly started misbehaving: it would appear at the wrong coordinates (0,0), and then jump to the proper ones.
At first glance this this looked like a classic case of creating the dialog in a visible state, and then moving it during the CREATE event, but checking the dialog properties in the Form Designer showed that the dialog’s Visible property was “Hidden”, so this wasn’t the source of the problem.
Stepping through the CREATE event in the debugger showed that the dialog was indeed created hidden, but then became visible during an RList() call that performed a SELECT statement, ergo RList() was allowing some queued event code to execute (probably from an internal call to the Yield() procedure) and that was changing the dialog’s VISIBLE property.
Checking the other events revealed that the SIZE event contained the following code:
Call Set_Property( @Window, "REDRAW", FALSE$ )

// Move some controls around

Call Set_Property( @Window, "REDRAW", TRUE$ )
The REDRAW property works by toggling an object’s WS_VISIBLE style bit – when set to FALSE$ the style bit is removed but the object is not redrawn. When set to TRUE$ the object is marked as visible and redrawn.
So, putting all this together: creating the dialog generated a queued SIZE event, which under normal circumstances would run after the CREATE event. However, the Yield() call in RList() executed the SIZE event before the dialog was ready to be shown, and the REDRAW operation made the dialog visible before the CREATE event had moved it to the correct position.
The fix for this was to ensure that the REDRAW property wasn’t set to TRUE$ if it’s original value wasn’t TRUE$, like so:
bRedraw = Set_Property( @Window, "REDRAW", FALSE$ )

// Move some controls around

If bRedraw Then
   Call Set_Property( @Window, "REDRAW", TRUE$ )
End
Conclusion
Always protect calls to the REDRAW property by checking its state before you set it, and then only turn it back on again if it was set to TRUE$ originally.
Calling Yield() can cause events to run out of the normal sequence, and you should be aware of this when writing your application.
The next release of OpenInsight (version 10.1) includes a couple of updates to the FILEPREVIEW control as a result of using it extensively “out in the field”, and in this post we thought we’d look at these changes and why we made them in case you encounter the same issues yourself.
The Adobe problem
As mentioned in this previous post, the FILEPREVIEW control relies on third-party DLLs to provide “preview handlers” that OpenInsight uses to display the contents of files such as Word or PDF documents. However, what we found is that not all of these handlers are created equal and some can be quite problematic – in our case the Adobe PDF preview handler (supplied with the Adobe PDF Reader) proved to be one of these.
When the handler is loaded by OpenInsight one of the things that must be specified is the context in which it is created – this can be “in-process” (which means it runs in the same address space as OpenInsight) or “out-of-process” (which runs as a separate executable). This is done internally by a set of flags, and when you use the FILENAME property these flags are set to their default values which, until recently, had proved sufficient. However, extensive testing (by Martyn at RevSoft) found that the Adobe PDF preview handler had stopped working, and further investigation revealed that at some point recent versions of this had become sensitive to these context flags, so the first change we made was to provide a new SETFILENAME method, which allows you to set the flags yourself if need be:
(Equates for these flags can be found in the MSWIN_CLSCTX_EQUATES insert record)
If the returned value is 0 then the operation was successful, otherwise this is an error code reported from Windows and can be passed to the RTI_ErrorText stored procedure to get the details:
E.g.
// Load the PDF in an out-of-process context
$Insert MSWin_ClsCtx_Equates

RetVal = Exec_Method( CtrlEntID, "SETFILENAME", "C:\Temp\Test.PDF", "",
                      CLSCTX_LOCAL_SERVER$ )
If RetVal Then
   // Problem...
   ErrorText = RTI_ErrorText( "WIN", RetVal )
End
Even with this you may still find problems, as the above code was fine for me, but not for Martyn, even though the PDF preview handler worked fine in Windows Explorer itself for both of us! So, we could only conclude that Adobe made sure that the handler worked with the Windows Explorer, but they were less concerned about third party applications (Per-monitor DPI settings are also not supported by the preview handler which is disappointing as well).
The Foxit solution
After some more testing we decided to switch to the Foxit PDF reader which worked as expected, so we would recommend using this for PDF previewing in future if needed.
Removing the FILENAME property at design-time
One other change we made was to remove the FILENAME property from the Form Designer so that it could not be set at design-time due to the following reasons:
We had reports that once it had been set it was very difficult to select the control again in the Form Designer, because it basically takes over mouse handling!
Document previewing is deemed to more of a run-time operation than a design-time operation.
The FILENAME property is deprecated in favor of the SETFILENAME method because the latter provides a more complete API. The FILENAME property is still supported however, and will be going forwards.
Conclusion
So, for v10.1 we have provided a new SETFILENAME method to provide a better interface for file-previewing which gives more feedback and more control, and you should use this in preference to the FILENAME property.
We have also found the Adobe PDF preview handler to be somewhat temperamental in use so would recommend the Foxit preview handler instead if you have problems with the former (Note however, that other preview handlers we use regularly, such as Word, Excel and PowerPoint have all worked well without any issues so far).
One of the most popular “raw” Windows API functions that OpenInsight developers have used over the years is the ShellExecute function, which allows you to launch an application via its filename association, e.g. you can launch Word by using a document file name, or Excel using a spreadsheet filename and so on.
However, because it was never really made an “official” part of the product (it was normally passed on in forums), developers were left to create their own DLL Prototype definitions in order to use it – this gave rise to many variations over the years, many of which were not compatible with others. For example, some use LPCHAR as an argument type, some use LPSTR or LPASTR, whilst others use LPVOID with GetPointer(); some definitions use the “Wide” version of the function, some the “Ansi” version, and there are many different aliases, with or without the “A/W” suffix too. The list goes on.
For OpenInsight 10 we decided that we couldn’t move forward with this as we would run the risk of conflicting with established applications, so we moved all of the DLL Prototypes we used into a new namespace called “MSWIN_” and claimed it as our own. This left developers to bring forward their own DLL prototypes into version 10 as and when needed, and therefore we didn’t supply a “ShellExecute” function as such, though we did supply “MsWin_ShellExecute” instead (see below).
Another decision we took was to try and move away from the need for developers to use raw Windows API function calls as much as possible, as some of them can be complex and require knowledge of C/C++ programming, which is not necessarily a skill set that everyone has the time or desire to learn. Ergo, we moved a lot of functionality into the Presentation Server (PS) and created some Basic+ wrapper functions around others to shield developers from the sometimes gory internals.
(We also chose to use the “W” versions of functions rather than the “A” versions where possible, because these would translate better when in UTF8 mode and remove the need for an extra “A”->”W” conversion in Windows itself.)
So, coming back to ShellExecute, and in light of the above, we have three “official” and supported ways of calling it in OpenInsight 10 as detailed below:
The SYSTEM object SHELLEXEC method
The RTI_ShellExecuteEx stored procedure
The MSWin_ShellExecute DLL Prototype stored procedure
The SYSTEM object SHELLEXEC method
If your program is running in “Event Context”, (i.e. it is executing in response to an event originating from the PS) then you may use the SYSTEM SHELLEXEC method which invokes ShellExecuteW internally.
Name of a form to use as a parent for displaying UI messages.
Operation
No
Operation to be performed; “open”, “edit”, “print” etc.
File
Yes
File to perform the operation on.
Parameters
No
If File is an executable file this argument should specify the command line parameters to pass to it.
WorkingDir
No
The default working directory for the operation. If null the current working directory is used.
ShowCmd
No
Determines how an application is displayed when it is opened (as per the normal VISIBLE property).
The return value is the value returned by ShellExecuteW.
The RTI_ShellExecuteEx method
This stored procedure is a wrapper around the Windows API ShellExecuteExW function (which is used internally by ShellExecuteW itself), and may be used outside of event context – it can also return the handle to any new process it starts as a result of executing the document. As you can see it’s quite similar to the SHELLEXEC method:
Whilst you are free to use one of the methods outlined above, this may not be optimal if you are still sharing code between your existing version 9 application and your new version 10 one. In this case there are a couple of options you could use:
Define your preferred DLL prototype in v10.
Use a wrapper procedure and conditional compilation.
Defining your own prototype
This is probably the easiest option – you simply use the same prototype in v10 that you did in version 9, with the same alias (if any), and this way the code that uses it doesn’t need to be changed. The only downside to this if you’ve used any 32-bit specific data types instead of 32/64-bit safe types like HANDLE (this could happen if you have a really old prototype) – you must ensure that you use types that are 64-bit compliant.
Using conditional compilation
This is a technique we used when writing the initial parts of v10 in a v9 system so our stored procedures would run the correct code depending on the platform they were executing on (it was actually first used to share code between ARev and OI many years ago!).
The v10 Basic+ compiler defines a token called “REVENG64” which is not present in the v9 compiler – this means that you can check for this in your source code with “#ifdef/#ifndef” directives and write code for the different compiler versions.
For example, you could write your own wrapper procedure for ShellExecute that looks something like this:
Compile Function My_ShellExecute( hwnd, verb, file, params, dir, nShow )

#ifdef REVENG64
   // V10 Compiler - use RTI function
   Declare Function RTI_ShellExecuteEx
   RetVal = RTI_ShellExecuteEx( hwnd, verb, file, params, dir, nShow, "" )
#endif

#ifndef REVENG64
   // V9 Compiler - use existing "raw" prototype
   Declare Function ShellExecute
   RetVal = ShellExecute( hwnd, verb, file, params, dir, nShow )
#endif

Return RetVal
And then call My_ShellExecute from your own code.
So, there ends the Saga of ShellExecute … at least for now.
In a recent post we provided a preview of the OpenInsight IMAGE API documentation for the upcoming release of version 10.1. As that proved quite popular we thought we’d provide some more, this time dealing with the Common GUI API (i.e. the basic interface that virtually every GUI object supports) and the WINDOW object API – two core areas of OI GUI programming.
Methods, not Events
One thing you may notice as you look through these documents is the addition of many new methods, such as SHOWOPTIONS or QBFCLOSESESSION – this is an attempt to tidy up the API into a more logical and coherent format that is a better fit for an object-based interface.
As we went through the product in order to document it, it became very apparent that there were many instances where events were being used to mimic methods, such as sending a WRITE event to save the data in a form, or sending a CLICK event to simulate a button click and so on. In object-based terminology this sort of operation would be performed by a method, which is a directive that performs an action – the event is a notification in response to that action. So, for example, you would call a “write” method to save your data and the system would raise a “write” event so you could deal with it.
Of course, this distinction will probably not bother many developers – just API purists like myself, but this does have another advantage if you like to use Object Notation Syntax (I do) – you can now perform actions such as reading and writing form data by using the”->” notation, whereas before you would have to use the Send_Event stored procedure which essentially breaks the object-based paradigm.
So instead of:
Call Send_Event( @Window, "WRITE" )
you would use the form’s WRITEROW method instead:
@@Window->WriteRow( "" )
which is a more natural fit for this style of programming.
(It is also easier to explain to new OI programmers who are used to other object-based languages and environments where everything is properties, methods and events).
Methods, not Stored Procedures
This brings us finally onto the topic of Stored Procedures and the object API, where several of these also fulfill the role of methods. For example, take the venerable Msg stored procedure used to display a message box for a parent form – a different way of treating this would be to have a SHOWMESSAGE method for the parent form rather than using a “raw” Msg call. Likewise for starting a new form: instead of using the raw Start_Window procedure, the SYSTEM and WINDOW objects now support a STARTFORM method instead.
Of course, none of this changes your existing code, nor is it enforced, it’s just something you can use if and when you wish to. However, even if my API pedantry hasn’t persuaded you to change your coding style, some of the new methods are worth investigating as they provide a better opportunity for us to extend the product’s functionality further – take a look at the WINDOW READROW and WRITEROW methods for an example of this – they support new features that we couldn’t do with just sending events.
In any case, here are the links – hopefully some light reading for your weekend!
The next release of OpenInsight includes a new TABCONTROL property called ALLOWDRAGREORDER, which allows you to drag a tab to a new position within the control. It’s a simple boolean property, and when set to True tabs may be dragged and reordered with the mouse – an image of the tab is moved with the cursor, and a pair of arrows are displayed to mark the potential insertion point.
Here’s an example of a tab being dragged in the IDE:
Bonus trivia
The tabs may be scrolled while dragging by hovering outside either edge of the control.
This property is not supported for:
MultiLine tab controls
Vertically-aligned tab controls
The LISTBOX control also supports this property for reordering its items – see the “Order Tabs” dialog in the Form Designer for an example, or the list of types in the IDE’s “Open Entity” dialog.
Bitmap controls in OpenInsight 10 have a method called CAPTUREIMAGE, which allows you to “screenshot” the contents of another OI control or form into the Bitmap control’s IMAGE sub-object. As you can see, it has a very simple interface:
Where “CaptureID” is the fully qualified name of the control to screenshot.
E.g.
If we have a form called TEST_CAPTUREIMAGE, with a BITMAP control called BMP_SCREENSHOT, then we can screenshot the contents of the IDE into it like so:
The next release of OpenInsight sees a few updates to context menus and the ContextMenu Designer, so in this post we’ll take a brief look at these upcoming changes.
Moving the focus
One important aspect of standard Windows context menu behavior is that the focus is moved (if possible) to the control that the menu belongs to. Current versions of OpenInsight do not follow this pattern so the next release includes a fix for this, and this is something you should be aware of just in case it impacts your application (though to be honest, we’re not really expecting it to!).
Test-Run support
The Context-Menu Designer now supports the IDE “Test-Run” feature, so that you can see how your context menu will appear when you use it in your application.
When you test-run your context menu you will see a simple dialog box with an edit control (EDL_TEST) and and a static control (TXT_TEST) like so:
Right-clicking either of these controls displays your context menu:
Selecting an item displays it’s fully-qualified name, which has the standard format of:
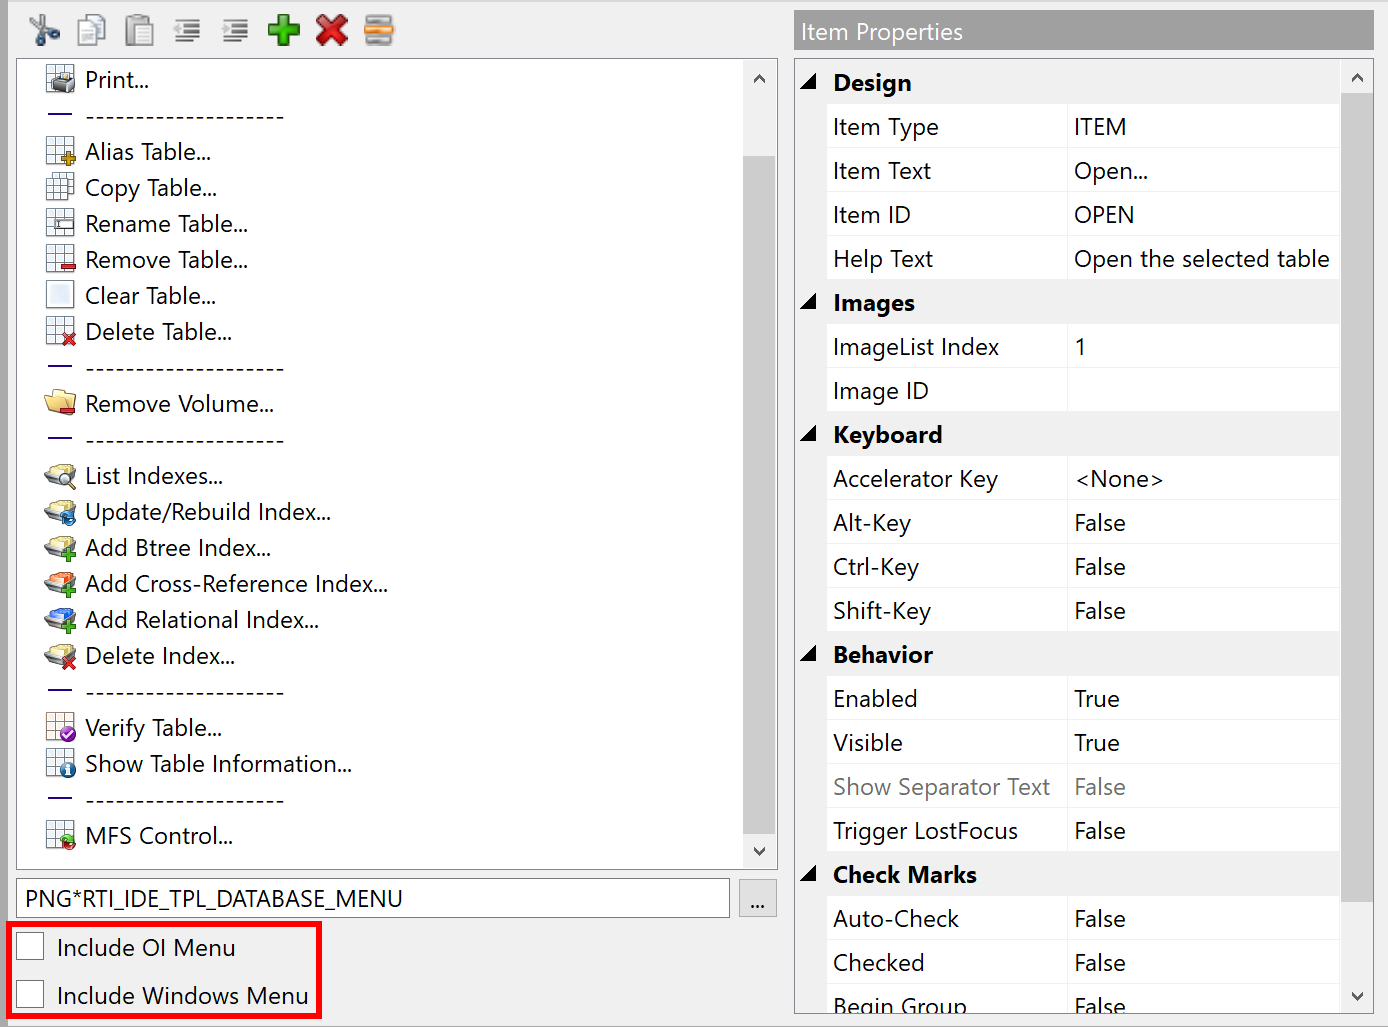
The initial release of the ContextMenu Designer in v10.0.8 included check-boxes for two “common menu” options as shown in the screenshot below. Each of these options appends a set of standard menu items to your context menu, and both have been enhanced for the next release and include new artwork as well.
The “OI Menu” appends the following items:
Options – Display options for the current control.
Whilst the “Windows Menu” appends the following standard “Edit” items instead:
Undo
Cut
Copy
Paste
Delete
Select All
In both cases the default system CONTEXTMENU event (i.e. the event responsible for actually displaying the menu) synchronizes the items to the parent control by using the HELPFLAGS and EDITSTATEFLAGS properties respectively.
(The definition for these items can be found in the SYSPROG “OIMENU_” and “WINMENU_” ContextMenu entities respectively – you may adjust these if you wish, but be aware that they may be overwritten in future OpenInsight updates, so you should make copies in your own application).
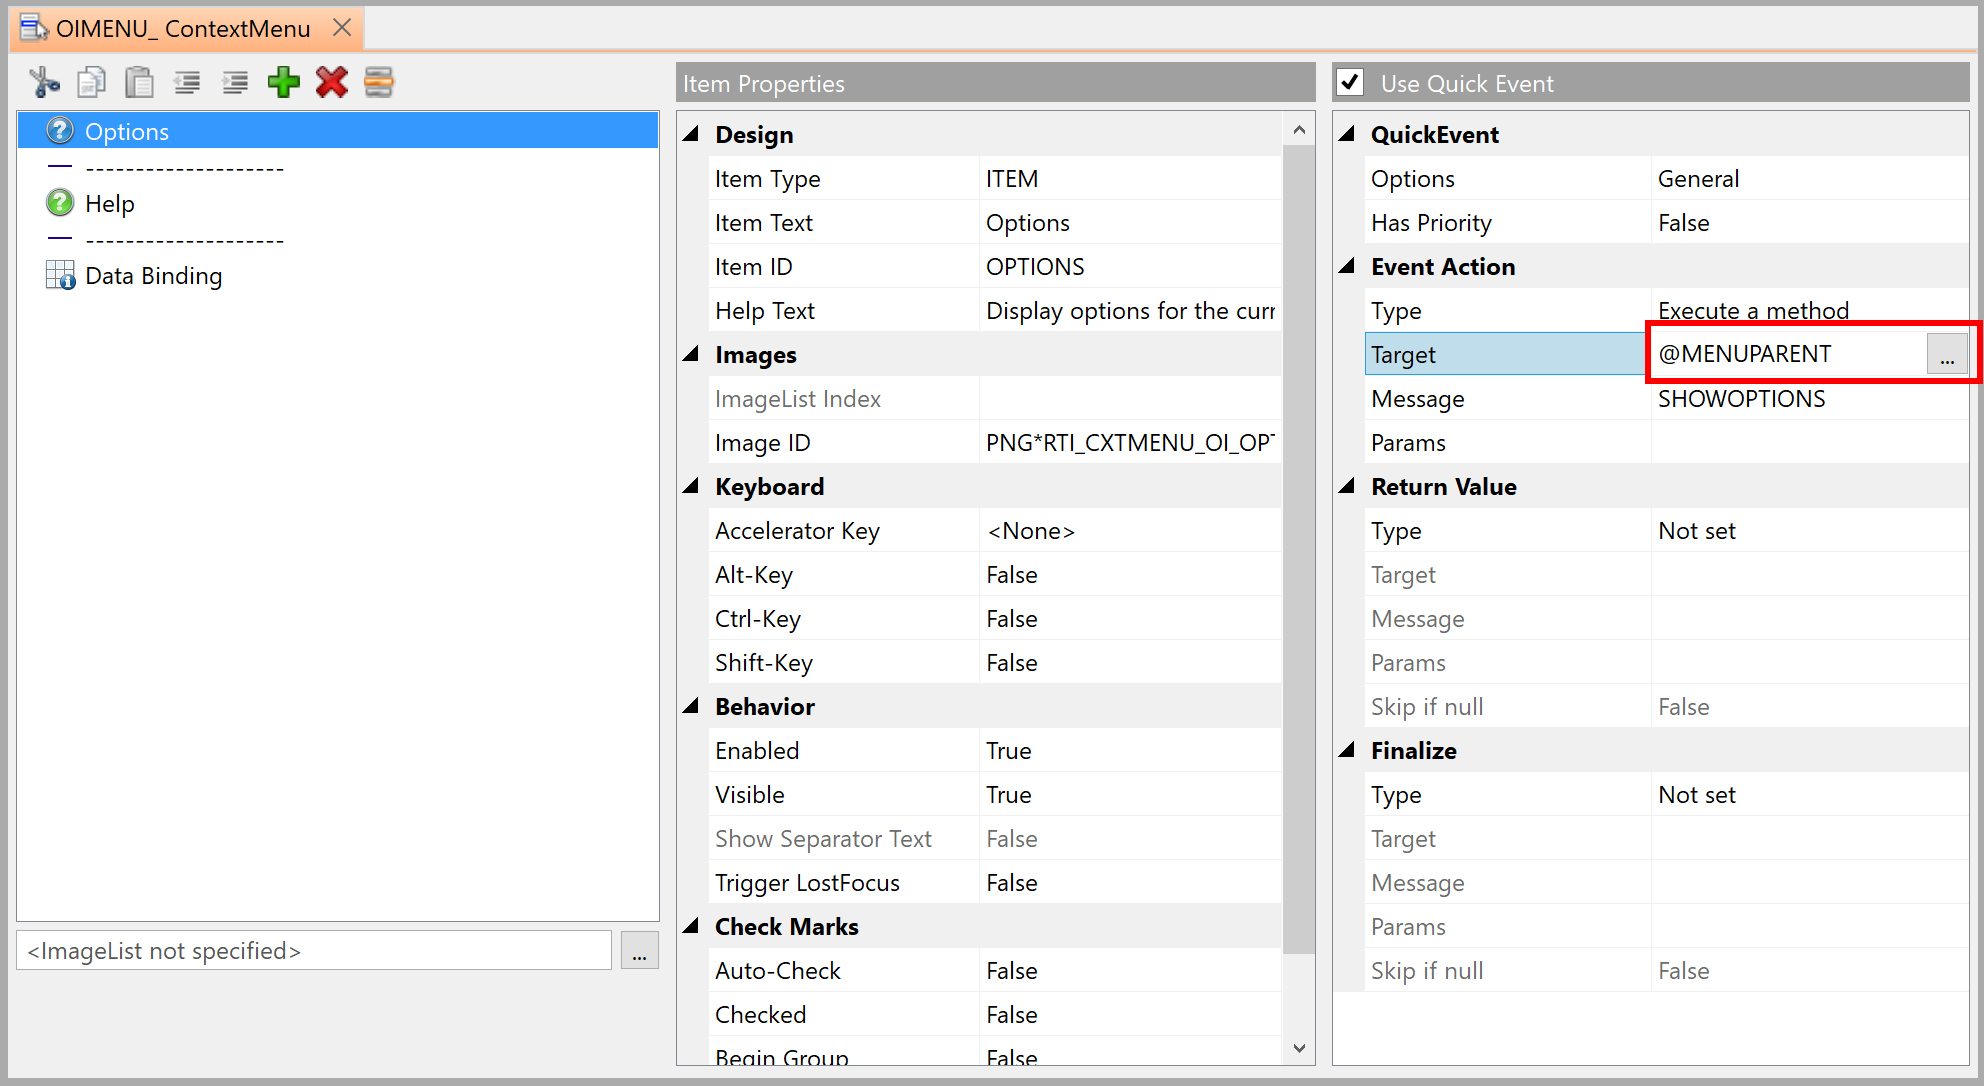
The @MENUPARENT pseudo-control name
When using QuickEvents there are several pseudo-control names you can use, such as “@WINDOW”, “@FOCUS” and “@SELF”, that are resolved to a “real” control name at runtime.
However, in order to be able to reference the context menu’s parent control at runtime we’ve introduced a new pseudo-control name called “@MENUPARENT”. This resolves to the name of the control displaying the menu and should be used in place of “@FOCUS” because it is perfectly possible for controls that don’t accept the focus (like Static Text controls) to have a context menu, and @FOCUS would not resolve to the correct value. Note that @MENUPARENT can only be used with MENU QuickEvents for context menu items – it cannot be used with any other type or event.
Context menus are an essential part of modern user interface design and we encourage you to use them as much as possible in your own applications – hopefully you’ll find that the tools provided in OpenInsight 10 make this easy to achieve!
In the next release of OpenInsight we’ve added a new feature that allows you to quickly display runtime databinding information for the controls in your application – the aptly named SHOWDATABINDING method.
It’s a simple method that is supported by all controls, and can be invoked like so:
Call Exec_Method( CtrlEntID, "SHOWDATABINDING" )
If the control is bound to a database table then it displays a view-only dialog of data binding information for that control. The following example shows the information for a bound column in an EditTable control:
The Description, Validation, Heading and Formula attributes all have their own sub-dialog boxes to display their full details.
If the control is not databound a simple message is displayed to inform the user of the fact.
This method can easily be added to menu or contextmenu QuickEvents in your own applications if you wish to expose this information to your users, or just for your own diagnostic purposes.
As mentioned in a previous post we added a new “dropdown-panel” dialog to the Database Toolpanel to allow the user to edit the viewing options:
Database Toolpanel Options dialog
Whilst this looked like a fairly simple job it did require a little bit of effort to get it right so we thought we’d share the method with you in case you wished to implement something similar in your own applications.
As this was dropdown panel we wanted it to behave as close as possible to the way that a dropdown list from a ComboBox works, i.e:
It appears when a “parent button” is clicked
It should appear underneath the parent button, right-justified
The parent button should have a pressed appearance while the panel is displayed, and return to it’s normal state when the panel is closed
The panel should close when it loses the focus (i.e. it becomes inactive)
The Database Toolpanel is updated as each CheckBox is clicked, so there are no “OK” or “Cancel” buttons for this dialog.
So, this seemed to be a fairly straightforward task:
On the Database Toolpanel:
The parent button’s CheckStyle property was set to True so that it behaves like a CheckBox and stays pressed when clicked, and then unpressed when clicked again.
A “SyncButton” OMNIEVENT handler was created for the Database Toolpanel that simply synchronizes the Check property of the button to True if the panel dialog exists, or False otherwise.
On the panel dialog:
The name of the parent button is passed to the dialog, and in the CREATE event it sets it’s own SYSTEMSIZE property relative to the SYSTEMSIZE of the parent button as required.
The INACTIVATED event closes the dialog.
When the dialog closes it posts the “SyncButton” OMNIEVENT to the Database Toolpanel
The problem
At first glance it appeared to work fine: the dialog appeared, you could update the view options, and when you clicked away from the panel it closed. Bravo.
The one remaining problem however, is that many users will click the parent button to close the dialog as well as open it – it’s just a natural action. In our case this actually had the effect of showing the dialog again, because the event sequence looked something like this (remember, by default all events in OpenInsight are executed asynchronously):
The user clicks the mouse button (down) on the parent button
The dialog deactivates and raises an INACTIVATED event
The INACTIVATED event executes and closes the dialog, which in turn posts a “SyncButton” OMNIEVENT to the Database ToolPanel
The “SyncButton” OMNIEVENT executes and, because the dialog no longer exists, it sets the parent button’s Check property to False
The user releases the mouse button (up) on the parent button raising a CLICK event and setting the Check property to True
The CLICK event executes and reloads the dialog again because the parent button’s Check property is True
The solution
To solve this we needed a way to jump into that sequence so we could set a flag to control how the synchronization logic behaves – we needed to stop it setting the parent button’s Check property to False if the user had clicked on it.
The solution was to use the parent button’s BUTTONDOWN event, because this runs after the INACTIVATED event, but before the OMNIEVENT, and before the mouse-up click changes the Check property. We made the following three changes:
In the BUTTONDOWN handler we set a user-defined property (“@_BUTTONDOWN”) on the parent button to True. This is just to flag the fact that the button was clicked on by the user.
In the “SyncButton” OMNIEVENT we check “@_BUTTONDOWN” – if it’s True then we don’t do anything else, otherwise we set parent button’s Check property to False (This means that if the user clicks away from the dialog it closes as normal).
In the CLICK event we set “@_BUTTONDOWN” back to False, then look at the parent button’s Check property. If it’s False we don’t do anything, but if it’s True then we reload the dialog.
With these changes the dropdown panel dialog now behaves in a familiar fashion, and closes correctly regardless of how it loses the focus.
Once upon a time, in a blog post far far away, we looked at a very early incarnation of the version 10 Image API which described how images were used with OpenInsight forms and controls. Since then the API has changed quite a bit, so this post gives you a PDF link to a preview of the API documentation which covers the capabilities in the next release, some of which hasn’t been described before.
An overview of the Image API
Many GUI types managed by the Presentation Server support images in one form or another; some have background images, some have glyphs, some have image lists and so on. However, many of these images have properties of their own, and in most cases these image properties are common to all.
Because of this most Presentation Server types that support images expose them as intrinsic “sub-objects”, thorough a model we refer to as the “Image Object API”. The image object’s lifetime is managed by the system and it cannot be programmatically destroyed from Basic+, but it can be manipulated by the Get/Set_Property and Exec_Method functions just like any other Presentation Server object.
The entire Image API is described in the linked PDF below but be aware that not all image objects support all of the API. For example, a PUSHBUTTON type does not support an “INDEX” property for its background image, and its SplitGlyph image doesn’t support an ALIGN property: All such exceptions are documented in the relevant sections that describe each object type.
Supported image types
The Presentation Server supports the following image types via the WIC (Windows Imaging Component) sub-sytem:
BMP
ICO
PNG
GIF
JPEG
TIFF
Image Object Properties
Name
Description
ALIGN
Specifies the horizontal and vertical alignment of the image within its parent.
AUTOSCALE
Specifies if the image should be scaled along with its parent object.
COLORKEY
Specifies the color in the image that should be treated as the “transparent color”.
COUNT
Specifies the number of sub-images within an image file.
FILENAME
Returns the name of the image file being displayed.
FILENAMES
Specifies an array of DPI-specific image files to display.
FRAMECOUNT
Returns the number of “frames” within an image.
FRAMEDELAY
Returns the delay time in milliseconds for a multi-frame image.
FRAMEINDEX
Specifies the frame to display within a multi-frame image.
INDEX
Specifies the index of the sub-image to display within a multiimage file.
OFFSET
Specifies the point within the image (not the object) to begin drawing from.
ORIGIN
Specifies the point within the object (not the image) to begin drawing from.
SIZE
Returns the width and height of the image in pixels
STYLE
Specifies how the image is drawn into an object (Tiled, Stretched, Clipped or Scaled).
TRANSLUCENCY
Specifies the degree of transparency applied to an image when it is drawn
Image Object Methods
Name
Description
SAVETOFILE
Saves the current image to a file.
SETHBITMAP
Loads an image from a Windows BITMAP handle (HBITMAP).
SETIMAGE
Loads an image from an array of “raw” image bytes.
SETREPOSIMAGE
Specifies the image file(s) using an OpenInsight repository IMAGE entity.
Here’s the link to the Image Object API PDF – adding animated GIFs to your applications has never been so easy!