Monthly Archives: January 2020

Loading the IDE in v10.0.8

Those of you familiar with OpenInsight 10 may know that the way the IDE currently boots and restores previously loaded entities can sometimes be frustrating, mainly because it can repeatedly steal the focus, but also because you can end up with several informational messages which slow the entire process down.  If this is something that you find irritating then you’ll pleased to know we’ve made a change in v10.0.8 so that the IDE now loads invisibly in the background, while the actual boot-up progress is displayed in a splash-screen like so:

IDE Boot screen

IDE Boot screen

Messages are kept to a minimum, and all non-informational ones (like locking failures) are presented in a popup at the end.

These new changes should help provide a welcome and smoother experience when using the OpenInsight IDE in future.


OLE Control improvements in v10.0.8

We added quite a bit of design-time functionality for OLE controls in v10.0.8 so this post provides a quick overview of what’s new:

The CLSID property

This property has a new “editor” dialog.  While it doesn’t allow you to change the CLSID (that’s by design – if you change the CLSID it’s a totally different control!) it does provide you with a lot of information about the control question such as it’s Registry attributes and it’s properties, methods and events, e.g:

OLE Control CLSID General Tab

OLE Control CLSID Properties Tab

OLE Control CLSID Methods Tab

OLE Control CLSID Events Tab

The QualifiedOleEvents property

This property has a new editor that allows you to specify which OLE events you wish to qualify when the control is created, hopefully removing the need for you to do this in code:

OLE Control QualifiedOleEvents Editor

The OLE Properties section

We’ve also added a new category called “OLE” to the properties displayed in the IDE Property Panel, and this contains all of the design-time OLE properties that can be edited for the control:

OLE Properties in the IDE Property Panel

You may also notice that we’ve added some property type-support for editing OLE properties here as well:

  • Color properties can now use the standard Color property editor
  • Fonts can now be edited with the standard Windows Font dialog
  • Enumerated types are edited with a dropdown list showing the “internal” and “external values, e.g:

OLE Enumerated Properties dropdown

Hopefully this will make working with OLE controls and OpenInsight 10 easier for you in the future.

Using Evaluate Notes in the IDE – making a “To-Do” list

One of the goals of OpenInsight 10 was support better integration between the development tools and the Repository, which is why we provided a separate “Repository” tab for entities when they are opened in the IDE, thereby making their attributes easier to view and edit.

This in turn allowed us to expose a Repository feature called “Evaluate Notes”, which has actually been part of OpenInsight since version 2, but was only really used by some system processes (mainly the old and deprecated “Impact Analysis” feature) and provided no user interface to allow editing.  This has now been rectified and is available from the Repository tab as you can see here:

Evaluation Notes

The Evaluate Notes functionality is composed of two parts – an “Evaluate” flag, and the notes themselves. The latter is simply a text field where you may record your notes and have them attached to the entity in question, e.g:

Evaluation Notes editor

The Evaluate flag, when set to True, adds the entity into one of the Repository indexes so that a list of entities with that flag can be obtained quickly.

It is then a simple matter to query this index and obtain a list of all entities flagged “in need of evaluation”, which you can actually treat as a “to-do” list if you wish.  We already provide this list in the IDE by means of the “Evaluate” tab in the “Quick Launch” tool panel as you can see below:

Quick Launch Evaluate Tab

Quick Launch Evaluate Tab

Hopefully this is a feature you find as useful as we do!

Adding Custom Properties in the Form Designer

User-defined properties (“UDPs”) have always been supported at run-time in OpenInsight by giving the desired property a name prefixed with an “@” symbol and then setting a value for it, e.g:

Call Set_Property( CtrlEntID, "@MYPROP_1", "SomeVal" )
Call Set_Property( CtrlEntID, "@MYPROP_2", "SomethingElse" )

Value = Get_Property( CtrlEntID, "@MYPROP_1" )

// etc...

With the upcoming release of version 10.0.8, design-time support for these has been added in the Form Designer via the new “CustomProperties” property.  This is simply a list of UDP  property names and values that can be specified and stored in the Form definition record, which are then processed during form creation to create UDPs that can be accessed in the normal way by Get_Property and Set_Property.

For example, if you enter a couple of custom properties in the Form Designer called MYPROP_1 and MYPROP_2:

CustomProperties Property

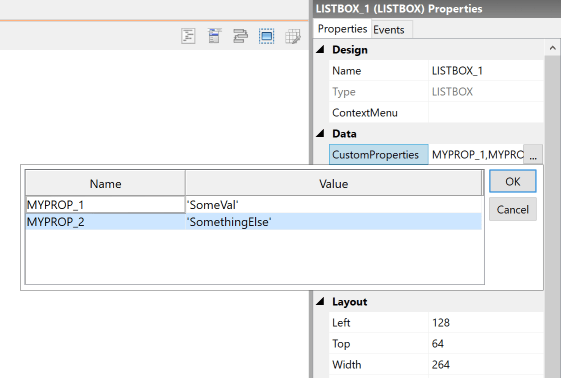
Editing the CustomProperties property

You may then use these with Get_Property and Set_Property at runtime, by referencing them with an “@” prefix (i.e. “@MYPROP_1” and “@MYPROP_2”) like so:

// Value will contain "SomethingElse"
Value = Get_Property( CtrlEntID, "@MYPROP_2" )

Two things to note:

1) You don’t need to specify an “@” prefix for the property name in the CustomProperties editor, and

2) You are not limited to simple strings when entering CustomProperties values – you may also use the standard “[,]” syntax for entering dynamic arrays just like you would for QuickEvent parameters:

E.g. to enter an @fm-delimited array you enclose the list of items in ‘[]’ brackets, and delimit them with a comma like so:

An array like this: 

   <1> ItemOne
   <2> ItemTwo

Can be entered as:

   ['ItemOne','ItemTwo']

Note that each array item must be single-quoted, but you can escape a quote in the data by using two single quotes, e.g.

An array like 

   <1> ItemOne
   <2> ItemTwo's Stuff

Can be entered as:

   ['ItemOne','ItemTwo''s Stuff']

For arrays with lower-level delimiters like @vm and @svm you add a set of nested ”[]’ brackets for each level, e.g:

An array like:
   <1>      ItemOne
   <2,1>    ItemTwo_A
   <2,2>    ItemTwo_B
   <2,3,1>  ItemTwo_C_1
   <2,3,2>  ItemTwo_C_2
   <3>      ItemThree

Can be entered as:
   
   ['ItemOne',['ItemTwoA','ItemTwoB',['ItemTwo_C_1','ItemTwo_C_2']],'ItemThree']

And so on.

Hopefully you find this new feature useful and help to reduce the amount of code you need to write.