As you know, dynamic arrays in OpenInsight are internally represented as delimiter-separated strings commonly containing fields, values and sub-values. Traditionally, locating an element required scanning the string from the start to find the required delimiters at the specified index . This can be a performance issue on large arrays, so one of the new features we’ve added to OpenInsight 11 is index/offset caching.
This is a technique that involves caching the byte offsets of previously located field, value and sub-value indexes when you use the “<>” operators, and the Insert/Extract/Replace/Delete functions. This means that we don’t always have to start scanning from the beginning of the string each time an element is accessed.
For example, suppose field 67 is located at byte offset 234, and field 68 begins at offset 245.
Without caching, locating field 68 requires rescanning the dynamic array from the beginning to find all preceding field marks.
With caching, once field 67 has already been located, the search for field 68 can begin from offset 234 instead of offset 1.
This optimization is especially effective when forward-iterating through large dynamic arrays, where successive accesses are close together. In previous versions, repeatedly accessing successive fields could result in near O(n²) scanning behaviour for large arrays. Offset caching eliminates much of this repeated work.
Consider the following program which processes 10000 SYSOBJ keys:
Running this benchmark on the same machine using v10.2.4 took approximately 360ms, while OpenInsight 11 completed the same test in around 1–2ms.
For small dynamic arrays the difference may not be noticeable, but performance improvements become increasingly significant as array sizes grow.
This means you can continue using the familiar “<>” syntax for sequential dynamic array processing without needing to rewrite code using LOOP/REMOVE or LOOP/[] parsing patterns.
With the recent release of OI 10.2.4 it’s time to look ahead at OpenInsight 11 and some of the new features that will be heading your way with the next major release. We’ve been working on it for some time, with a focus on cloud-based features, and there’s plenty to talk about over the next few months as we get it ready, but in the meantime here’s a few highlights:
Revelation Application Server
This is a new native Windows Service application that can host one or more concurrent OpenInsight application instances in a variety of modes:
Background Task processing
Index Server processing
General-purpose “engine-server” with access via a Basic+/Windows DLL/.Net class library/Linux SO, Python wrapper etc.
Thin-Client mode for RTP57R (see below)
Web-CGI Server (Windows ISAPI, Linux S/CGI, FastCGI, CGI, PHP modules)
Internal Web Server with reverse proxying for use with Linux Ngnix/Apache, HTTPS and static file serving support.
MCP endpoint for AI access.
RTP57R – Cloud-Optimized Data Access
With the new Application Server we’ve introduced a specialized filing system driver engineered with the Thin-Client mode to meet the demands of distributed applications. As you know, when databases migrate to remote cloud servers and corporate WANs, connection stability and latency often become greater bottlenecks than raw bandwidth. RTP57R (the “R” stands for Remote) addresses these challenges by seamlessly offloading processing to the server when needed and minimizing “chatter” across the wire.
AI Integration
OpenInsight 11 will also feature AI integration features, including a “chat” interface to agentic AI that can be either self-hosted or available through subscription. The Application Server provides an MCP (Model Context Protocol) interface to expose tools and resources to an AI client – we provide a standard set of tools for stored procedure and general DB access, and you can define your own as well.
Basic+ DYNLIST data type
We’ve added a new data type called a “DynList” to Basic+. Basically this is similar to a dimensioned array but it can be resized at runtime. If you’re used to working with other languages then you can think of this as similar to a C++ vector or a C# List<> type etc. DynList variables can store other DynList variables so you can implement fully multi-dimensional data structures.
Basic+ JSON data type
We’ve also made JSON a first class citizen and implemented a set of new JSON functions into Basic+. OI10 included a set of JSON functions exported from RevJSON.dll, but there was always the issue of manual handle management, and some memory management issues. Having JSON in Basic+ removes these concerns.
And there’s more…
So that’s just a few new things that we can tell you about now, and of course there will be more work on improving the performance and functionality of other existing areas like the IDE, Form Designer and other tools. We’ll reveal more details in future posts.
Probably one of the most annoying issues that developers encounter is distributing programs to customers that contain unintentional ‘Debug’ statements. These are often left in from testing, and, with the pressure of deadlines to deliver, they are very easy to overlook.
In order to help alleviate this issue OpenInsight 10 implements a “$DEBUG” statement that you can use in place of the normal “Debug” statement: The difference here is that the debugger only triggers if the code is running on the same machine that it was compiled on, so if your program does manage to escape with a compiled $DEBUG statement it shouldn’t execute on other machines.
There are two variations of $DEBUG. The first is a simple “$DEBUG” statement like so:
Write Record To hFile, Key Else
   // Failed etc...
   $DEBUG
End
The second type of $DEBUG statement behaves in the same manner as described above, but also includes the ability to define a simple expression to test, and will only trigger the debugger if the test is met (This is similar to the way that the $ASSERT statement works). For example:
// Only debug if x is equal to 3
$DEBUG( x == 3 )
$DEBUG can be used in any version of OpenInsight 10 with the following caveats:
From version 10.2.3 onwards the raw workstation name (e.g. “REVWS07” ) is used to test if the debugger should execute.
Prior to this (version 10.2.2 and earlier), the entire contents of @station is used to test. The issue here is that @station usually includes the OpenInsight process ID (e.g. “REVWS07_45383” ) so it will only debug within the instance of OpenInsight that it was compiled on. This can be a little too restrictive unless you are willing to recompile your programs after restarting your application, hence the change for version 10.2.3 mentioned above.
Note that you can also disable $DEBUG statements when compiling, in which case the debug tests are never included in the object code. To do this simply use the NODEBUG token with the #define statement like so:
#define NODEBUG
So, hopefully you can use the $DEBUG statement for your test debugging and have a smoother experience with your customers!
Over the years there have been several different and disparate ways of managing directories in OpenInsight, and not all of them fully documented. In this post we’re going to take look at the “official” preferred methods, along with a mention of the deprecated ones too.
As you may be aware, an OpenInsight application runs in one of the following contexts:
Event Context – This applies when your Basic+ programs are called in response to an event from a standard OpenInsight application form or control (i.e. an application managed by the Presentation Server).
Non-Event Context – This applies to applications that run Basic+ programs outside of the Presentation Server using the RevCAPI interface to manage an instance of RevEngine. These are usually “Inet” or O4W web applications, but also include other methods like the RevRun.exe program too.
Therefore, one of the most fundamental considerations when choosing which directory management method to use is the context in which it is called: As a rule, when running in Event Context, you should always prefer to use the FILESYSTEM object for directory management, otherwise you should choose the RTI_OS_Dir stored procedure instead.
Note that if there is a possibility that your Basic+ programs will be executed in different contexts at runtime (i.e. you share them between contexts) then you should invoke the IsEventContext stored procedure to determine which method to use.
For example, here is a simple context-aware code snippet that removes a directory:
   Declare Function IsEventContext, RTI_OS_Dir, Exec_Method
   $Insert PS_FileSystem_Equates
   $Insert RTI_SSP_Equates

   ErrText = ""

   If IsEventContext() Then
      // Use the FILESYSTEM object
      If Exec_Method( "FILESYSTEM", "REMOVEDIR", DirName ) Else
         ErrInfo = Get_Property( "FILESYSTEM", "FILEOPRESULT" )
         ErrCode = ErrInfo<PS_FOR_ERRORCODE$>
         ErrText = ErrInfo<PS_FOR_ERRORTEXT$>
      End
   End Else
      // Use RTI_OS_DIR
      Call Set_Status( SETSTAT_OK$ )
      If RTI_OS_Dir( "REMOVEDIR", DirName ) Else
         Call Get_Status( ErrText )
      End
   End
Using the FILESYSTEM object
The FILESYSTEM object supports the following methods to manage directories. It integrates fully with the Windows Shell and provide the best user experience in Event Context:
This stored procedure was added to OpenInsight 10 to provide a non-Event Context version of the functionality exposed by the FILESYSTEM object. It supports the following methods:
COPYDIR
DIREXISTS
GETTEMPDIR
MAKEDIR
MOVEDIR
REMOVEDIR
RENAMEDIR
The RTI_OS_Dir stored procedure is fully documented here.
(Note that there is no direct equivalent of the FILESYSTEM GETSPECIALDIR method, due to the fact that it is very Windows-specific – the GET_SPECIAL_FOLDER stored procedure should be used instead.)
The Utility stored procedure (Deprecated)
As long-time readers of this blog will know, this stored procedure was deprecated some years ago at the outset of the OpenInsight 10 project, and it is now basically a thin wrapper around several SYSTEM and FILESYSTEM object methods. It supports the following directory management methods:
MAKEDIR
REMOVEDIR
RENAMEDIR
When called in Event Context each of these methods forwards the request to the FILESYSTEM object. When called outside of Event Context these methods call the following stored procedures instead:
UtilityMakeDir
UtilityRemoveDir
UtilityRename
See below for more details on these.
The RTI_OS_Directory stored procedure (Deprecated)
This stored procedure was deprecated in favor of RTI_OS_Dir as it is very platform specific and makes use internally of RTI_OS_Dir, Utility, and an OLE interface to the Windows Shell, making it less performant than calling those procedures directly. Like Utility it is still supported but will not be updated further with any new functionality.
DirExists stored procedure (Deprecated)
This stored procedure is a simple wrapper around the RTI_OS_Dir DIREXISTS method and so has been deprecated, but can still be used by existing code.
MkDir stored procedure (Deprecated)
This venerable stored procedure is a DLL function that calls the Windows API CreateDirectory function. It has been deprecated in favor of the RTI_OS_Dir MAKEDIR method but can still be used by existing code.
UtilityMakeDir, UtilityRemoveDir and UtilityRename stored procedures (Deprecated)
These three functions form part of the original internals of the Utility stored procedure, and use a “raw” C interface that requires explicit null-terminated strings. They are all still available to use, but are deprecated in favor of the RTI_OS_Dir MAKEDIR, REMOVEDIR and RENAMEDIR methods.
Conclusion
As you can see, version 10 has pulled together the many different historical methods of directory management and consolidated them into two entities that can be used dependent on the execution context. These should be the preferred methods of directory management in your OpenInsight applications.
(As of the time of writing the full documentation for RTI_OS_DIR and GET_SPECIAL_FOLDER is in preparation and will be available shortly. All methods described here apply to version 10.2.3 and later.)
QUICKDEX.MFS and RIGHTDEX.MFS are programs that provide a quick method to obtain a list of all keys in a table, and both call the subroutine LRDEX.SUB. This stored procedure maintains a sorted list of keys in a special record named %RECORDS%. You can read this list in one operation. For example:
Keys = Xlate(‘MYTABLE’,’%RECORDS%’, ”, ‘X’)
However, there is a cost to maintaining this record. LRDEX.SUB must lock, read, scan, and if needed update the %RECORDS% row every time a row is written or deleted. This creates a potential bottleneck in a busy table. READNEXT operations must scan the result list to remove ‘%RECORDS%’. The read method must rebuild the %RECORDS% row if it does not exist. The special %RECORDS% row is not compatible with other BFS’s. The LRDEX.SUB program originated with early versions of Advanced Revelation. At that time, storing a list of keys offered a substantial performance benefit. The benefit justified the cost for smallish tables that rarely change. These tables often populate dropdowns for data entry forms, where a quick read of all keys is useful.
When reviewing LRDEX.SUB for OpenInsight 10 we realized it needed revision. The sorting depended on the Arev language sets feature and was incompatible with DICT.MFS, causing crashes. Rebuilding the %RECORDS% rows was not optimized. We wanted to address these and other issues and improve performance.
Changes
We started by optimizing the %RECORDS% rebuild. We needed to perform a rapid table scan and write a sorted list of keys. OI10’s RList already provides optimized table scans, so we reused that with V119 to sort the list. Surprisingly, reading %RECORDS% with and without the new rebuild showed a negligible performance difference! We realized that storing a list of keys no longer offered much benefit. We could remove the overhead of maintaining the list without sacrificing performance. Thus, the revised LRDEX.SUB will perform a table scan when you ask for %RECORDS%. It does not lock or write anything. It still checks for %RECORDS% in a READNEXT. It will delete the record if it finds it. Quickdex.mfs remains best suited to smaller tables. However, it will not fail unexpectedly as a table grows, and it will work with any of the BFS’s.
Sharing data with OpenInsight 9
Note that the OI10 version of LRDEX.SUB is not compatible with the OI 9 version. OI9 requires the %RECORDS% row, OI10 deletes it. For that reason we soft-coded LRDEX.SUB so you can specify which version to use with a configuration setting. If you need share tables between OI9 and OI10 you must configure OI10 to use the same logic as OI9. Create a record in the SYSENV table named “RTI_CFG_LRDEX” with “RTI_LRDEX_SUB_9” in the first row.
Summary
OpenInsight 10 offers a simplified Quickdex/Rightdex capability with similar benefits and without the shortcomings of the OI9 version. The simplified version cannot be used on tables shared with OI9. You can configure OI10 to use the OI9 version if needed.
Basic+ is a dynamically-typed language, and sometimes the system will attempt to change the type of a variable before using it in an operation. For example, if we have variable containing a numeric value as a string, and we attempt to compare it to a variable containing an actual numeric value, then the former will be coerced to a numeric format before the comparison, e.g.:
   StrVar = "3"  ; // String representing an integer
   NumVar = 7    ; // Integer

   Ans = ( StrVar = NumVar ) ; // Ans is FALSE$ and StrVar
                             ; // is converted to an Integer
This works well in the vast majority of cases, but causes issues when attempting to compare strings that that could be numbers but really aren’t for the purposes of the comparison. For example, consider the following:
   Var1 = "12"    ; // String
   Var2 = "012"   ; // String

   Ans = ( VarA = VarB ) ; // Ans = TRUE$ - should be FALSE$!!
The system first attempts to coerce the operands to a numeric format, and of course it can because they both evaluate to the number 12, and are therefore treated as equal. If you wish to compare them both as strings, the usual solution has been to change them so that they cannot be converted to a number, usually by prefixing them with a letter or symbol like so:
   Var1 = "12"    ; // String
   Var2 = "012"   ; // String

   Ans = ( ( "X" : VarA ) = ( "X" : VarB ) ) ; // Ans = FALSE$
Although this works it hurts performance and can be a cumbersome solution.
OpenInsight 10.2 introduces a new set of extended comparison operators to Basic+ that ensure both operands are coerced to a string type (if needed) before being evaluated, and provides the following benefits:
Removes the need for any concatenation thereby avoiding unnecessary copying
Removes the need to check if a variable can be a number before the comparison
Makes it obvious that you are performing a “string-only” comparison so your code looks cleaner.
The new (case-sensitive) operators are:
Operator
Description
_eqs
Equals operator
_nes
Not Equals operator
_lts
Less Than operator
_les
Less Than Or Equals operator
_gts
Greater Than operator
_ges
Greater Than Or Equals operator
There is also matching set of case-insensitive operators too:
Operator
Description
_eqsc
Case-Insensitive Equals operator
_nesc
Case-Insensitive Not Equals operator
_ltsc
Case-Insensitive Less Than operator
_lesc
Case-Insensitive Less Than Or Equals operator
_gtsc
Case-Insensitive Greater Than operator
_gesc
Case-Insensitive Greater Than Or Equals operator
So we could write the previous example like so:
   Var1 = "12"    ; // String
   Var2 = "012"   ; // String

   Ans = ( VarA _eqs VarB ) ; // Ans = FALSE$
Hopefully you’ll find this a useful addition when performing string-only comparisons in your own applications.
With the release of version 10.1 a new control type called DIRWATCHER (“Directory Watcher”) has been added to OpenInsight. This is a fairly simple control which allows you to monitor one or more directories on your system and then receive notifications when the contents are changed.
Using the control is very straightforward:
Use the WATCHDIR method to add a directory to monitor for changes.
Handle the CHANGED event to receive notifications of directory changes.
Use the STOP method to stop monitoring directories.
We’ll take a quick look at each of these methods and events below along with a couple of important properties:
The WATCHDIR method
This method allows you to specify a directory to monitor along with some optional flags. It may be called multiple times to watch more than one directory.
The flag values are specified in the MSWIN_FILENOTIFY_EQUATES insert record,
This method returns TRUE$ if successful, or FALSE$ otherwise.
The STOP method
This method stops the control monitoring its specified directories.
bSuccess = Exec_Method( CtrlEntID, "STOP" )
This method returns TRUE$ if successful, or FALSE$ otherwise.
(Note – to resume directory monitoring after the STOP method has been called the WATCHDIR method(s) must be executed again).
The CHANGED event
This event is raised when changes have been detected in the monitored directories.
bForward = CHANGED( NewData )
This event passes a single parameter called NewData which contains an @vm-delimited list of changed items (i.e. notifications). Each item in the list comprises an “action code” and the name and path of the affected file, delimited by an @svm.
Action codes are defined in the MSWIN_FILENOTIFY_EQUATES insert record like so:
   equ FILE_ACTION_ADDED$               to 0x00000001
   equ FILE_ACTION_REMOVED$             to 0x00000002
   equ FILE_ACTION_MODIFIED$            to 0x00000003
   equ FILE_ACTION_RENAMED_OLD_NAME$    to 0x00000004
   equ FILE_ACTION_RENAMED_NEW_NAME$    to 0x00000005
Remarks
If a monitored directory experiences a high volume of changes (such as copying or removing thousands of files) it could generate a correspondingly high number of CHANGED events, which in turn could produce an adverse affect on your application and slow it down. In order to deal with this potential issue it is possible to “bundle up” multiple notifications with the NOTIFYTHRESHOLD property into a single CHANGED event so they may be processed more efficiently.
The NOTIFYTHRESHOLD property
The NOTIFYTHRESHOLD property is an integer that specifies the maximum number of notifications that should be bundled before a CHANGED event is raised.
The NOTIFYTIMER property is an integer that specifies the number of milliseconds before a CHANGED event is raised if the NOTIFYTHRESHOLD property value is not met.
If the NOTIFYTHRESHOLD property is set to a value greater than 1 then the control will try to bundle that number of notifications together before raising a CHANGED event. However, when this is set to a high value it is possible that the threshold may not be reached in a timely fashion and the CHANGED event not actually raised.
E.g. If the NOTIFYTHRESHOLD is set to 1000, and only 200 notifications are received then the CHANGED event would not be raised.
To prevent this problem the NOTIFYTIMER property may be used to specify the amount of time after receiving the last notification before a CHANGED event is raised even if the NOTIFYTHRESHOLD is not met.
E.g. in the example above, if the control had a NOTIFYTIMER of 50, then a CHANGED event would be raised 50ms after the last notification (200) was received, even though the NOTIFYTHRESHOLD of 1000 has not actually been met.
Developer Notes
The DIRWATCHER control is intended as a “non-visual” control and should probably be hidden at runtime in your own applications. However, it is actually derived from a normal STATIC control so all of the properties and methods that apply to a STATIC apply to the DIRWATCHER as well, and you may use them as normal if you wish.
When executing a long running process in a desktop environment, such as selecting records from a large table, it is important for the user to be able to interact with the application even though it is busy. A common example of this is displaying a dialog box that shows the progress of an operation and allowing the user to cancel it if they wish. Failure to provide this ability generally results in user frustration, or causes the dreaded “Window Ghosting” effect where Windows changes a form’s caption to “Not Responding” (this is never a good look, and usually ends in a quick visit to the Task Manager to kill the application).
In order to avoid this problem we have to allow the application to check for user interaction, a process usually referred to as “yielding” (hence the awful title of this post), and this time we’ll take a look at the various options available to accomplish this and the differences between them. Before we go any further however, here’s a little background information on how OpenInsight runs beneath the hood so that you can appreciate how messages and events are handled.
Under the hood
OpenInsight.exe (aka. the “Presentation Server”, or “PS”) has a main thread (the “UI thread”) with a Windows message loop that manages all of the forms and controls, and it also has an internal “event queue” for storing Basic+ events that need to be executed. The PS also creates an instance of the RevEngine virtual machine (“the engine”), which has its own thread (the “engine thread”) with a Windows message loop, and is responsible for executing Basic+ code.
When the PS needs to execute an event it passes it to the engine directly if possible, otherwise it adds the details to the event queue and then posts a message to itself so the queue can be checked and processed when the engine is not busy. When the engine receives the event data it is executed on the engine thread. Stored procedures such as Get_Property, Set_Property, and Exec_Method provide a way for the Basic+ event to communicate back to the PS to interact with the user interface controls and forms during its execution.
The key point to note here is that Basic+ event code runs in a different thread to the UI, so while the engine thread is processing the event, the UI thread is basically waiting for it to finish, and this means that it may or may not get chance to process it’s own message loop. This is where the problems can begin, and why the need for a yielding ability, because:
The engine thread needs to be paused or interrupted in some fashion so that the UI thread can check and process its own Windows message queue for things like mouse, keyboard and paint messages. If this queue is not checked at least every 10 seconds then Windows assumes that the PS is hung and the “Not Responding” captions are shown on the application forms.
While the engine is processing an event, the PS cannot pass it a new one, so it is added to the event queue. If we are waiting to process some Basic+ event code like a button CLICK to cancel the current operation, then we need some way for this to be retrieved and executed before the current event is finished.
So, now we know why “window ghosting” happens we can take a look at the various options to deal with it.
Options for yielding
MSWin_Sleep stored procedure
This is a direct call to the Windows API Sleep function, and it puts the engine thread to sleep for at least the specified number of milliseconds. However, while calling this will allow Windows to schedule another thread to run, there’s no guarantee that this would be the UI thread, so it’s not really a good solution.
WinYield stored procedure
This is a simple wrapper around the Windows API Sleep function, with a sleep-time of 10ms. This suffers from the same disadvantages discussed for MSWin_Sleep above (This function remains for backwards compatibility with early versions of of OI and Windows).
MSWin_SwitchToThread stored procedure
This is a direct call to the Windows API SwitchToThread function which forces Windows to schedule another thread for execution. Like MSWin_Sleep and WinYield there’s no guarantee that this would cause the UI thread to run, so again it’s not a great solution.
SYSTEM PROCESSEVENTS method (a.k.a Yield stored procedure)
This is a new method in version 10.1 that performs two tasks that solve the problem:
It explicitly tells the UI thread to process its message queue (which will avoid the “ghosting” issue), and
It allows the UI thread to process the event queue so waiting events can be executed as well.
One possible drawback here is that waiting events are also processed, and this might not be a desirable outcome depending on what you are doing. In this case there is another method called PROCESSWINMGS that should be used instead.
(FYI – The PROCESSEVENTS method is essentially a wrapper around the venerable Yield() stored procedure, but allows the same functionality to be called via the standard object-based method API rather than as a “flat” function. Yield() itself is still and will be fully supported in the product).
SYSTEM PROCESSWINMSGS method
This is a new method in version 10.1 that tells the PS to process it’s Windows message queue but it does not process any Basic+ events, i.e. it prevents the “ghosting” effect but does not cause events to fire before your application is ready for them.
Conclusion
Version 10.1 has added more functionality to help you avoid the dreaded “Not Responding” message via the PROCESSWINMGS and PROCESSEVENTS methods, and hopefully, armed with the information above, this will help you to write better integrated desktop-applications.
RList is the OpenInsight tool for queries and ad hoc reports. OpenInsight 10 implements an extended version of RList via the new RTI_RLISTX stored procedure which offers additional features for selecting and reporting data. However, you do not need to change existing programs to take advantage of this.
This post takes a look at some of the new RList capabilities, along with a full description of the API and some code examples.
OLIST/RUN_REPORT syntax support
LIST statements can use the same syntax as RUN_REPORT or OLIST if the output is going to the screen or printer.
With OLIST LIST statements you can use keywords like GRID and PDFFILE. When the target is TARGET_PRINTER$, RList calls OLIST_PRODUCE to render the output.
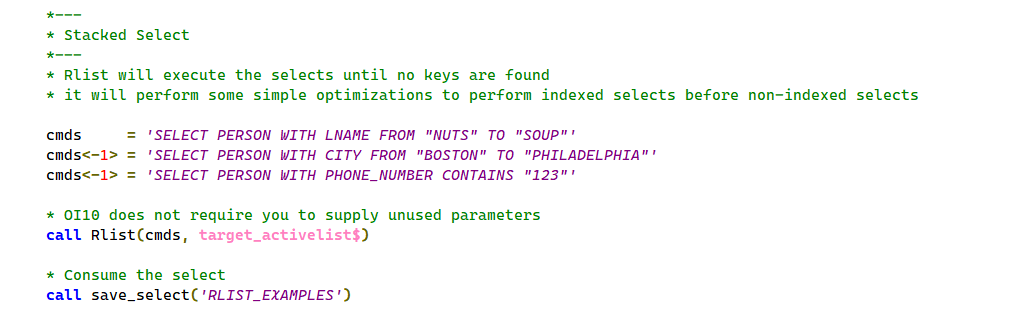
Stacked selects
RList accepts a stack of SELECT statements and optionally one output (LIST) statement. RList will execute SELECT statements until zero records are selected or a LIST statement is executed. This allows developers to break a complex query into a series of simpler SELECT statements. Each subsequent SELECT statement refines the active select list.
RList to BRW
The TARGET_BRWDESIGN$ option will create a BRW (Banded Report Writer) report from an RList statement and open it in the BRW Designer for the developer to refine it. RList will prompt for the report group name. The intent is to let you quickly rough out a report or even a set of master/detail reports using RList, then use the BRW Designer to refine the result.
RList to a variable
The TARGET_VARIABLE$ option will return the result of an RList statement into a variable. For example, you can get a list of keys without using loop/readnext, you can populate an edit table with a SELECT statement, and you can obtain CSV, XML or JSON data by calling RList. This is similar to the OpenInsight 9 SELECT_INTO stored procedure. The SELECT_INTO syntax is still supported and now calls RTI_RLISTX internally to implement the commands instead.
Cursor support
RList support allows you to specify a cursor number between 0 and 8, or -1 to use the next non-zero cursor. OpenInsight 9 offered cursor support but the RList interface did not. Cursors permit sub-queries that don’t corrupt the main select loop. Sub-queries can operate on other BFS’s too. For example OpenInsight calculated columns can query SQL tables.
Reduce, Select by, ReadNext, Swap.Cursor, Make.list, Save_Select, Activate_Save_Select all support cursors in OpenInsight 10.
Performance enhancements
RList implements many optimizations in selecting and reporting:
It will use indexes to refine an existing select, whereas previous versions only use indexes on a select without an active select list.
Caching can reduce server IO so RList can now cache rows as they are read if it knows that the same rows will be sorted or reported – previous versions always read the records to select, sort and report.
RESOLVE_SELECT, the program which finalizes a select, is improved. If you specify the number of rows, RESOLVE_SELECT exits when it reaches that number of rows rather than resolving all of the rows before applying the limit.
RList calls a new routine, RTI_CHAIN_SELECT, to pre-process selects which has some query optimization built in. For example, it will select on indexed fields before non-indexed, and hard fields before calculated. It performs sorts after the all selects are completed.
This parameter should contain one or more OpenList (SELECT/LIST) statements, separated by field marks. RList will process each statement sequentially until it exhausts the list of keys, selects zero rows, or executes a LIST statement. Note that in OpenInsight 10 RList accepts the same syntax as the classic OLIST or RUN_REPORT procedures as well as that used in TCL and any legacy OpenInsight 9 syntax.
Target parameter
Target is a code indicating the desired output format. OpenInsight supplies an insert which enumerates the options for target. See the RLIST_EQUATES insert record for more details.
Target
Value
Description
TARGET_PRINTER$
0
Sends the output of a LIST statement to the printer.
TARGET_CLIENT$
1
Sends the output of a LIST statement to the screen.
TARGET_VARIABLE$
2
Returns the output of a LIST statement to a variable.
TARGET_CALLBACK$
3
Triggers an RLIST_CALLBACK routine.
TARGET_SAVELIST$
4
Performs a SAVE_SELECT operation on the result of select statements.
TARGET_ACTIVELIST$
5
Activates a cursor with the result of select statements.
TARGET_LATENTLIST$
6
Creates a latent cursor for subsequent ReadNext processing.
TARGET_CHECKSYNTAX$
7
Checks the statements for valid syntax but does not execute them.
TARGET_CALLBACK_NOFMT$
8
Triggers an RLIST_CALLBACK routine but with no formatting or truncation applied to the returned values.
TARGET_BRWDESIGN$
9
Generate a Banded report, and open it in the designer.
TARGET_BRWRUN$
10
Generate a Banded report, and execute immediately.
TargetName parameter
This parameter is polymorphic. You supply different values for different combinations of target and SELECT or LIST statements:
Target
Select Statement
LIST statement
TARGET_PRINTER$
N/a
N/a
TARGET_CLIENT$
N/a
N/a
TARGET_VARIABLE$
RList will return the keys if the output format is “KEYS”. See the UserArg parameter.
RList will return the output into the variable. The format of the output depends on the UserArg parameter.
TARGET_CALLBACK$
N/a
The name of an “RList callback” procedure.
TARGET_SAVELIST$
The name of the list to save. The string you pass is the list name in the SYSLISTS table. If you pass a space delimited string, RLIST will write the list to a table other than SYSLISTS using the first word as the name of the table and the second as the id of the list.
N/a
TARGET_ACTIVELIST$
N/a
N/a
TARGET_LATENTLIST$
N/a
N/a
TARGET_CHECKSYSTAX$
N/a
N/a
TARGET_CALLBACK_NOFMT$
N/a
The name of an “RList callback” procedure. RList will not enforce column widths on the output. Used by SELECT_INTO in OpenInsight 9.
TARGET_BRWDESIGN$
N/a
The name of the report group and report to generate.
TARGET_BRWRUN$
N/a
N/a
UserArg parameter
Another polymorphic parameter whose format depends on the chosen Target parameter:
Target
Select Statement
LIST statement
TARGET_PRINTER$
N/a
UserArg<2> = cursor number
TARGET_CLIENT$
N/a
UserArg<2> = cursor number
TARGET_VARIABLE$
UserArg<1> = output format. “KEYS” is the only relevant format. UserArg<2> = cursor number
UserArg<1> = ResultFormat ( see below ) UserArg<2> = cursor number
TARGET_CALLBACK$
N/a
UserArg<2> = cursor number
TARGET_SAVELIST$
UserArg<2> = cursor number
N/a
TARGET_ACTIVELIST$
UserArg<2> = cursor number
N/a
TARGET_LATENTLIST$
N/a
TARGET_CHECKSYSTAX$
N/a
N/a
TARGET_CALLBACK_NOFMT$
N/a
UserArg<2> = cursor number
TARGET_BRWDESIGN$
N/a
The name of the report group and report to generate.
TARGET_BRWRUN$
N/a
N/a
ResultFormat
ResultFormat values are applicable when returning the result to a variable using the TARGET_VARIABLE$ Target.
ResultFormat
Description
ADO
Result is an OLE record-set containing VARCHAR values.
CSV
Result is a set of comma separated values, all values quoted, commas between columns, carriage-return/linefeed characters between rows.
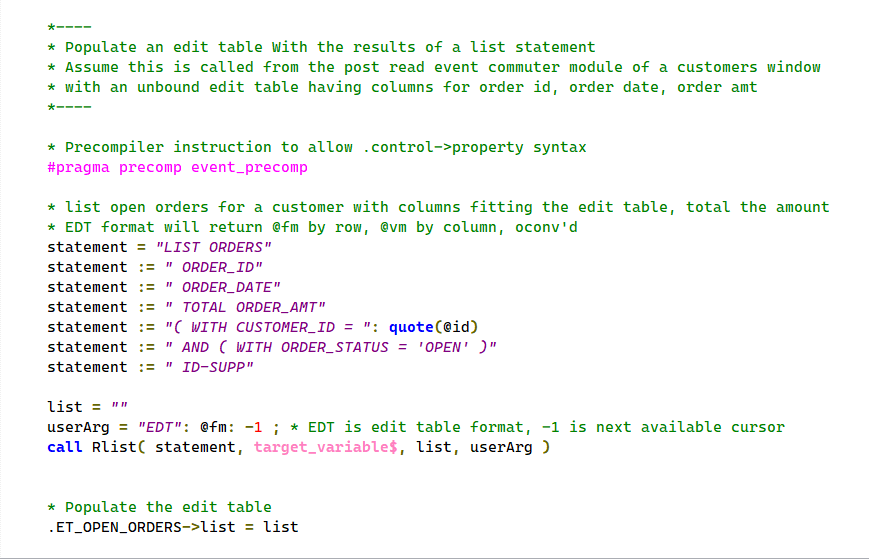
EDT
Edit Table format. Row 1 is column headings, @vm between columns, @fm between rows. Useful for populating edit tables using RList statements
HTML
Result is an HTML table.
JSON
Result is a JSON array of row objects, each column is an object in the row, multi-values are arrays.
KEYS
Result is an @fm-delimited list of keys.
MV
Default format. Result is an array – @fm between columns, @rm between rows. Row 1 is the column headers.
TAB
Result is a set of tab-delimited column values, carriage-return/linefeed characters between rows.
TXT
Same as TAB (see above).
XML
Result is an XML collection of rows, each row is an XML collection of columns.
Cursor Number
Cursor numbers specified in the UserArg parameter should be one of the following values:
An integer between 0 and 8
Null to use for cursor 0 (the default)
-1 for next available, which chooses an inactive cursor from 1 to 8
DebugFlag parameter
N/a.
Code Examples
RList to PDF
RList To PDF
Stacked Queries
Sometimes it’s easier to execute a series of select statements rather than a single complex query. RList accepts a list of selects with an optional closing list statement. RList will execute until completed or no records are selected. If one of the conditions selects nothing then the list statement will not run.
Stacked queries
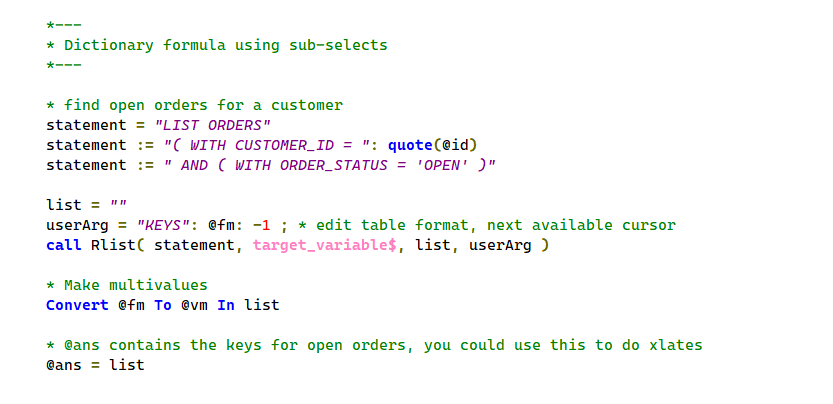
Query using a cursor
RList now supports cursors like REDUCE and SELECT BY. Indicate the cursor in field two of the UserArg parameter (in other words, UserArg<2>). Use this to execute sub queries. The sub query can return keys from a select or the output from a LIST statement.
Query using alternate cursor
Sub-query without corrupting the main select
Sub-query example
Sub query in calculated column
You can use sub-queries in calculated columns too. A cursor variable of -1 uses the next available cursor. This allows you to nest calculated columns which perform sub-selects. If you always use subqueries rather than direct calls to btree.extract then your logic will function with or without indexes. You can make indexing choices in the performance tuning stage of development rather than when designing the dictionaries.
Calculated column using sub-query
Return results to a variable
A new target type, TARGET_VARIABLE$ ( 2 ), will return the output to a variable. Pass a variable as the third parameter and an output format as the fourth. For SELECT statements, you must specify ‘KEYS’ as the output format. For LISTS statements you supply one of the formats listed above.
Select keys into a variable
Populating an edit table control
The “EDT” output format is convenient for loading data into edit table controls:
Populate an edit table control
Conclusion
RList for OpenInsight 10 offers new features as well as improved performance. Some of the features are available in previous versions but not via the RList interface. We tried to unify the disparate query capabilities (rlist, reduce, btree.extract, select_Into, olist ) under a single interface so you can focus on functionality and we can focus on performance.
One of the most popular “raw” Windows API functions that OpenInsight developers have used over the years is the ShellExecute function, which allows you to launch an application via its filename association, e.g. you can launch Word by using a document file name, or Excel using a spreadsheet filename and so on.
However, because it was never really made an “official” part of the product (it was normally passed on in forums), developers were left to create their own DLL Prototype definitions in order to use it – this gave rise to many variations over the years, many of which were not compatible with others. For example, some use LPCHAR as an argument type, some use LPSTR or LPASTR, whilst others use LPVOID with GetPointer(); some definitions use the “Wide” version of the function, some the “Ansi” version, and there are many different aliases, with or without the “A/W” suffix too. The list goes on.
For OpenInsight 10 we decided that we couldn’t move forward with this as we would run the risk of conflicting with established applications, so we moved all of the DLL Prototypes we used into a new namespace called “MSWIN_” and claimed it as our own. This left developers to bring forward their own DLL prototypes into version 10 as and when needed, and therefore we didn’t supply a “ShellExecute” function as such, though we did supply “MsWin_ShellExecute” instead (see below).
Another decision we took was to try and move away from the need for developers to use raw Windows API function calls as much as possible, as some of them can be complex and require knowledge of C/C++ programming, which is not necessarily a skill set that everyone has the time or desire to learn. Ergo, we moved a lot of functionality into the Presentation Server (PS) and created some Basic+ wrapper functions around others to shield developers from the sometimes gory internals.
(We also chose to use the “W” versions of functions rather than the “A” versions where possible, because these would translate better when in UTF8 mode and remove the need for an extra “A”->”W” conversion in Windows itself.)
So, coming back to ShellExecute, and in light of the above, we have three “official” and supported ways of calling it in OpenInsight 10 as detailed below:
The SYSTEM object SHELLEXEC method
The RTI_ShellExecuteEx stored procedure
The MSWin_ShellExecute DLL Prototype stored procedure
The SYSTEM object SHELLEXEC method
If your program is running in “Event Context”, (i.e. it is executing in response to an event originating from the PS) then you may use the SYSTEM SHELLEXEC method which invokes ShellExecuteW internally.
Name of a form to use as a parent for displaying UI messages.
Operation
No
Operation to be performed; “open”, “edit”, “print” etc.
File
Yes
File to perform the operation on.
Parameters
No
If File is an executable file this argument should specify the command line parameters to pass to it.
WorkingDir
No
The default working directory for the operation. If null the current working directory is used.
ShowCmd
No
Determines how an application is displayed when it is opened (as per the normal VISIBLE property).
The return value is the value returned by ShellExecuteW.
The RTI_ShellExecuteEx method
This stored procedure is a wrapper around the Windows API ShellExecuteExW function (which is used internally by ShellExecuteW itself), and may be used outside of event context – it can also return the handle to any new process it starts as a result of executing the document. As you can see it’s quite similar to the SHELLEXEC method:
Whilst you are free to use one of the methods outlined above, this may not be optimal if you are still sharing code between your existing version 9 application and your new version 10 one. In this case there are a couple of options you could use:
Define your preferred DLL prototype in v10.
Use a wrapper procedure and conditional compilation.
Defining your own prototype
This is probably the easiest option – you simply use the same prototype in v10 that you did in version 9, with the same alias (if any), and this way the code that uses it doesn’t need to be changed. The only downside to this if you’ve used any 32-bit specific data types instead of 32/64-bit safe types like HANDLE (this could happen if you have a really old prototype) – you must ensure that you use types that are 64-bit compliant.
Using conditional compilation
This is a technique we used when writing the initial parts of v10 in a v9 system so our stored procedures would run the correct code depending on the platform they were executing on (it was actually first used to share code between ARev and OI many years ago!).
The v10 Basic+ compiler defines a token called “REVENG64” which is not present in the v9 compiler – this means that you can check for this in your source code with “#ifdef/#ifndef” directives and write code for the different compiler versions.
For example, you could write your own wrapper procedure for ShellExecute that looks something like this:
Compile Function My_ShellExecute( hwnd, verb, file, params, dir, nShow )

#ifdef REVENG64
   // V10 Compiler - use RTI function
   Declare Function RTI_ShellExecuteEx
   RetVal = RTI_ShellExecuteEx( hwnd, verb, file, params, dir, nShow, "" )
#endif

#ifndef REVENG64
   // V9 Compiler - use existing "raw" prototype
   Declare Function ShellExecute
   RetVal = ShellExecute( hwnd, verb, file, params, dir, nShow )
#endif

Return RetVal
And then call My_ShellExecute from your own code.
So, there ends the Saga of ShellExecute … at least for now.