Tag Archives: Form Designer

The Case of the Extra Pixel

In the current OpenInsight 10.1 Beta program, Martyn at RevSoft UK had reported a bug about the Height property creeping up by a pixel each time he opened a form. This was traced to the point when the menu structure was parsed and created: it was actually inserting an extra pixel, so this was fixed and the form Height now stayed the same between each opening.

However, a little more testing against a form without a menu revealed another issue – in some cases a pixel was added to the Height but it didn’t creep up on each subsequent opening:

E.g. when set to a Height of 400 and saved, the form would re-open with a Height of 401, but it would stay at the same value afterwards; not the same bug as before but it did need investigating

The Height and the ClientHeight properties

As some of you will know, Windows forms are split into two areas (1):

  1. The “Nonclient area” which contains items such as the borders, menus and title bars, and
  2. The “Client area”, which is the part that contains the controls.

When an OpenInsight form definition is saved the actual Width and Height properties are not used. Instead, the ClientWidth and ClientHeight properties (i.e. the dimensions of the Client area) are saved because Windows can change the size of the Nonclient parts when a form is run on different systems with different visual styles, and this can make the form’s Client area the wrong size when created from a saved Width and Height (as we all found out many years ago when Windows XP was released). In our particular case above, when the form was saved and reopened, the ClientWidth and ClientHeight properties were correct, but the Height had gained a pixel.

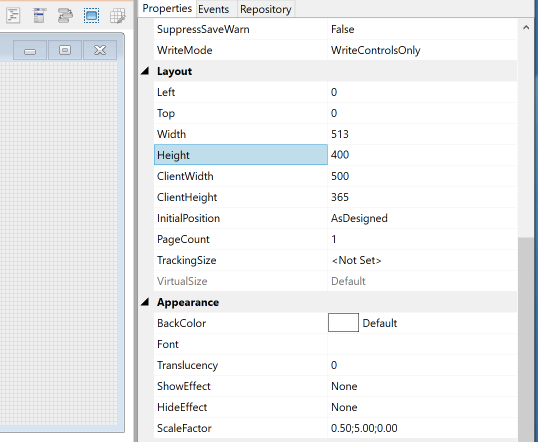
E.g. When set to a Height of 400, the saved form ClientHeight was 365. When the same form was reopened the ClientHeight was still 365, but the Height was now reported as 401.

Height, ClientHeight and High DPI

I run my primary and secondary monitors at different DPI settings to ensure that scaling works correctly, and in this case, at 192 DPI (i.e. scaled to 200%), it transpired that the integer rounding used during scaling was the issue because:

  • Setting the Height to 400 resulted in a ClientHeight of 365.
  • Setting the Height to 401 also resulted in a ClientHeight of 365.
  • Setting the ClientHeight to 365 resulted in a Height of 401.

I.e. setting the ClientHeight to a specific value, and then retrieving the form’s actual height in real pixels, and then scaling it back to 96 DPI (all values in the Form designer are shown and stored at 96 DPI), gave the extra pixel. Because we don’t record the Height in the form definition we have no way of knowing that the ClientHeight was set from a value of 400 rather than 401 when the form was reopened in the designer, so we have to go with the 401. Mystery solved!

Of course, this looks odd, but it’s just an artifact of the scaling calculations. The crucial value is the ClientHeight because this is the value that is recorded and used, and this is what needs to be preserved when forms are saved and reopened. To help put your mind at ease about this, the ClientWidth and ClientHeight properties have now been exposed (for forms only) in the Form Designer, so you can be confident that the correct size is always being maintained (ClientWidth and ClientHeight are normally runtime only properties).

E.g. In the following two images (saved and reopened) you can see that the pixel height has increased, but in both cases the ClientHeight (365) is preserved and is correct:

Image of form with a saved Height property of 400
Form saved with a Height of 400
Image of reopened form with a Height property of 401
Form reopened, now with a Height of 401

Conclusion

  • Windows XP taught us many years ago that the Width and Height properties are not reliable when creating a forms as they can produce inconsistent results on different systems, so we always rely on the ClientWidth and ClientHeight properties instead.
  • Don’t be concerned if you see a slightly different Height value when you reopen a form if you’re running at a high DPI setting – the crucial property is the ClientHeight value – as long as this is consistent there is no actual problem.
  • To make sure you can monitor this yourself the ClientWidth and ClientHeight properties have been exposed in the Form Designer, and you can edit these directly if you wish.

(Note: the ClientHeight and ClientWidth properties are only exposed after builds later than the current Beta 3 release)

(1) If you are not familiar with Client and Nonclient areas in Windows GUI programming you can find out more information here).

Databinding in the Form Designer

Still on the topic of UI updates in the next release we also took a look at the Databinding dialog in the Form Designer, which had been in need of a make-over for some time. Based on user feedback we wanted to provide much more information when selecting columns and so applied this to the redesign, which now looks like this:

Updated Form Designer Databinding dialog
Redesigned databinding dialog

As you can see, there’s quite a few changes so here’s a brief description of the new features:

  • Typing in the Table box uses AutoComplete to provide a matching list of tables
  • Typing in the Column box auto-selects the first match in the list below
  • The list of columns includes the field position as well as the name
  • The list of columns can be sorted from options on the context menu:
Databinding context menu
  • Columns can be filtered by type (F or S)
  • Columns can be filtered so that only multi-valued columns are shown (this is the default for columns bound to an EditTable control)
  • Use the “No Column Selected” option to clear Databinding information from a control
  • The dialog is resizable and remembers the size between calls.
  • Summary information for each column can be seen in the grid control on the right (This is view-only and cannot be used to edit the details – this may change in a future update, but not this one).
    • Description, Formula, Validation and Heading can be expanded to see their full details
Databinding dialog and formula details
Databinding and expanded formula details

Hopefully this will provide a welcome improvement to working with data-bound forms in the next release.

Menu Designer update in v10.0.8

Version 10.0.8 has seen each of the Menu Designer tools (Form and Context) get a substantial overhaul, both to fix some bugs and also to improve their usability.  This post will provide a quick overview of what has changed.

The Context Menu Designer

ContextMenu Designer

Context Menu Designer

  • The “Item Properties” have been moved from the IDE Property Panel onto the designer itself, adjacent to the menu structure outline.  The previous layout needed far too much mouse movement between the items and their properties.
  • The ability to specify an image list for the menu has been added (this has always been supported at runtime but was not exposed via the Menu Design tools).
  • Re-added the “OI Menu” and “Windows Menu” options.
    • These are no longer global like they were in version 9.x, rather they are specific to the menu in question.
  • Added back the leading “-” symbol for items that don’t have an image as per version 9.
  • Added back the missing “F11” and “F12” Accelerator Key options
  • Improvements to the validation of item properties, e.g:
    • Better generation of default Item IDs.
    • Better checks for duplicate IDs.
    • Prevent events for POPUP item types.
    • A warning message when indenting/un-indenting items will change the parent item type (for example, indenting an item could cause the preceding ITEM to become a POPUP which would remove any existing event code from it).
  • Added “Shift-key” functionality to the buttons to control “insert before/after” operations (normal operation is “insert before”, pressing Shift changes them “insert after”), i.e:
    • Shift + Insert button for “insert after current item”.
    • Shift + Insert Separator button for “insert separator after current item”.
    • Shift + Paste button for “paste after current item”.
  • Added a full keyboard interface for the menu item structure list-box:
    • F2 (or Double-Click) to edit Item text in place.
    • Enter to insert a new item after the current item and move automatically into  “edit mode” (as per “F2” above).
      • Down arrow on the last item will insert a new item as per above.
      • Esc on a new “untouched” item will delete it.
    • Left key to shift an item and any sub-items to the left (un-indent).
    • Right key to shift an item and any sub-items to the right (indent).
    • Del key to delete items and their child items.
    • Ctrl-C to copy an item and it’s sub-items to the Windows Clipboard.
    • Ctrl-X to cut an item and it’s sub-items to the Windows Clipboard.
    • Ctrl-P to Paste items from the Windows Clipboard into the menu structure.
  • Added a context menu to the menu item structure listbox that duplicates the buttons, and adds the following operations:
    • Reset All Item IDs – processes the entire menu and changes all item IDs to their defaults based on their text and the name of their parent item.
    • Copy All – Copies all items to the Windows Clipboard – useful for duplicating menus from one form to another.
    • Delete All – Removes all items from the menu.
  • You are not asked to save the details for each item as you select items in the designer, but you will be prevented from moving to a different item if there is a validation failure.

The Form Menu Designer

Form Menu Designer

Form Menu Designer

Likewise the Form Menu designer has received the same treatment with a few additional extras:

  • A tab has been added for maintaining Event Scripts.
  • The events tab has colored indicators (orange and blue) to denote if an item has a QuickEvent or an Event Script.
  • More validation:
    • Prevent Separators being top-level items.
    • Prevent events for top-level items (unfortunately they are not supported by the Presentation Server in this version).
  • Syntax checking.
    • Syntax is automatically checked if you attempt to select another item – you will be prevented from moving to a different item if the check fails.

You should be able to catch these improvements in the next release, so please try them out and let us know how they work for you!

OLE Control improvements in v10.0.8

We added quite a bit of design-time functionality for OLE controls in v10.0.8 so this post provides a quick overview of what’s new:

The CLSID property

This property has a new “editor” dialog.  While it doesn’t allow you to change the CLSID (that’s by design – if you change the CLSID it’s a totally different control!) it does provide you with a lot of information about the control question such as it’s Registry attributes and it’s properties, methods and events, e.g:

OLE Control CLSID General Tab

OLE Control CLSID Properties Tab

OLE Control CLSID Methods Tab

OLE Control CLSID Events Tab

The QualifiedOleEvents property

This property has a new editor that allows you to specify which OLE events you wish to qualify when the control is created, hopefully removing the need for you to do this in code:

OLE Control QualifiedOleEvents Editor

The OLE Properties section

We’ve also added a new category called “OLE” to the properties displayed in the IDE Property Panel, and this contains all of the design-time OLE properties that can be edited for the control:

OLE Properties in the IDE Property Panel

You may also notice that we’ve added some property type-support for editing OLE properties here as well:

  • Color properties can now use the standard Color property editor
  • Fonts can now be edited with the standard Windows Font dialog
  • Enumerated types are edited with a dropdown list showing the “internal” and “external values, e.g:

OLE Enumerated Properties dropdown

Hopefully this will make working with OLE controls and OpenInsight 10 easier for you in the future.

Adding Custom Properties in the Form Designer

User-defined properties (“UDPs”) have always been supported at run-time in OpenInsight by giving the desired property a name prefixed with an “@” symbol and then setting a value for it, e.g:

Call Set_Property( CtrlEntID, "@MYPROP_1", "SomeVal" )
Call Set_Property( CtrlEntID, "@MYPROP_2", "SomethingElse" )

Value = Get_Property( CtrlEntID, "@MYPROP_1" )

// etc...

With the upcoming release of version 10.0.8, design-time support for these has been added in the Form Designer via the new “CustomProperties” property.  This is simply a list of UDP  property names and values that can be specified and stored in the Form definition record, which are then processed during form creation to create UDPs that can be accessed in the normal way by Get_Property and Set_Property.

For example, if you enter a couple of custom properties in the Form Designer called MYPROP_1 and MYPROP_2:

CustomProperties Property

Editing the CustomProperties property

You may then use these with Get_Property and Set_Property at runtime, by referencing them with an “@” prefix (i.e. “@MYPROP_1” and “@MYPROP_2”) like so:

// Value will contain "SomethingElse"
Value = Get_Property( CtrlEntID, "@MYPROP_2" )

Two things to note:

1) You don’t need to specify an “@” prefix for the property name in the CustomProperties editor, and

2) You are not limited to simple strings when entering CustomProperties values – you may also use the standard “[,]” syntax for entering dynamic arrays just like you would for QuickEvent parameters:

E.g. to enter an @fm-delimited array you enclose the list of items in ‘[]’ brackets, and delimit them with a comma like so:

An array like this: 

   <1> ItemOne
   <2> ItemTwo

Can be entered as:

   ['ItemOne','ItemTwo']

Note that each array item must be single-quoted, but you can escape a quote in the data by using two single quotes, e.g.

An array like 

   <1> ItemOne
   <2> ItemTwo's Stuff

Can be entered as:

   ['ItemOne','ItemTwo''s Stuff']

For arrays with lower-level delimiters like @vm and @svm you add a set of nested ”[]’ brackets for each level, e.g:

An array like:
   <1>      ItemOne
   <2,1>    ItemTwo_A
   <2,2>    ItemTwo_B
   <2,3,1>  ItemTwo_C_1
   <2,3,2>  ItemTwo_C_2
   <3>      ItemThree

Can be entered as:
   
   ['ItemOne',['ItemTwoA','ItemTwoB',['ItemTwo_C_1','ItemTwo_C_2']],'ItemThree']

And so on.

Hopefully you find this new feature useful and help to reduce the amount of code you need to write.