Example Screen

Deep Dive: Integrating OpenInsight with External REST APIs Using PowerShell and RTI_JSONX

Author: Bob Carten

Categories: Advanced Integration, Basic+, PowerShell, REST API, JSON Architecture

As corporate ecosystems grow, the need to bridge OpenInsight applications with modern, third-party web services becomes inevitable. In the Revelation Software OpenInsight world, we face a choice: do we try to manage complex HTTP protocols, certificate handshakes, and raw multi-part binary streaming natively in Basic+, or do we lean into modern execution pipelines?

Recently, while modernizing an OpenInsight 10 document management workflow to sync index data with an external ImageQuest REST API, I developed a hybrid architecture that leverages the native strengths of OpenInsight, Basic+ RTI_JSONX, and Windows PowerShell runspaces via rti_powerscript.

This article walks through that design pattern in full — covering the exact traps you will hit around unmanaged memory management, .NET model binding validation, certificate enforcement, and multipart binary upload — and how to solve them for production-grade reliability.


The Architecture Overview

The most significant architectural trap when integrating an OpenInsight 10 application with a strict .NET-backed REST API is treating updates as simple PATCH statements. Many modern document management APIs enforce full object graphs during a PUT request. If you send only the properties modified in your UI window, the server-side model binder encounters a NullReferenceException on missing tracking fields (internal IDs, system creation timestamps, hidden file references) and crashes with a 500 Server Error.

To keep OpenInsight completely insulated from needing to know or track hidden system-level fields, the solution is a clean separation of concerns using a Read-Modify-Write cycle:

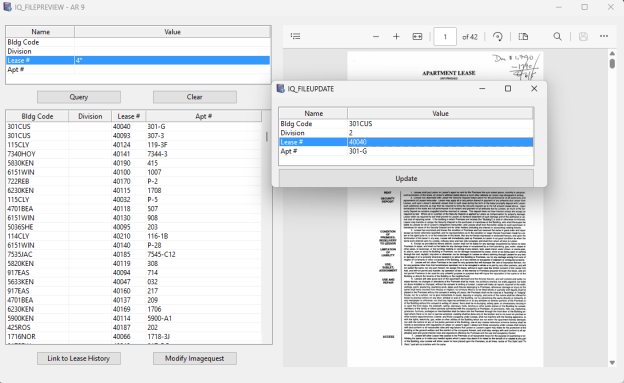
  1. OpenInsight Form: Collects user-edited criteria inside an Edit Table grid.
  2. Basic+ (RTI_JSONX): Translates internal OpenInsight delimiters (@FM and @VM) cleanly into a structured JSON string, escaping text variables natively and protecting data boundaries.
  3. PowerShell Engine via rti_powerscript: Authenticates via an OAuth2 token endpoint, fetches the absolute fresh master copy of the record from the server, merges the OpenInsight delta JSON string in memory, and submits a 100% compliant payload graph back to the network.

The result: OpenInsight never touches HTTP. PowerShell never parses OpenInsight delimiters. Each layer does only what it does best.


Step 1: The Basic+ Serialization Pipeline

When preparing data for a REST API, performing the transform in Basic+ via RTI_JSONX is vastly superior to doing text-splitting inside a PowerShell script. OpenInsight natively handles its own delimiters; passing a raw matrix to the OS layer is incredibly fragile if a user types a character that collides with an internal separator.

The following snippet shows how to iterate through an Edit Table array, build individual key/value JSON objects, append them into a root array container, and properly manage unmanaged heap pointers.

* =============================================================================
* Routine: Form Event Handler (e.g., BTN_UPDATE Click)
* Purpose: Extract Edit Table grid edits and serialize to valid JSON
* =============================================================================
docId = @atWindow->udp_DocId$
modified_Array = .ET_Metadata->Array
* Safely append the active context module without using dangerous <-1> indicators
nextCol = FieldCount(modified_Array<1>, @VM) + 1
modified_Array<1, nextCol> = 'Document Type'
modified_Array<2, nextCol> = @atWindow->udp_CurrentModule$
* 1. Initialize a new root JSON Array pointer handle
hJsonArray = rti_jsonx(null$, "NEW", "ARRAY")
* 2. Loop through the metadata row entries
numRows = nextCol
For r = 1 To numRows
attrName = modified_Array<1, r>
attrValue = modified_Array<2, r>
If attrName != "" Then
hPairObj = rti_jsonx(null$, "NEW", "OBJECT")
Call rti_jsonx(hPairObj, "SETVALUE", "name", attrName, "STRING")
Call rti_jsonx(hPairObj, "SETVALUE", "value", attrValue, "STRING")
* Method 16 = RJSON_MTD_APPENDITEM$ -- array append does NOT go through rti_jsonx
Call rti_rjson(16, hJsonArray, "", hPairObj)
* CRITICAL: Free the child immediately -- parent now holds the reference
Call rti_jsonx(hPairObj, "FREE")
End
Next r
* 3. Serialize the object graph to a flat text string
jsonString = rti_jsonx(hJsonArray, "STRINGIFY")
* 4. Free the parent array handle
Call rti_jsonx(hJsonArray, "FREE")
* 5. Hand the payload to the REST interface
response = IQREST_INTERFACE('MODIFY', docId, jsonString)

A few things are worth mentioning:

  • Array append does not go through rti_jsonx. You must call rti_rjson(16, hParent, "", hChild) directly. This is the raw method number for RJSON_MTD_APPENDITEM$ inside RevJSON.dll.
  • Free the child immediately after appending. The parent array now holds the only live reference. Holding the child handle is not just unnecessary — it is a leak that compounds in loops.
  • Free the parent after STRINGIFY. The serialized string is a normal Basic+ variable. Once you have it, the handle has no further purpose.
  • Memory Managment is an oi10 requirement. OpenInsight 11 has a native Json type which manages the memory for you.

Step 2: Storing the PowerShell Module in the OI Repository

Note that the PowerShell module lives entirely inside the OpenInsight repository. There is no separate .psm1 file to deploy, version, or synchronize. Because this was an OpenInsight 10 project, the module is stored in an OI Insert record using a wrapper which the OI compiler silently ignores at compile time but that is readable at runtime.

Compile Insert IQREST_UTILS_PSM
#IFDEF IGNORE_ME
# PowerShell module begins here -- lines starting with # are PS comments
function Get-IQToken {
param([string]$BaseUrl, [string]$Username, [string]$Password)
$body = @{ username = $Username; password = $Password }
$resp = Invoke-RestMethod -Uri "$BaseUrl/api/token" -Method Post -Body $body
return $resp.access_token
}
function Get-IQDocument {
param([string]$BaseUrl, [string]$Token, [string]$DocId)
$headers = @{ Authorization = "Bearer $Token" }
return Invoke-RestMethod -Uri "$BaseUrl/api/documents/$DocId" -Method Get -Headers $headers
}
function Update-IQMetadata {
param([string]$BaseUrl, [string]$Token, [string]$DocId, [string]$DeltaJson)
# Step 1: Read-Modify-Write -- fetch the complete document graph first
$doc = Get-IQDocument -BaseUrl $BaseUrl -Token $Token -DocId $DocId
$delta = ConvertFrom-Json $DeltaJson
# Step 2: Merge the delta attributes sent from OpenInsight
foreach ($pair in $delta) {
$existing = $doc.Attributes | Where-Object { $_.name -eq $pair.name }
if ($existing) {
$existing.value = $pair.value
} else {
$doc.Attributes += [PSCustomObject]@{ name = $pair.name; value = $pair.value }
}
}
# Step 3: PUT the complete, merged object graph back
$headers = @{ Authorization = "Bearer $Token"; "Content-Type" = "application/json" }
$body = $doc | ConvertTo-Json -Depth 10
Invoke-RestMethod -Uri "$BaseUrl/api/documents/$DocId" -Method Put `
-Headers $headers -Body $body
Write-Output "UPDATE_STATUS:SUCCESS"
}
#ENDIF

At runtime, the calling Basic+ routine reads the insert record and strips the OI framing before passing it to rti_powerscript:

* Read the insert record from the repository
Call Repository("ACCESS", repoRow, "STPROCINS", "IQREST_UTILS_PSM", "", "", "", sErr)
insertText = repoRow<2>
* Strip everything before the first # to remove the OI compiler wrapper
psModule = insertText[Index(insertText, '#', 1), Len(insertText)]

This approach has significant operational benefits: the PowerShell code travels with your OI application export, is subject to the same source control workflow, and requires zero additional deployment steps on a new workstation.


Step 3: The PowerShell Communication Engine

rti_powerscript hosts a PowerShell runspace in-process via OI’s .NET bridge. It requires System.Management.Automation.dll in the OI client files directory — the same assembly used by PowerShell itself. Once that assembly is present, no other installation is required.

The calling pattern from the IQREST_INTERFACE subroutine looks like this:

Declare Function rti_powerscript
* Build the complete script: load the module, then call the function
psScript = psModule : @fm
psScript := "$baseUrl = '" : baseUrl : "'" : @fm
psScript := "$token = Get-IQToken -BaseUrl $baseUrl -Username '" : user : "' -Password '" : pass : "'" : @fm
psScript := "Update-IQMetadata -BaseUrl $baseUrl -Token $token -DocId '" : docId : "' -DeltaJson '" : jsonString : "'"
* Execute -- pipeline is single-use, must CLEAR before running another script
scriptHandle = rti_powerscript("ADDSCRIPT", psScript)
results = rti_powerscript("RUNCOMMAND", scriptHandle)
status = results<1>
dummy = rti_powerscript("CLEAR")
* Check result
If status == "UPDATE_STATUS:SUCCESS" Then
Msg(@window, "Document updated successfully.")
End Else
errMsg = Field(status, ":", 3)
Msg(@window, errMsg)
End

Key behaviors to understand:

  • Default runspace auto-initializes. You do not need to call CREATERUNSPACE for typical single-shot scripts. The runspace persists in a named common block between calls.
  • Pipelines are single-use. After RUNCOMMAND, you must call CLEAR before running another script. Forgetting this causes the second call to fail silently.
  • Each Write-Output line becomes one field. RUNCOMMAND returns results as an @FM-delimited string where results<1> is the first output line, results<2> is the second, and so on. CRLF within a line is converted to @VM.
  • Result tokens are explicit contracts. By convention, the first Write-Output line is a status token like UPDATE_STATUS:SUCCESS or UPDATE_STATUS:ERROR:message text. Basic+ checks this token and reacts accordingly. This keeps error handling clean on both sides of the boundary.

Step 4: Handling Real-World Network Constraints

In most enterprise environments, you will immediately run into TLS certificate validation failures against internal servers running self-signed or private CA certificates. Rather than deploying certificates to every workstation, the cleanest approach for an internal integration is a targeted TLS bypass scoped to the specific request:

# At the top of the PowerShell module, before any Invoke-RestMethod calls:
[System.Net.ServicePointManager]::ServerCertificateValidationCallback = { $true }
[System.Net.ServicePointManager]::SecurityProtocol = `
[System.Net.SecurityProtocolType]::Tls12 -bor `
[System.Net.SecurityProtocolType]::Tls13

The TLS12/TLS13 enforcement is equally important. Older .NET framework versions default to TLS 1.0, which most modern servers now reject outright.

Multipart File Upload

The one area where Invoke-RestMethod falls short is multipart/form-data uploads where the boundary must be precisely controlled and binary content must be included alongside metadata fields. For Add-IQDocument, we dropped down to System.Net.HttpWebRequest directly:

function Add-IQDocument {
param([string]$BaseUrl, [string]$Token, [string]$FilePath, [string]$MetaJson)
$boundary = [System.Guid]::NewGuid().ToString()
$url = "$BaseUrl/api/documents"
$req = [System.Net.HttpWebRequest]::Create($url)
$req.Method = "POST"
$req.Headers.Add("Authorization", "Bearer $Token")
$req.ContentType = "multipart/form-data; boundary=$boundary"
$bodyStream = New-Object System.IO.MemoryStream
# Metadata part
$metaPart = "--$boundary`r`nContent-Disposition: form-data; name=`"metadata`"`r`n`r`n$MetaJson`r`n"
$metaBytes = [System.Text.Encoding]::UTF8.GetBytes($metaPart)
$bodyStream.Write($metaBytes, 0, $metaBytes.Length)
# File part
$fileName = [System.IO.Path]::GetFileName($FilePath)
$filePart = "--$boundary`r`nContent-Disposition: form-data; name=`"file`"; filename=`"$fileName`"`r`nContent-Type: application/octet-stream`r`n`r`n"
$fileBytes = [System.Text.Encoding]::UTF8.GetBytes($filePart)
$bodyStream.Write($fileBytes, 0, $fileBytes.Length)
$fileData = [System.IO.File]::ReadAllBytes($FilePath)
$bodyStream.Write($fileData, 0, $fileData.Length)
$closing = "`r`n--$boundary--`r`n"
$closingBytes = [System.Text.Encoding]::UTF8.GetBytes($closing)
$bodyStream.Write($closingBytes, 0, $closingBytes.Length)
$req.ContentLength = $bodyStream.Length
$bodyStream.Position = 0
$bodyStream.CopyTo($req.GetRequestStream())
$resp = $req.GetResponse()
Write-Output "ADD_STATUS:SUCCESS"
}

This gives you byte-perfect control over the multipart boundary, content-type headers, and binary encoding — something Invoke-RestMethod -Form cannot reliably deliver across all PowerShell versions.


Why This Architecture Works

After working through this integration, the design philosophy is clear and reusable for any REST API target:

ConcernHandled byWhy it belongs there
UI state, user input, OI delimitersBasic+ / RTI_JSONXOI knows its own data model; JSON escaping is handled natively
HTTP, TLS, OAuth2, multipartPowerShellModern .NET stack; no native support needed in Basic+
Server-side model graph integrityPowerShell Read-Modify-WriteFetching fresh state before PUT avoids all partial-update 500 errors
Module deploymentOI Insert + #IFDEF IGNORE_MEPowerShell travels with the OI app; no separate file management
Result communicationWrite-Output token protocolClean contract; Basic+ reads results<1> without parsing raw HTTP

The #IFDEF IGNORE_ME insert pattern for storing PowerShell modules is particularly worth highlighting. It means your PowerShell is versioned in the OI repository, exported with your application, and deployed with zero extra steps. This pattern works well for OpenInsight 10, but it overloads the functionality of inserts. We expect that interacting with external agents will be a common requirement in the future, so in OpenInsight version 11 we intend to add a powerscript document type, as well as python, JavaScript and other common scripting languages supported by the new Revelation application server (RevAS). That is a topic for future articles.

For any integration project that involves a .NET-modeled API, certificate-sensitive endpoints, or binary file transfer, this three-layer pattern — Basic+ for data, RTI_JSONX for serialization, PowerShell for the network — is a solid approach for a production-reliable result. We intend that OpenInsight 11 will make using this pattern even easier.

Dynamic arrays and offset caching

As you know, dynamic arrays in OpenInsight are internally represented as delimiter-separated strings commonly containing fields, values and sub-values. Traditionally, locating an element required scanning the string from the start to find the required delimiters at the specified index . This can be a performance issue on large arrays, so one of the new features we’ve added to OpenInsight 11 is index/offset caching.

This is a technique that involves caching the byte offsets of previously located field, value and sub-value indexes when you use the “<>” operators, and the Insert/Extract/Replace/Delete functions. This means that we don’t always have to start scanning from the beginning of the string each time an element is accessed.

For example, suppose field 67 is located at byte offset 234, and field 68 begins at offset 245.

  • Without caching, locating field 68 requires rescanning the dynamic array from the beginning to find all preceding field marks.
  • With caching, once field 67 has already been located, the search for field 68 can begin from offset 234 instead of offset 1.

This optimization is especially effective when forward-iterating through large dynamic arrays, where successive accesses are close together. In previous versions, repeatedly accessing successive fields could result in near O(n²) scanning behaviour for large arrays. Offset caching eliminates much of this repeated work.

Consider the following program which processes 10000 SYSOBJ keys:

compile function test_dyn_cache( void )
$insert rti_Struct_Equates
$insert logical
select @file_sysobj
eof = FALSE$
idList = ""
loop
readNext id else eof = TRUE$
until eof
idList := id : @fm
repeat
idList[-1,1] = ""
idList = field( idList, @fm, 1, 10000 )
ctr = fieldCount( idList, @fm )
pf = blank_Struct( "MSWIN_LARGE_INTEGER" )
pcStart = blank_Struct( "MSWIN_LARGE_INTEGER" )
pcEnd = blank_Struct( "MSWIN_LARGE_INTEGER" )
call msWin_QueryPerformanceFrequency( pf )
call msWin_QueryPerformanceCounter( pcStart )
for x = 1 to ctr
id = idList<x>
next
call msWin_QueryPerformanceCounter( pcEnd )
pcStart = struct_To_Var( pcStart, "MSWIN_LARGE_INTEGER" )
pcEnd = struct_To_Var( pcEnd, "MSWIN_LARGE_INTEGER" )
pf = struct_To_Var( pf, "MSWIN_LARGE_INTEGER" )
pcTime = ( ( pcEnd - pcStart ) * 1000 ) / pf
call send_Dyn( "TEST_DYN_CACHE processed " : ctr : " items -> " : pcTime : " ms" )
return ""

Running this benchmark on the same machine using v10.2.4 took approximately 360ms, while OpenInsight 11 completed the same test in around 1–2ms.

For small dynamic arrays the difference may not be noticeable, but performance improvements become increasingly significant as array sizes grow.

This means you can continue using the familiar “<>” syntax for sequential dynamic array processing without needing to rewrite code using LOOP/REMOVE or LOOP/[] parsing patterns.

Introducing OpenInsight 11

With the recent release of OI 10.2.4 it’s time to look ahead at OpenInsight 11 and some of the new features that will be heading your way with the next major release. We’ve been working on it for some time, with a focus on cloud-based features, and there’s plenty to talk about over the next few months as we get it ready, but in the meantime here’s a few highlights:

Revelation Application Server

This is a new native Windows Service application that can host one or more concurrent OpenInsight application instances in a variety of modes:

  • Background Task processing
  • Index Server processing
  • General-purpose “engine-server” with access via a Basic+/Windows DLL/.Net class library/Linux SO, Python wrapper etc.
  • Thin-Client mode for RTP57R (see below)
  • Web-CGI Server (Windows ISAPI, Linux S/CGI, FastCGI, CGI, PHP modules)
  • Internal Web Server with reverse proxying for use with Linux Ngnix/Apache, HTTPS and static file serving support.
  • MCP endpoint for AI access.

RTP57R – Cloud-Optimized Data Access

With the new Application Server we’ve introduced a specialized filing system driver engineered with the Thin-Client mode to meet the demands of distributed applications. As you know, when databases migrate to remote cloud servers and corporate WANs, connection stability and latency often become greater bottlenecks than raw bandwidth. RTP57R (the “R” stands for Remote) addresses these challenges by seamlessly offloading processing to the server when needed and minimizing “chatter” across the wire.

AI Integration

OpenInsight 11 will also feature AI integration features, including a “chat” interface to agentic AI that can be either self-hosted or available through subscription. The Application Server provides an MCP (Model Context Protocol) interface to expose tools and resources to an AI client – we provide a standard set of tools for stored procedure and general DB access, and you can define your own as well.

Basic+ DYNLIST data type

We’ve added a new data type called a “DynList” to Basic+. Basically this is similar to a dimensioned array but it can be resized at runtime. If you’re used to working with other languages then you can think of this as similar to a C++ vector or a C# List<> type etc. DynList variables can store other DynList variables so you can implement fully multi-dimensional data structures.

Basic+ JSON data type

We’ve also made JSON a first class citizen and implemented a set of new JSON functions into Basic+. OI10 included a set of JSON functions exported from RevJSON.dll, but there was always the issue of manual handle management, and some memory management issues. Having JSON in Basic+ removes these concerns.

And there’s more…

So that’s just a few new things that we can tell you about now, and of course there will be more work on improving the performance and functionality of other existing areas like the IDE, Form Designer and other tools. We’ll reveal more details in future posts.

$DEBUG – the safer alternative to Debug

Probably one of the most annoying issues that developers encounter is distributing programs to customers that contain unintentional ‘Debug’ statements. These are often left in from testing, and, with the pressure of deadlines to deliver, they are very easy to overlook.

In order to help alleviate this issue OpenInsight 10 implements a “$DEBUG” statement that you can use in place of the normal “Debug” statement: The difference here is that the debugger only triggers if the code is running on the same machine that it was compiled on, so if your program does manage to escape with a compiled $DEBUG statement it shouldn’t execute on other machines.

There are two variations of $DEBUG. The first is a simple “$DEBUG” statement like so:

Write Record To hFile, Key Else
// Failed etc...
$DEBUG
End

The second type of $DEBUG statement behaves in the same manner as described above, but also includes the ability to define a simple expression to test, and will only trigger the debugger if the test is met (This is similar to the way that the $ASSERT statement works). For example:

// Only debug if x is equal to 3
$DEBUG( x == 3 )

$DEBUG can be used in any version of OpenInsight 10 with the following caveats:

  • From version 10.2.3 onwards the raw workstation name (e.g. “REVWS07” ) is used to test if the debugger should execute.
  • Prior to this (version 10.2.2 and earlier), the entire contents of @station is used to test. The issue here is that @station usually includes the OpenInsight process ID (e.g. “REVWS07_45383” ) so it will only debug within the instance of OpenInsight that it was compiled on. This can be a little too restrictive unless you are willing to recompile your programs after restarting your application, hence the change for version 10.2.3 mentioned above.

Note that you can also disable $DEBUG statements when compiling, in which case the debug tests are never included in the object code.  To do this simply use the NODEBUG token with the #define statement like so:

#define NODEBUG

So, hopefully you can use the $DEBUG statement for your test debugging and have a smoother experience with your customers!

The new Scan Repository tool

OpenInsight 10.2.3 brings a much needed update to the venerable Scan Repository tool, providing an updated user interface, full support for new repository types, and some new methods for problem detection and repair. In this post we’ll take a look at each of these areas in more detail, and how the various options work when repairing your system.

A new user interface

The Scan Repository tool is accessed from the IDE main menu via the Tools\Repository menu item and then choosing the “Scan Repository For Errors” option (or alternatively by executing the RTI_IDE_SCAN_REP form via the System Monitor). Users of previous incarnations of the Scan Repository tool will notice an immediate change in the user interface as it is no longer a “wizard” style UI, but now shows all of the scanning options, progress information and results on a single form instead:

The new Scan Repository tool
The Scan Repository Tool

Using the scanner is a simple process:

  • Ensure the Scan Prerequisites are met.
  • Choose the Scan Options.
  • Click the “Analyze” button to begin the scan. Progress information will be shown at the top of the form and the scan can be cancelled at any point.
  • Review the results and, if necessary, select the appropriate repair action. These appear in dropdown lists in the “Action” column of the results table and can be one or more of the following options (depending on the error):
    • Add
    • Delete
    • Ignore
  • Make sure that the items you want to fix are highlighted (selected) in the list (Remember to use the context menu to help with the selection process!).
  • When ready click the “Process” button to begin the repair process.
  • Review the repair results.
    • Note that some repairs may not be able to be completed automatically. In this case the corresponding action item may change to an “Edit” button so that the problem item can be fixed manually.
    • Details of errors encountered during the repair process are shown in a tooltip when the mouse is hovered over a problem item.

Scan Prerequisites

Repairing errors in your repository involves possible changes to some fundamental system components, so the following requirements must be met before the scan can take place:

  • Ensure that you have backed up your system and check the “A recent backup is available” check box.
  • Ensure that all others users are logged out of your system, otherwise the scan cannot proceed. The details of other logged-in users will appear in the Users list to help identify them.

Scan Options

There are two categories of scanning options. The first, “Types and Classes”, scans the core repository records to ensure that they are all correct, while the second category, “Entities” scans the normal application components.

Scanning for Types and Classes

The functionality of the repository is based heavily on the information contained in the following three locations, so it is essential that these items are correct:

  • REPFAMILY entities (SYSREPOSTYPEFAMILIES records)
  • REPTYPE entities (SYSREPOSTYPES records)
  • REPCLASS entities (SYSREPOSCLASSES records)

These are referred to as FTC entities (Family/Type/Class). They can be one of two types:

  1. “Known” – these are the FTC entities are that are supplied by Revelation.
  2. “Custom” – these are non-Revelation FTC entities added by developers that have been marked as valid in a previous “Types and Classes” scan (When an “unknown” FTC entity is first encountered in a repository scan it can be flagged as “custom” so it is considered valid in subsequent scans – see the “Unknown” class of errors in the table below).

Verify Repository Types and Classes

The state of the FTC entities can be validated by checking the “Verify Repository Types and Classes” box which ensures that this process takes place before any other normal entities are checked.

Checks performed during this scan include:

  • All known FTC entities are present and not missing any critical information.
  • All custom FTC entities which have been flagged as valid are not missing any critical information.
  • All other FTC entities that are not flagged as custom are reported as “Unknown” so they can be reviewed.

The Verify Repository Types and Classes scan can produce the following errors:

ErrorDESCRIPTION
Missing Known Type Family,
Missing Known Type,
Missing Known Class
One of the known FTC entities is missing. The default version can be added back into the system using the “Add” action.
Unknown Type Family,
Unknown Type,
Unknown Class
An unknown FTC entity has been found. It can be added as a custom type using the “Add” action, or removed using the “Delete” action. Items that have been added are marked as custom and treated as a valid FTC type in future scans.
Missing Repository RecordThe raw FTC body record is missing a corresponding SYSREPOS header record. A default SYSREPOS record can be created using the “Add” action.

(Note: OpenInsight repository entities are usually comprised of two components: A “header” record in the SYSREPOS table, and a “body”. The latter can be a record in a table or an OS file depending on the type of entity).
Bad Repository Sub-keyThe SYSREPOS header record for the FTC entity has an invalid SUBKEY entry. The “Add” action may be used to correct this.
Missing Title,
Missing Icon,
Missing Image,
Missing Type Family,
Missing SCM Format,
Missing SCM Include,
Missing Storage Type,
Missing Location,
Missing RDK Extract Type,
Missing Key Format,
Missing Designer Tool
The FTC body record is missing some required information.

If this is a known FTC entity then the “Add” action may be used to reset the missing value to its default setting.

If this is a custom FTC entity the “Add” action will switch to an “Edit” button, which opens the entity for editing in the IDE.
Missing Event ClassA custom event (added via the Event Designer tool) is missing a corresponding SYSEPOSCLASSES record. The “Add” action may be used to add a default record.

Reset to default values

Selecting this option ensures that all known Revelation-supplied FTC entities are reset to their default values during the scan. This option can be used to ensure that your repository is always in a good state.

Scanning Entities

This part of the process scans the rest of the repository based on the options chosen:

OptionDescrIPTION
Scan for missing entity headersScans a set of core tables looking for missing repository header (SYSREPOS) records.

Due to the fact that it can allow “lost” entities to be readded to the repository it is recommended that this option be run before any others.

If this option is selected all of the other Entity scanning options will be disabled.
Scan repository keys onlyOnly checks the validity of repository header (SYSREPOS) keys and does not check the state of the entity itself.

The only other option allowed with this selection is “Use strict validation criteria for entity IDs”.
Validate “uses” dependenciesEnsures any entities flagged as “used” by the entity being scanned actually exist. If they don’t the link is automatically removed.
Validate “used by” dependenciesEnsures any entities flagged as “used-by” by the entity being scanned actually exist. If they don’t the link is automatically removed.
Validate “documentation” dependenciesEnsures any documentation entities linked to the entity being scanned actually exist. If they don’t the link is automatically removed.
Scan for orphaned event handlersEvent entities (source and executable) are checked to ensure that they are linked to their parent forms, and that the parent forms actually exist.
Scan for missing entity bodiesValidates that each repository entity has a corresponding body record or OS file as appropriate.
Use strict validation criteria for entity IDsValidates that keys in the SYSREPOS table conform to a limited set of characters.

When the “Scan for missing entity headers” box is checked the Entities scan can produce the following errors:

ErrorDescription
Orphan – Missing SYSREPOS [<id>]An entity body record is missing a corresponding SYSREPOS header record. The “Add” action may be used to add a default header record, the “Delete” action may be used to delete the orphaned body.
Orphan – Bad App [<id>]An entity body record is linked to a non-existent application ID. The “Delete” action may be used to delete the record (and any associated SYSREPOS header record).
Orphan – Suspected Bad App [<id>]Due to the polymorphic nature of the records in some tables (primarily SYSPROCS and SYSOBJ) it is not always possible to accurately determine what type of record is being checked.

This error can be raised in such circumstances, and the “Delete” action may be used to remove the record in question.

However, it is advised that you review the record in question before you delete it!
Orphan – Bad Key Format [<id>]A known type has a badly formatted key. The “Delete” action may be used to remove the record in question.

When the “Scan for missing entity headers” box is not checked the Entities scan can produce the following errors:

ERRORDescription
Bad KeyThe entity has a badly formatted SYSREPOS key. The “Delete” action may be used to remove the entity.
Bad AppThe APPID of the SYSREPOS key refers to an invalid application ID. The “Delete” action may be used to remove the entity.
Bad TypeThe TYPEID of the SYSREPOS key refers to an invalid SYSREPOSTYPES type ID. The “Delete” action may be used to remove the entity.
Bad ClassThe CLASSID of the SYSREPOS key refers to an invalid SYSREPOSCLASSES class ID. The “Delete” action may be used to remove the entity.
Deprecated EventAn entity has been found for a class of event that is no longer supported in version 10. The “Delete” action may be used to remove the event in question.
Strict TestThe SYSREPOS header key failed the “strict” test and is considered to be badly formatted. The “Delete” action may be used to remove the entity.
No locationThe SYSREPOS header record is missing a required location (e.g. an IMAGE type is missing the location of the OS image file). The “Delete” action may be used to remove the entity.
No BodyThe entity is missing a body record or OS File as determined by its type. This can happen if the body record exists but is null, or the ACCESS method returns null. The “Delete” action may be used to remove the SYSREPOS header record.
No Body <FSError>The entity’s body record cannot be accessed because of a filing system error. The “Delete” action may be used to remove the SYSREPOS header record.
Open ErrorA table open error occurred when checking a DBTABLE type entity. The “Delete” action may be used to remove the SYSREPOS header record.
Orphan – Missing FormAn event script entity is referring to a form entity that does not exist (i.e. there is no SYSREPOS header record for the form). The “Delete” action may be used to remove the event entity.
Orphan – Missing Form BodyAn event script entity is referring to a form entity whose body record does not exist (i.e. there is no SYSREPOSWINS or SYSREPOSWINEXES record for the form). The “Delete” action may be used to remove the event entity.
Orphan – Missing ControlAn event script entity is linked to a control that does not exist on the form. The “Delete” action may be used to remove the event entity.
Orphan – Event Not LinkedAn event script entity has been found for a control or form that does exist but it is not linked to it. The “Add” option may be used to create the link, or the “Delete” action may be used to remove the event.

(Note: Please review the control and event in question before you decide to add it as there may be a good reason that it is no longer linked!)
Orphan – Missing Script ExeAn event script debug-table entity has no corresponding event script executable entity. The “Delete” action may be used to remove the event script debug-table entity.
Orphan – Event Cannot Be LinkedAn executable event script entity cannot be dereferenced to an owner. The “Delete” action may be used to remove the executable event script.

The Scan Repository context menu

The results list of the Scan Repository tool includes a comprehensive context menu to help with selecting the items to repair along with an export option and an easy way to view the details of a specific entity:

Menu ItemDescription
Process all itemsExecutes the specified repair action (if appropriate) for all entities in the results list.
Process selected items onlyExecutes the specified repair action (if appropriate) for all selected entities in the results list.
Set all items to “Add”Sets the action option of all items in the results list to “Add” (but only if they have an “Add” option).
Set all items to “Delete”Sets the action option of all items in the results list to “Delete” (but only if they have a “Delete” option).
Set all items to “Ignore”Sets the action option of all items in the results list to “Ignore” (but only if they have an “Ignore” option).
Set all selected items to “Add”Sets the action option of all selected items in the results list to “Add” (but only if they have an “Add” option).
Set all selected items to “Delete”Sets the action option of all selected items in the results list to “Delete” (but only if they have a “Delete” option).
Set all selected items to “Ignore”Sets the action option of all selected items in the results list to “Ignore” (but only if they have an “Ignore” option).
Select all itemsSelects all of the items in the results list.
Clear all selectionsUnselects all of the items in the results list.
View <entity>Attempts to open both the SYSREPOS header record and body record (if possible) for the specified entity. These are opened as “raw” records in the IDE.
Export resultsExport the contents of the results list to a CSV file.

Conclusion

The new Scan Repository tool is available in OpenInsight v10.2.3 onwards. Hopefully it will allow you to keep your repository in good shape moving forwards!

Directory Management in OpenInsight 10

Over the years there have been several different and disparate ways of managing directories in OpenInsight, and not all of them fully documented. In this post we’re going to take look at the “official” preferred methods, along with a mention of the deprecated ones too.

Preferred methods

  • The FILESYSTEM object (for Event Context)
  • RTI_OS_Dir stored procedure (for non-Event Context)

Deprecated methods

  • Utility stored procedure
  • RTI_OS_Directory stored procedure
  • DirExists stored procedure
  • MkDir stored procedure
  • UtilityMakeDir stored procedure
  • UtilityRemoveDir stored procedure
  • UtilityRename stored procedure

A note on directory management and context

As you may be aware, an OpenInsight application runs in one of the following contexts:

  • Event Context – This applies when your Basic+ programs are called in response to an event from a standard OpenInsight application form or control (i.e. an application managed by the Presentation Server).
  • Non-Event Context – This applies to applications that run Basic+ programs outside of the Presentation Server using the RevCAPI interface to manage an instance of RevEngine. These are usually “Inet” or O4W web applications, but also include other methods like the RevRun.exe program too.

Therefore, one of the most fundamental considerations when choosing which directory management method to use is the context in which it is called: As a rule, when running in Event Context, you should always prefer to use the FILESYSTEM object for directory management, otherwise you should choose the RTI_OS_Dir stored procedure instead.

Note that if there is a possibility that your Basic+ programs will be executed in different contexts at runtime (i.e. you share them between contexts) then you should invoke the IsEventContext stored procedure to determine which method to use.

For example, here is a simple context-aware code snippet that removes a directory:

   Declare Function IsEventContext, RTI_OS_Dir, Exec_Method
   $Insert PS_FileSystem_Equates
   $Insert RTI_SSP_Equates
   
   ErrText = ""

   If IsEventContext() Then
      // Use the FILESYSTEM object
      If Exec_Method( "FILESYSTEM", "REMOVEDIR", DirName ) Else
         ErrInfo = Get_Property( "FILESYSTEM", "FILEOPRESULT" )
         ErrCode = ErrInfo<PS_FOR_ERRORCODE$>
         ErrText = ErrInfo<PS_FOR_ERRORTEXT$>
      End
   End Else
      // Use RTI_OS_DIR
      Call Set_Status( SETSTAT_OK$ )
      If RTI_OS_Dir( "REMOVEDIR", DirName ) Else
         Call Get_Status( ErrText )
      End
   End

Using the FILESYSTEM object

The FILESYSTEM object supports the following methods to manage directories. It integrates fully with the Windows Shell and provide the best user experience in Event Context:

  • COPYDIR
  • DIREXISTS
  • GETSPECIALDIR
  • MAKEDIR
  • MOVEDIR
  • REMOVEDIR
  • RENAMEDIR

The FILESYSTEM object is fully documented here.

Using the RTI_OS_Dir stored procedure

This stored procedure was added to OpenInsight 10 to provide a non-Event Context version of the functionality exposed by the FILESYSTEM object. It supports the following methods:

  • COPYDIR
  • DIREXISTS
  • GETTEMPDIR
  • MAKEDIR
  • MOVEDIR
  • REMOVEDIR
  • RENAMEDIR

The RTI_OS_Dir stored procedure is fully documented here.

(Note that there is no direct equivalent of the FILESYSTEM GETSPECIALDIR method, due to the fact that it is very Windows-specific – the GET_SPECIAL_FOLDER stored procedure should be used instead.)

The Utility stored procedure (Deprecated)

As long-time readers of this blog will know, this stored procedure was deprecated some years ago at the outset of the OpenInsight 10 project, and it is now basically a thin wrapper around several SYSTEM and FILESYSTEM object methods. It supports the following directory management methods:

  • MAKEDIR
  • REMOVEDIR
  • RENAMEDIR

When called in Event Context each of these methods forwards the request to the FILESYSTEM object. When called outside of Event Context these methods call the following stored procedures instead:

  • UtilityMakeDir
  • UtilityRemoveDir
  • UtilityRename

See below for more details on these.

The RTI_OS_Directory stored procedure (Deprecated)

This stored procedure was deprecated in favor of RTI_OS_Dir as it is very platform specific and makes use internally of RTI_OS_Dir, Utility, and an OLE interface to the Windows Shell, making it less performant than calling those procedures directly. Like Utility it is still supported but will not be updated further with any new functionality.

DirExists stored procedure (Deprecated)

This stored procedure is a simple wrapper around the RTI_OS_Dir DIREXISTS method and so has been deprecated, but can still be used by existing code.

MkDir stored procedure (Deprecated)

This venerable stored procedure is a DLL function that calls the Windows API CreateDirectory function. It has been deprecated in favor of the RTI_OS_Dir MAKEDIR method but can still be used by existing code.

UtilityMakeDir, UtilityRemoveDir and UtilityRename stored procedures (Deprecated)

These three functions form part of the original internals of the Utility stored procedure, and use a “raw” C interface that requires explicit null-terminated strings. They are all still available to use, but are deprecated in favor of the RTI_OS_Dir MAKEDIR, REMOVEDIR and RENAMEDIR methods.

Conclusion

As you can see, version 10 has pulled together the many different historical methods of directory management and consolidated them into two entities that can be used dependent on the execution context. These should be the preferred methods of directory management in your OpenInsight applications.

(As of the time of writing the full documentation for RTI_OS_DIR and GET_SPECIAL_FOLDER is in preparation and will be available shortly. All methods described here apply to version 10.2.3 and later.)

(EDIT: Full documentation for RTI_OS_DIR and GET_SPECIAL_FOLDER is now live on the Revelation Wiki.)

Quickdex in OpenInsight 10

Overview

QUICKDEX.MFS and RIGHTDEX.MFS are programs that provide a quick method to obtain a list of all keys in a table, and both call the subroutine LRDEX.SUB. This stored procedure maintains a sorted list of keys in a special record named %RECORDS%. You can read this list in one operation. For example:

Keys = Xlate(‘MYTABLE’,’%RECORDS%’, ”, ‘X’)

However, there is a cost to maintaining this record. LRDEX.SUB must lock, read, scan, and if needed update the %RECORDS% row every time a row is written or deleted. This creates a potential bottleneck in a busy table. READNEXT operations must scan the result list to remove ‘%RECORDS%’.  The read method must rebuild the %RECORDS% row if it does not exist. The special %RECORDS% row is not compatible with other BFS’s. The LRDEX.SUB program originated with early versions of Advanced Revelation. At that time, storing a list of keys offered a substantial performance benefit. The benefit justified the cost for smallish tables that rarely change. These tables often populate dropdowns for data entry forms, where a quick read of all keys is useful.

When reviewing LRDEX.SUB for OpenInsight 10 we realized it needed revision. The sorting depended on the Arev language sets feature and was incompatible with DICT.MFS, causing crashes.  Rebuilding the %RECORDS% rows was not optimized. We wanted to address these and other issues and improve performance.

Changes

We started by optimizing the %RECORDS% rebuild. We needed to perform a rapid table scan and write a sorted list of keys.  OI10’s RList already provides optimized table scans, so we reused that with V119 to sort the list.  Surprisingly, reading %RECORDS% with and without the new rebuild showed a negligible performance difference!  We realized that storing a list of keys no longer offered much benefit.  We could remove the overhead of maintaining the list without sacrificing performance.  Thus, the revised LRDEX.SUB will perform a table scan when you ask for %RECORDS%. It does not lock or write anything. It still checks for %RECORDS% in a READNEXT. It will delete the record if it finds it. Quickdex.mfs remains best suited to smaller tables. However, it will not fail unexpectedly as a table grows, and it will work with any of the BFS’s.

Sharing data with OpenInsight 9

Note that the OI10 version of LRDEX.SUB is not compatible with the OI 9 version. OI9 requires the %RECORDS% row, OI10 deletes it. For that reason we soft-coded LRDEX.SUB so you can specify which version to use with a configuration setting.  If you need share tables between OI9 and OI10 you must configure OI10 to use the same logic as OI9.  Create a record in the SYSENV table named “RTI_CFG_LRDEX” with “RTI_LRDEX_SUB_9” in the first row.

Summary

OpenInsight 10 offers a simplified Quickdex/Rightdex capability with similar benefits and without the shortcomings of the OI9 version. The simplified version cannot be used on tables shared with OI9. You can configure OI10 to use the OI9 version if needed.

ListBoxes and TreeListBoxes – Checkbox Items

A recent question on the Revelation forum touched on the subject of using checkbox items in LISTBOX and TREELISTBOX controls, and this highlighted the need to document some of the new properties in OpenInsight v10 that support this functionality. In this post we’ll take a look at how you can use these to make adding checkbox items to your controls a simple task.

In previous versions of OpenInsight adding checkboxes to items was done with “smoke and mirrors”, i.e. actual item images were used to represent the checkbox, and the control itself had no concept of a checked state for any of it’s contents. Usually, when the user clicked on the item’s checkbox image, the UPDATE method was used toggle the image from checked to unchecked and vice versa. The checked state would be obtained by looking at the image number using the LIST property. Unfortunately this technique has two main drawbacks:

  • The code for detecting the mouse clicks can be complex, and when added to the image manipulation code itself the intent of the code can become obscured.
  • The images themselves must be maintained manually and updated to match the current Windows visual styling.

In OpenInsight v10 checkbox items are supported “natively” so that the control itself knows which items are “checked” and exposes the properties described below to support this. This results in less coding and a much cleaner program. 

The CHECKBOXES property

This is a simple boolean property that can be set in the Form Designer or at runtime. Setting it to TRUE$ ensures that all items in the control are drawn with a checkbox – this is all that needs to be done to use checkbox items.

The CHECKED property

This property allows you to get or set the checked state of one or more items using an @fm-delimited dynamic array of boolean flags.

// Set the second and fourth items in the LISTBOX to checked, ensure the
// third item is NOT checked.

CheckedItems = Get_Property( CtrlEntID, "CHECKED" )
CheckedItems<2> = TRUE$
CheckedItems<3> = FALSE$
CheckedItems<4> = TRUE$

Call Set_Property_Only( CtrlEntID, "CHECKED", CheckedItems )

The CHECKED property may also be used with the index parameter to get or set the state of a single item at a time:

// Set the ninth item to checked, and uncheck the tenth item
Call Set_Property_Only( CtrlEntID, "CHECKED", TRUE$, 9 )
Call Set_Property_Only( CtrlEntID, "CHECKED", FALSE$, 10 )

The CHECKEDX property

This property is similar to the CHECKED property but only applies to TREELISTBOX controls, and gets or sets the checked state for all items in the fully expanded list. 

CHECKEDLIST property

This property returns an @fm-delimited dynamic array of item indexes that have been checked. This is an optimization property so that you don’t have to iterate over the CHECKED property to find out what has been checked.

AllCheckedItems = Get_Property( CtrlEntID, "CHECKEDLIST" )

CheckedCount = FieldCount( AllCheckedItems, @Fm )
For N = 1 To CheckedCount
 CheckedItemNo = AllCheckedItems<N>
Next

CHECKEDLISTTEXT property

This property is similar to the CHECKEDLIST property except that it returns an @fm-delimited dynamic array of text for the checked items rather than their index.

AllCheckedItemsText = Get_Property( CtrlEntID, "CHECKEDLISTTEXT" )

CheckedCount = FieldCount( AllCheckedItemsText, @Fm )
For N = 1 To CheckedCount
 CheckedItemText = AllCheckedItemsText<N>
Next

Conclusion

So that wraps up this short post on checkbox items – hopefully you’ll find them much easier to use in your v10 applications.

Bonus Trivia

The CHECKED property name is a synonym for the original OpenInsight CHECK property name, and you may use either as it suits you – Here at Revelation we prefer to use CHECKED as it feels more natural. Note that this convention applies to other controls like the CHECKBOX control too.

WEBVIEW object documentation

First released with OpenInsight v10.2, the WEBVIEW object is a control that wraps the Microsoft WebView2 Edge Browser control and allows you to embed web technologies (HTML, CSS and JavaScript) in your OpenInsight forms.

This is just a quick post to let you know that the full documentation has been uploaded and can be found here:

   495 – WEBVIEW object.pdf

Migration tool updates in OpenInsight 10.2.1

Due to a significant rise in OpenInsight migrations in the past few months and the resulting feedback, we’ve fixed several bugs in the migration tool for the next release and we’ve also made one major change which we’ll describe here.

The previous migration tool post had a small note at the end called “Bonus Trivia – a quick note on migrating data” in which we recommended ignoring the option to move or copy your data tables with the tool and do it manually instead. This is still the preferred course of action, but the tool has been updated to offer more useful functionality instead: it now has the ability attach the same list of tables as your v9 system but at a different location, which should save you time when migrating an application with a large number of tables.

Attaching tables in the migration tool

OpenInsight v10.2.1 Migration Tool showing new "attach tables" option
Migration Tool Start Page

If you are familiar with previous versions of the tool you will see the following changes have been made:

  • The Move and Copy Table actions have been removed from the list of Actions
  • The “Attach” action has been renamed to “Attach Original”. This attaches the tables at their existing location as defined in your v9 application DBT file.
  • An “Attach New” action has been added. This attaches the same list of tables as the v9 application but at a different location instead. When you select this option you must specify the location in the “New Location” column.
  • A “Save database definition” check box has been added. This is enabled when you have selected at least one of the “Attach Original” or “Attach New” actions.

So, the recommended course of action for handling your tables when migrating your application for the first time is to:

  1. Move or copy your existing data tables to a new location if you wish.
  2. If your tables have been moved/copied then specify the “Attach New” action for each affected data volume and enter the new location.
  3. If your tables have not been moved then choose the “Attach Original” action instead.
  4. Check the “Save database definition” check box.

On subsequent re-runs of the tool you may simply select the “Ignore” action for your data volumes.

Hopefully this update will make migrating systems with many tables much easier for you.