First released with OpenInsight v10.2, the WEBVIEW object is a control that wraps the Microsoft WebView2 Edge Browser control and allows you to embed web technologies (HTML, CSS and JavaScript) in your OpenInsight forms.
This is just a quick post to let you know that the full documentation has been uploaded and can be found here:
OpenInsight 10.2 adds a new event called CELLPOSCHANGED to the EDITTABLE control. This is effectively the same as the normal POSCHANGED event but with the addition of an extra parameter called “ContextFlags” that provides more information on why the event was raised.
ContextFlags is a simple bitmask integer that contains the following flags:
Bit Flag Value
Description
0x00000001
If set then the cell position was changed via a keystroke.
0x00000002
If set then the cell position was changed via the mouse.
Equates for these flags can be found in the PS_EDITTABLE_EQUATES insert record:
Equ PS_EDT_CTF_NONE$         To 0x00000000;
Equ PS_EDT_CTF_KEYSTROKE$    To 0x00000001;
Equ PS_EDT_CTF_MOUSECLICK$   To 0x00000002;
Example – testing to see if the position (CARETPOS) was changed via a mouse click:
$Insert PS_EditTable_Equates

If BitAnd( ContextFlags, PS_EDT_CTF_MOUSECLICK$ ) Then
   // CARETPOS was changed by using the mouse.
   ...
End
Notes on using the CELLPOSCHANGED event
The default promoted system CELLPOSCHANGED event handler performs the same processing as the default promoted system POSCHANGED event handler (i.e. data validation and required checking etc).
If a CELLPOSCHANGED event handler is defined by the developer then a standard POSCHANGED event will not be raised.
To preserve backwards compatibility with existing applications the default promoted system CELLPOSCHANGED event will not be compiled into a control if there is no CELLPOSCHANGED quick event handler. This is to ensure that POSCHANGED is always executed if CELLPOSCHANGED has not been explicitly set for a control by the developer.
CELLPOSCHANGED is available in OpenInsight 10.2 from the Beta 3 release onwards.
One of the new features that was added to the ListBox and TreeListBox controls in version 10 was the ability to use “in-place” editing on the items in the same manner as the Windows Explorer when you press “F2” or double-click an item. If you’ve done any work with the OpenInsight Menu Designers you will have seen this capability in action.
In-place editing for an item
The READONLY property
Enabling in-place editing is as simple as setting the READONLY property to False – once you’ve done that the user can press “F2” while using the control and edit the text of the currently selected item. Pressing “Enter” when editing will update the item text (as will losing focus or selecting another item), while pressing “Esc” will abandon the changes. Obviously that’s a very simple take on the topic and hardly worth a blog post in and of itself, so next we’ll take a look at some of the properties, methods and events that you can use to tailor the editing process.
The EDITING property
This is a simple boolean property that returns TRUE$ if an item is being edited.
The EDITORHANDLE property
This property returns the HANDLE of the editor control if an item is being edited.
The EDITKEY property
By default, hitting “F2” on an item puts the control into “edit mode”, just like the Windows Explorer. However, if you wish to change this then you may use the EDITKEY property to select another key instead. The edit key is a Windows virtual key code and constants for these codes can be found in the MSWIN_VIRTUALKEY_EQUATES insert record.
The EDITOPTIONS property
This property allows you to fine-tune some of the validation options for the editor:
TextCase – Specifies if the text entered is lower-case only, upper-case only or mixed (See the EDITLINE TEXTCASE property for more details).
ValidChars – Specifies which characters may be entered into the editor (See the EDITLINE VALIDCHARS property for more details).
MaxLimit – Specifies the maximum number of characters that may be entered into the editor (See the EDITLINE LIMIT property for more details).
At runtime this property is an @fm-delimited array – constants for use with this property can be found in the PS_LISTBOX_EQUATES insert record.
The INCLUDEEDITORTEXT property
By default getting item text from the ListBox (e.g. via the LIST property) will include the text from an item currently being edited, even if that edited text has not yet been saved. Setting this property to FALSE$ ensures that the returned item text ignores the value in the editor instead.
The BEGINEDIT method
This method allows you to programmatically put the ListBox into edit mode, as if the user had pressed “F2” (or whatever value the EDITKEY property is set to). You may specify the index of the item to edit, otherwise it will default to the current item.
This method allows you to programmatically stop the item editing process, optionally allowing any changes to be accepted as if the “Enter” key had been pressed (the default is to reject any changes as if the “Esc” key had been pressed).
This event is raised when the item is updated via the editor, i.e. the user hit the “Enter” key, the control lost the focus, or the EDITEDIT method was used with the bUpdate parameter set to TRUE$. The event passes the index of the item that has changed as well as the old and new data:
This event is raised when an item leaves edit mode without being updated, i.e. the user hit the “Esc” key or the EDITEDIT method was used with the bUpdate parameter set to FALSE$. The event passes the index of the item that was being edited:
So that wraps up this short post on ListBox editing – we’re sure that you’ll find many useful ways of implementing this new feature when expanding your application’s functionality.
As you can see, setting up the control is fairly easy, but the bulk of the work needs to be done in the HTTPREQUEST event where you examine the contents of the request and return the appropriate content.
Type of control firing the event – this is always “HTTPSERVER”
RequestID
Unique identifier for returning a response to the client – this is used with the various “SETRESPONSE” methods that set response data.
RequestHeaders
An @FM delimited dynamic array of data that describes the request. The format is similar to the HTTPRequest argument used in OECGI programming. The full format is described in the PS_HTTPSERVER_EQUATES insert record.
As mentioned above, the RequestHeaders parameter describes the details of the request using a format similar to the format used in OECGI programming. There are some differences that are worth highlighting however:
For a GET request the query values are already parsed into their own fields (<37> and <38>) as an associated multi-value pair. They are not found unparsed in field <1> as per OECGI.
For a POST or PUT request the content is obtained using the GETREQUESTCONTENT method (see below) – it is not passed in the RequestHeaders variable.
Cookies are already parsed into their own fields (<39> and <40>) as an associated multi-value pair.
Headers are already parsed into their own fields (<35> and <36>) as an associated multi-value pair.
Note that out of the box we do not enforce any restrictions or framework on how you handle the request – compare this to classic OECGI programming where the “PathInfo” field is used to determine which “INET_” procedure is executed to fulfill it (via the RUN_INET_REQUEST stored procedure) There is no such requirement with the HTTPSERVER control, and you may create your own framework if you wish (although see the note on RTI_RUN_HTTPSERVER_REQUEST below).
Returning a response
There are several methods described below that you may use to process the content that you return to the client.
GETREQUESTCONTENT
GETRESPONSECONTENT
GETRESPONSECOOKIE
GETRESPONSEFILE
GETRESPONSEHEADER
GETRESPONSESTATUS
ISPORTINUSE
SETRESPONSECONTENT
SETRESPONSECOOKIE
SETRESPONSEFILE
SETRESPONSEHEADER
SETRESPONSESTATUS
SENDRESPONSE
Note: With each of these you must use the unique RequestID parameter passed to you in the HTTPREQUEST event.
IPv6 – if TRUE$ then check the IPv6 bindings, otherwise check the IPv4 bindings
SENDRESPONSE method
Sends the response back to the client. This method should be called when you have finished setting the response details (Note that this is called by the promoted system HTTPREQUEST handler in case you forgot to do it in your own code!).
CookieValue is an @fm-delimited array formatted as follows:
    <1> Value
    <2> Path
    <3> Domain
    <4> Expires (internal date format)
    <5> Max Age (seconds)
    <6> Secure  (TRUE$/FALSE$)
    <7> HttpOnly (TRUE$/FALSE$)
    <8> SameSite
SETRESPONSEFILE method
If you have a file that contains the content you wish to return then you should use this method to let the server read the file and return it to the client itself. This offers better performance than reading the contents via Basic+ and using the SETRESPONSECONTENT method as it avoids any unnecessary copying of data.
As part of version 10.2 we have included a sample HTTPREQUEST event handler called RTI_RUN_HTTPSERVER_REQUEST which you can examine and copy for your own applications if you wish. It emulates the core behavior of the OECGI RUN_INET_REQUEST handler in that it uses the “PathInfo” field to determine the stored procedure to fulfill the request. In this case it looks for a matching procedure that has the prefix “HTTPSVR_” and we have included a couple of example “HTTPSVR_” procedures for you to review as well.
Conclusion
With the addition of the HTTPSERVER control it is now possible to provide HTML content directly from your application, and also provide a means of web-development directly from your desktop without necessarily needing to install a dedicated web-server like IIS.
It is also a good solution for when you want to provide local HTML content in your application’s user-interface via an embedded browser control, because it can avoid the usual security restrictions that browsers enforce for such scenarios.
With the release of version 10.1 a new control type called DIRWATCHER (“Directory Watcher”) has been added to OpenInsight. This is a fairly simple control which allows you to monitor one or more directories on your system and then receive notifications when the contents are changed.
Using the control is very straightforward:
Use the WATCHDIR method to add a directory to monitor for changes.
Handle the CHANGED event to receive notifications of directory changes.
Use the STOP method to stop monitoring directories.
We’ll take a quick look at each of these methods and events below along with a couple of important properties:
The WATCHDIR method
This method allows you to specify a directory to monitor along with some optional flags. It may be called multiple times to watch more than one directory.
The flag values are specified in the MSWIN_FILENOTIFY_EQUATES insert record,
This method returns TRUE$ if successful, or FALSE$ otherwise.
The STOP method
This method stops the control monitoring its specified directories.
bSuccess = Exec_Method( CtrlEntID, "STOP" )
This method returns TRUE$ if successful, or FALSE$ otherwise.
(Note – to resume directory monitoring after the STOP method has been called the WATCHDIR method(s) must be executed again).
The CHANGED event
This event is raised when changes have been detected in the monitored directories.
bForward = CHANGED( NewData )
This event passes a single parameter called NewData which contains an @vm-delimited list of changed items (i.e. notifications). Each item in the list comprises an “action code” and the name and path of the affected file, delimited by an @svm.
Action codes are defined in the MSWIN_FILENOTIFY_EQUATES insert record like so:
   equ FILE_ACTION_ADDED$               to 0x00000001
   equ FILE_ACTION_REMOVED$             to 0x00000002
   equ FILE_ACTION_MODIFIED$            to 0x00000003
   equ FILE_ACTION_RENAMED_OLD_NAME$    to 0x00000004
   equ FILE_ACTION_RENAMED_NEW_NAME$    to 0x00000005
Remarks
If a monitored directory experiences a high volume of changes (such as copying or removing thousands of files) it could generate a correspondingly high number of CHANGED events, which in turn could produce an adverse affect on your application and slow it down. In order to deal with this potential issue it is possible to “bundle up” multiple notifications with the NOTIFYTHRESHOLD property into a single CHANGED event so they may be processed more efficiently.
The NOTIFYTHRESHOLD property
The NOTIFYTHRESHOLD property is an integer that specifies the maximum number of notifications that should be bundled before a CHANGED event is raised.
The NOTIFYTIMER property is an integer that specifies the number of milliseconds before a CHANGED event is raised if the NOTIFYTHRESHOLD property value is not met.
If the NOTIFYTHRESHOLD property is set to a value greater than 1 then the control will try to bundle that number of notifications together before raising a CHANGED event. However, when this is set to a high value it is possible that the threshold may not be reached in a timely fashion and the CHANGED event not actually raised.
E.g. If the NOTIFYTHRESHOLD is set to 1000, and only 200 notifications are received then the CHANGED event would not be raised.
To prevent this problem the NOTIFYTIMER property may be used to specify the amount of time after receiving the last notification before a CHANGED event is raised even if the NOTIFYTHRESHOLD is not met.
E.g. in the example above, if the control had a NOTIFYTIMER of 50, then a CHANGED event would be raised 50ms after the last notification (200) was received, even though the NOTIFYTHRESHOLD of 1000 has not actually been met.
Developer Notes
The DIRWATCHER control is intended as a “non-visual” control and should probably be hidden at runtime in your own applications. However, it is actually derived from a normal STATIC control so all of the properties and methods that apply to a STATIC apply to the DIRWATCHER as well, and you may use them as normal if you wish.
When executing a long running process in a desktop environment, such as selecting records from a large table, it is important for the user to be able to interact with the application even though it is busy. A common example of this is displaying a dialog box that shows the progress of an operation and allowing the user to cancel it if they wish. Failure to provide this ability generally results in user frustration, or causes the dreaded “Window Ghosting” effect where Windows changes a form’s caption to “Not Responding” (this is never a good look, and usually ends in a quick visit to the Task Manager to kill the application).
In order to avoid this problem we have to allow the application to check for user interaction, a process usually referred to as “yielding” (hence the awful title of this post), and this time we’ll take a look at the various options available to accomplish this and the differences between them. Before we go any further however, here’s a little background information on how OpenInsight runs beneath the hood so that you can appreciate how messages and events are handled.
Under the hood
OpenInsight.exe (aka. the “Presentation Server”, or “PS”) has a main thread (the “UI thread”) with a Windows message loop that manages all of the forms and controls, and it also has an internal “event queue” for storing Basic+ events that need to be executed. The PS also creates an instance of the RevEngine virtual machine (“the engine”), which has its own thread (the “engine thread”) with a Windows message loop, and is responsible for executing Basic+ code.
When the PS needs to execute an event it passes it to the engine directly if possible, otherwise it adds the details to the event queue and then posts a message to itself so the queue can be checked and processed when the engine is not busy. When the engine receives the event data it is executed on the engine thread. Stored procedures such as Get_Property, Set_Property, and Exec_Method provide a way for the Basic+ event to communicate back to the PS to interact with the user interface controls and forms during its execution.
The key point to note here is that Basic+ event code runs in a different thread to the UI, so while the engine thread is processing the event, the UI thread is basically waiting for it to finish, and this means that it may or may not get chance to process it’s own message loop. This is where the problems can begin, and why the need for a yielding ability, because:
The engine thread needs to be paused or interrupted in some fashion so that the UI thread can check and process its own Windows message queue for things like mouse, keyboard and paint messages. If this queue is not checked at least every 10 seconds then Windows assumes that the PS is hung and the “Not Responding” captions are shown on the application forms.
While the engine is processing an event, the PS cannot pass it a new one, so it is added to the event queue. If we are waiting to process some Basic+ event code like a button CLICK to cancel the current operation, then we need some way for this to be retrieved and executed before the current event is finished.
So, now we know why “window ghosting” happens we can take a look at the various options to deal with it.
Options for yielding
MSWin_Sleep stored procedure
This is a direct call to the Windows API Sleep function, and it puts the engine thread to sleep for at least the specified number of milliseconds. However, while calling this will allow Windows to schedule another thread to run, there’s no guarantee that this would be the UI thread, so it’s not really a good solution.
WinYield stored procedure
This is a simple wrapper around the Windows API Sleep function, with a sleep-time of 10ms. This suffers from the same disadvantages discussed for MSWin_Sleep above (This function remains for backwards compatibility with early versions of of OI and Windows).
MSWin_SwitchToThread stored procedure
This is a direct call to the Windows API SwitchToThread function which forces Windows to schedule another thread for execution. Like MSWin_Sleep and WinYield there’s no guarantee that this would cause the UI thread to run, so again it’s not a great solution.
SYSTEM PROCESSEVENTS method (a.k.a Yield stored procedure)
This is a new method in version 10.1 that performs two tasks that solve the problem:
It explicitly tells the UI thread to process its message queue (which will avoid the “ghosting” issue), and
It allows the UI thread to process the event queue so waiting events can be executed as well.
One possible drawback here is that waiting events are also processed, and this might not be a desirable outcome depending on what you are doing. In this case there is another method called PROCESSWINMGS that should be used instead.
(FYI – The PROCESSEVENTS method is essentially a wrapper around the venerable Yield() stored procedure, but allows the same functionality to be called via the standard object-based method API rather than as a “flat” function. Yield() itself is still and will be fully supported in the product).
SYSTEM PROCESSWINMSGS method
This is a new method in version 10.1 that tells the PS to process it’s Windows message queue but it does not process any Basic+ events, i.e. it prevents the “ghosting” effect but does not cause events to fire before your application is ready for them.
Conclusion
Version 10.1 has added more functionality to help you avoid the dreaded “Not Responding” message via the PROCESSWINMGS and PROCESSEVENTS methods, and hopefully, armed with the information above, this will help you to write better integrated desktop-applications.
We recently noticed a new bug in the IDE where a dialog that hadn’t been updated for quite some time suddenly started misbehaving: it would appear at the wrong coordinates (0,0), and then jump to the proper ones.
At first glance this this looked like a classic case of creating the dialog in a visible state, and then moving it during the CREATE event, but checking the dialog properties in the Form Designer showed that the dialog’s Visible property was “Hidden”, so this wasn’t the source of the problem.
Stepping through the CREATE event in the debugger showed that the dialog was indeed created hidden, but then became visible during an RList() call that performed a SELECT statement, ergo RList() was allowing some queued event code to execute (probably from an internal call to the Yield() procedure) and that was changing the dialog’s VISIBLE property.
Checking the other events revealed that the SIZE event contained the following code:
Call Set_Property( @Window, "REDRAW", FALSE$ )

// Move some controls around

Call Set_Property( @Window, "REDRAW", TRUE$ )
The REDRAW property works by toggling an object’s WS_VISIBLE style bit – when set to FALSE$ the style bit is removed but the object is not redrawn. When set to TRUE$ the object is marked as visible and redrawn.
So, putting all this together: creating the dialog generated a queued SIZE event, which under normal circumstances would run after the CREATE event. However, the Yield() call in RList() executed the SIZE event before the dialog was ready to be shown, and the REDRAW operation made the dialog visible before the CREATE event had moved it to the correct position.
The fix for this was to ensure that the REDRAW property wasn’t set to TRUE$ if it’s original value wasn’t TRUE$, like so:
bRedraw = Set_Property( @Window, "REDRAW", FALSE$ )

// Move some controls around

If bRedraw Then
   Call Set_Property( @Window, "REDRAW", TRUE$ )
End
Conclusion
Always protect calls to the REDRAW property by checking its state before you set it, and then only turn it back on again if it was set to TRUE$ originally.
Calling Yield() can cause events to run out of the normal sequence, and you should be aware of this when writing your application.
In a recent post we provided a preview of the OpenInsight IMAGE API documentation for the upcoming release of version 10.1. As that proved quite popular we thought we’d provide some more, this time dealing with the Common GUI API (i.e. the basic interface that virtually every GUI object supports) and the WINDOW object API – two core areas of OI GUI programming.
Methods, not Events
One thing you may notice as you look through these documents is the addition of many new methods, such as SHOWOPTIONS or QBFCLOSESESSION – this is an attempt to tidy up the API into a more logical and coherent format that is a better fit for an object-based interface.
As we went through the product in order to document it, it became very apparent that there were many instances where events were being used to mimic methods, such as sending a WRITE event to save the data in a form, or sending a CLICK event to simulate a button click and so on. In object-based terminology this sort of operation would be performed by a method, which is a directive that performs an action – the event is a notification in response to that action. So, for example, you would call a “write” method to save your data and the system would raise a “write” event so you could deal with it.
Of course, this distinction will probably not bother many developers – just API purists like myself, but this does have another advantage if you like to use Object Notation Syntax (I do) – you can now perform actions such as reading and writing form data by using the”->” notation, whereas before you would have to use the Send_Event stored procedure which essentially breaks the object-based paradigm.
So instead of:
Call Send_Event( @Window, "WRITE" )
you would use the form’s WRITEROW method instead:
@@Window->WriteRow( "" )
which is a more natural fit for this style of programming.
(It is also easier to explain to new OI programmers who are used to other object-based languages and environments where everything is properties, methods and events).
Methods, not Stored Procedures
This brings us finally onto the topic of Stored Procedures and the object API, where several of these also fulfill the role of methods. For example, take the venerable Msg stored procedure used to display a message box for a parent form – a different way of treating this would be to have a SHOWMESSAGE method for the parent form rather than using a “raw” Msg call. Likewise for starting a new form: instead of using the raw Start_Window procedure, the SYSTEM and WINDOW objects now support a STARTFORM method instead.
Of course, none of this changes your existing code, nor is it enforced, it’s just something you can use if and when you wish to. However, even if my API pedantry hasn’t persuaded you to change your coding style, some of the new methods are worth investigating as they provide a better opportunity for us to extend the product’s functionality further – take a look at the WINDOW READROW and WRITEROW methods for an example of this – they support new features that we couldn’t do with just sending events.
In any case, here are the links – hopefully some light reading for your weekend!
As I’m sure many of you will know, when you’re working with object oriented languages like C++, JavaScript and VB , the compiler provides you with a keyword (e.g. ‘this’ or ‘Me’) that you can use as a reference to the specific instance of an object under which the code is currently executing. This provides a neat and easy way to access details about the current context when responding to events and methods, and generally improves the clarity of the code.
However, a ‘this/Me’ construct is not something we’ve really had in OpenInsight, because when we write our event handling code the system explicitly passes the name of the current object as the first argument called “CtrlEntID”, so in our event scripts we can use that instead. Obviously this works well enough, but over the years I’ve found some situations where it would be nice to go a little further:
In many of the OpenInsight training courses I’ve run, one of the most common questions I get asked from new students is: “what is the equivalent of ‘this’, or “where is the ‘Me’ keyword”? Having some sort of “this/me” construct in Basic+ would make learning the system much easier for them, and the name “CtrlEntID” hardly seems slick!
With the trend away from using event scripts and moving code into commuter modules the name “CtrlEntID” is no longer enforced – it can be named anything the author of the commuter module wishes, leading to a possible loss of clarity (for example in my own commuter modules I always use the variable name “Object” in place of “CtrlEntID”, but that’s just my convention, and is something subsequent code maintainers must adopt).
As code becomes deeper and more nested passing the “CtrlEntID” variable to each subsequent procedure as an argument becomes more of a chore, and I’ve seen global variables used in place of this which can lead to code that is difficult to maintain.
Of course, we do have the “@Window” system variable, which contains the name of the parent WINDOW instance for the currently executing context, so we’re nearly there, but unfortunately that’s not the same as ‘this/Me’ unless you’re responding to a WINDOW event.
So, with the release of version 10.0.8 we’ve now gone the whole way and added a new system variable called:
@Self
When an event is triggered this variable contains the full name of the control instance under which the event code is executing, just like @Window contains the name of the parent WINDOW instance.
E.g:
// Using CtrlEntID
Name = Get_Property( CtrlEntID, "TEXT" )

// Using @Self
Name = Get_Property( @Self, "TEXT" )
We’ve also included two more system variable names as synonyms for @Self as well:
@This @Me
You may use these in place of @Self if you’re more inclined to use names that are familiar from another language (@Self was chosen because it is already referenced in OpenInsight as a pseudo-variable name when defining QuickEvents).
Hopefully, moving forward, this small addition may help to maintain a cleaner code-base and make teaching new students a little easier.
OpenInsight 10 introduced a couple of changes to how QuickEvents are processed that you may or may not be aware of, so in this post we’ll take a look at them so you can see how they work.
1) QuickEvent arguments are now passed by reference
In previous versions of OpenInsight, arguments passed to QuickEvents were duplicated and passed as copies, which meant that if you altered them in your Commuter Module you wouldn’t see the changes in the calling routine. As QuickEvents are normally the last item processed in the event chain this is not something you might actually notice, unless perhaps you were using the Forward_Event() procedure from an Event Script.
Event arguments in version 10 are now passed by reference, which means a calling routine will see any changes you make to them. This is an important point to bear in mind now that it’s possible to alter the order in which QuickEvents are executed in the event chain (see the “Has Priority” flag section below), so be careful when using those arguments in your Commuter Modules.
2) The new “Has Priority” flag
Under normal circumstances QuickEvents are always the last handlers processed in the event chain which normally looks something like this:
Control-specific Event Script
Promoted Events
“System” Promoted Events
QuickEvent
For most purposes this works fine, but there are occasions when you might need to step in front of the system code to do some pre-processing on events such as READ and WRITE, and unfortunately this usually involves writing an Event Script (or a Promoted Event perhaps) to contain your pre-system code like so:
E.g. Sample pre-WRITE Event Script
Function WRITE( CtrlEntID, CtrlClassID )

   $Insert Logical
   WriteOK = TRUE$

   // Check if we can save the record - if not then WriteOK will be
   // Set to FALSE$ which will stop the event chain
   GoSub CheckOKToWrite

Return WriteOK
However, this removes one of the main advantages of using Commuter Modules in the first place: i.e. the ability to keep all of your code in one place. To alleviate this you could just place your pre-WRITE code in your Commuter Module and call it directly :
Function WRITE( CtrlEntID, CtrlClassID )

   $Insert Logical

   // (Assume Commuter Module ID is the same name as the form with an
   // "_EVENTS" suffix)
   CommID  = @window[1,"*"] : "_EVENTS"
   WriteOK = Function( @CommID( CtrlEntID, "PREWRITE" ) )

Return WriteOK
But then you’re still having to create the Event Script, so you still have a fragment that you need to track.
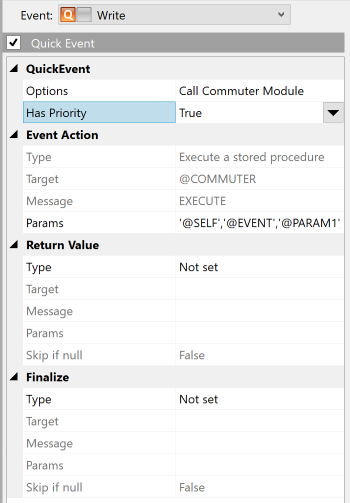
With version 10 we added a new flag to the QuickEvent handler called “Has Priority”:
“Has Priority” QuickEvent
If you set this to True the event chain is changed to this instead:
Control-specific Event Script
QuickEvent
Promoted Events
“System” Promoted Events
Which means that you can place something like a WRITE event handler in the Commuter Module, do your pre-processing, and return TRUE$ to allow the system to continue the chain, or use Forward_Event() if you need to do some post processing as well.
Points to note:
If you call Set_EventStatus( TRUE$ ) in your Commuter Module QuickEvent handler the event chain is stopped.
If you return FALSE$ (“0”) from your Commuter Module QuickEvent handler (and it has to be “0”, not null) the event chain is stopped.
Hopefully this removes the need for Event Scripts for writing pre-system events and should help to keep your applications a little more streamlined and organized, and preserve the benefits of using Commuter Modules.