Due to a significant rise in OpenInsight migrations in the past few months and the resulting feedback, we’ve fixed several bugs in the migration tool for the next release and we’ve also made one major change which we’ll describe here.
The previous migration tool post had a small note at the end called “Bonus Trivia – a quick note on migrating data” in which we recommended ignoring the option to move or copy your data tables with the tool and do it manually instead. This is still the preferred course of action, but the tool has been updated to offer more useful functionality instead: it now has the ability attach the same list of tables as your v9 system but at a different location, which should save you time when migrating an application with a large number of tables.
Attaching tables in the migration tool
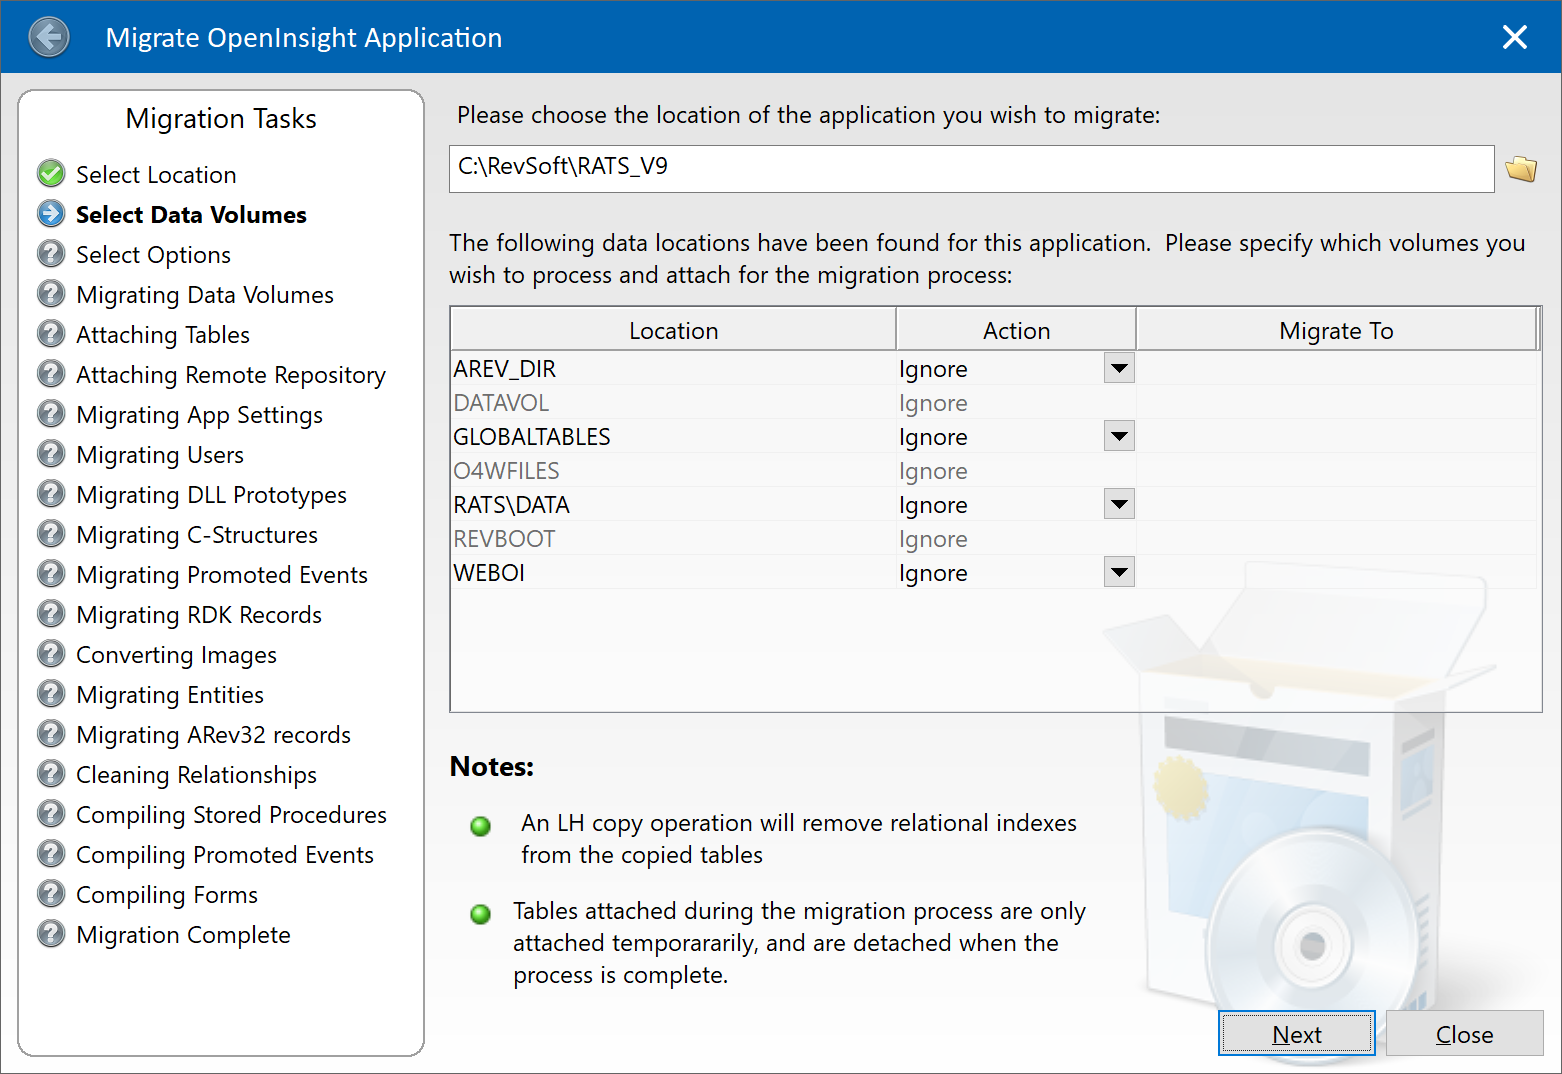
Migration Tool Start Page
If you are familiar with previous versions of the tool you will see the following changes have been made:
The Move and Copy Table actions have been removed from the list of Actions
The “Attach” action has been renamed to “Attach Original”. This attaches the tables at their existing location as defined in your v9 application DBT file.
An “Attach New” action has been added. This attaches the same list of tables as the v9 application but at a different location instead. When you select this option you must specify the location in the “New Location” column.
A “Save database definition” check box has been added. This is enabled when you have selected at least one of the “Attach Original” or “Attach New” actions.
So, the recommended course of action for handling your tables when migrating your application for the first time is to:
Move or copy your existing data tables to a new location if you wish.
If your tables have been moved/copied then specify the “Attach New” action for each affected data volume and enter the new location.
If your tables have not been moved then choose the “Attach Original” action instead.
Check the “Save database definition” check box.
On subsequent re-runs of the tool you may simply select the “Ignore” action for your data volumes.
Hopefully this update will make migrating systems with many tables much easier for you.
Based on user feedback (and our own experience) version 10.2 includes the following new updates for the OpenInsight migration process that we think you’ll find invaluable when moving your applications:
The ability to choose individual migration tasks
The ability to select individual entities
The ability to migrate SYSPROG components
We’ll take a look at each of these features below, along with a small note on “migrating” your data.
Task Selection
In previous releases the Migration Tool had a fixed set of tasks to perform which it did in sequence. In this release you may now specify which tasks you wish to execute instead, which might save some time if you have to repeat the migration process more than once (a common requirement if needing to keep a version 9 application synchronized with version 10 during upgrade development).
Migration Tool Selection Page
By default all tasks are selected, but you may deselect any that you don’t wish to run.
Task
Description
Migrate App Settings
Migrates information from the SYSAPPS record. Migrates database environment settings. Migrates custom event (CFG_EVENTS) settings.
Migrate Users
Migrates user details into the SYSUSERS table.
Migrate DLL Prototypes
Migrates “DLL_” records in SYSPROCS to DLLPROTOTYPE entities.
Migrate C-Structures
Migrates “STRUCT_” records in SYSOBJ to DLLSTRUCT entities.
Migrate Promoted Events
Migrates promoted event records in SYSREPOSEVENTS/EXES to PROMOTEDEVENT/EXE entities.
Migrate RDK records
Migrates SYSREPOSVIEWS/RELEASES records to REPVIEW/RELEASE entities.
Migrate Entities
Migrates application entities. Note that these can now be specified individually if desired (see below).
Migrate Arev32 records
Migrates Arev32-specific records in SYSENV. Migrates Arev32 records from SYSPRINTERS.
Clean Relationships
Removes invalid relationships (Using/Used By).
Compile Stored Procedures
Compiles migrated stored procedures.
Compile Promoted Events
Compiles migrated promoted events.
Compile Forms
Compiles migrated forms.
Migration Tool Tasks
Entity Selection
If you choose the “Migrate Entities” task then you now have the option to select individual entities to migrate (If you don’t select any then all entities in the v9 application will be migrated).
To select individual entities right-click on the “Selected Entities” control and choose “Select Entities” from the menu, or click the “…” options button in the top-right of the control’s header:
Selected Entities option button
You may now use the “Select Repository Entities” dialog to choose which entities you wish to migrate:
Select Repository Entities dialog
As you can see there are quite a few options you can use to find the entities you wish to migrate – these options make a “repository filter” that is used to create a list to choose from:
Option
Description
Filter ID
Name of a saved filter (REPFILTER entity). Choosing a filter will load the other selection criteria controls in this dialog with the saved filter details.
View ID
Name of a saved Repository View (REPVIEW entity). If specified, the list of entities in this View is used as a starting point for the filter when it executes.
Entity ID
If specified only entities matching this name will be selected. The standard ‘[]’,’]’ and ‘[‘ RList-style syntax for “containing”, “starting with” and “ending with” is respected.
Date From
If specified only entities updated from this date will be included. This option supports a “nD” syntax where “n” is the number of days since the current date. E.g. to select entities updated since the previous day specify “1D”, for entities updated in the last week specify “7D” and so on.
Date To
If specified do not include entities after this date. This option supports the same “nD” syntax as the “Date From” option.
Updated By
If specified then only entities updated by the specified user(s) are returned. This option may contain a “,” delimited list for matching against multiple users.
Filter Options
Only entities matching the checked options will be returned. Note that for a migration operation the “Show Inherited Entities” checkbox is always disabled (This dialog is used elsewhere in the system to select repository entities, so it can be enabled in such scenarios).
Filter By Types
Allows you to choose specific entity types and classes to include. If blank then all types and classes are included in the search. Click the “…” options button in the top right corner of the control, or right-click to use the context menu to launch a dialog to select the types and classes.
Filter By SELECT
This option allows you to enter an RLIST SELECT statement against the SYSREPOS table that will be used to filter the entities.
Save Filter
Click this button to save the filter criteria for future re-use (stored as a REPFILTER entity in the repository).
Apply Filter
Click this button to execute the filter criteria and load a list of matching entities into the “Available” controls below. If you have not entered any criteria then all entities in the v9 application will be selected.
Filter Options
Once you have applied your filter the “Available Types” control is populated – selecting a Type populates the “Available Entities” control where you can select the items that you wish to migrate. Use the “>” and “>>” buttons to add them to the “Selected Entities” control on the right, or the “<” and “<<” buttons to remove them.
Selecting Entities in the dialog
Things to note:
As items in the “Available Entities” control are selected, the list of items that they use is shown in the “Related (Used By) Entities” control below. These can also be selected if you wish.
Each of the “Available” and “Selected” controls have context menus and “…” options buttons (top-right corner).
If the “Auto-Add Executable” option is checked when you add entities to the “Selected Entities” control then any executable versions of the entity (e.g. STPROCEXE, OIWINEXE etc) are also added.
If the “Auto-Add Source” option is checked when you add entities to the “Selected Entities” control then any source versions of an executable entity (e.g. STPROC, OIWIN etc) are also added.
Clicking “OK” takes you back to the main migration form where you will see the list of entities selected. From there you may click the “Next” button to start the migration process.
(Note that the task and entity selections are saved automatically between migrations so that you may use them again if you wish.)
Migrating items from SYSPROG
Previous versions of the migration tool prevented migrating any entities from the SYSPROG application. This was to preserve the system from being damaged in case older v9 entities overwrote the v10 ones, thereby rendering it unusable.
With this release you may run the migration form from your SYSPROG application with the following restrictions:
You may only execute the following tasks:
Migrate RDK Records
Migrate Entities – You must specify the entities to migrate – you cannot migrate “All Entities”!
Migrate Arev32 Records
Clean Relationships
Compile Stored Procedures
Compile Forms
Migrating SYSPROG options
Bonus Trivia – a quick note on migrating data
The migration process begins with creating a new application in version 10 and then executing a form called RTI_MIGRATE_V9_TO_V10, which guides you through the steps necessary to move your application from version 9.
Migration Tool Start Page
At this point you select the location of the application you are migrating from, after which you see the data volumes that are attached in it. There are options for the data to be “migrated”, but in my experience it is best to move and attach the data you want for your application before you attempt the migration rather than use the facility here. The migration process does not change your data at all so there is no real advantage to using this facility (it is basically provided as a convenience), and in fact, if you are moving tables containing relational indexes they will be removed. It is far easier to copy/move and attach the tables yourself using the Database ToolPanel before you get here.
More Bonus Trivia – Sharing index data between v9 and v10
While on the topic of migrating data it is also worth taking a look at the end of this blog post by Sprezzatura if you intend to share your tables between v9 and v10 systems – you must make sure that you run the indexing system in a v9 compatible format:
The migration tool has been significantly improved for the version 10.2 release and we’re sure you will find it much more helpful when moving your older applications to the latest version of OpenInsight.
One of the most popular “raw” Windows API functions that OpenInsight developers have used over the years is the ShellExecute function, which allows you to launch an application via its filename association, e.g. you can launch Word by using a document file name, or Excel using a spreadsheet filename and so on.
However, because it was never really made an “official” part of the product (it was normally passed on in forums), developers were left to create their own DLL Prototype definitions in order to use it – this gave rise to many variations over the years, many of which were not compatible with others. For example, some use LPCHAR as an argument type, some use LPSTR or LPASTR, whilst others use LPVOID with GetPointer(); some definitions use the “Wide” version of the function, some the “Ansi” version, and there are many different aliases, with or without the “A/W” suffix too. The list goes on.
For OpenInsight 10 we decided that we couldn’t move forward with this as we would run the risk of conflicting with established applications, so we moved all of the DLL Prototypes we used into a new namespace called “MSWIN_” and claimed it as our own. This left developers to bring forward their own DLL prototypes into version 10 as and when needed, and therefore we didn’t supply a “ShellExecute” function as such, though we did supply “MsWin_ShellExecute” instead (see below).
Another decision we took was to try and move away from the need for developers to use raw Windows API function calls as much as possible, as some of them can be complex and require knowledge of C/C++ programming, which is not necessarily a skill set that everyone has the time or desire to learn. Ergo, we moved a lot of functionality into the Presentation Server (PS) and created some Basic+ wrapper functions around others to shield developers from the sometimes gory internals.
(We also chose to use the “W” versions of functions rather than the “A” versions where possible, because these would translate better when in UTF8 mode and remove the need for an extra “A”->”W” conversion in Windows itself.)
So, coming back to ShellExecute, and in light of the above, we have three “official” and supported ways of calling it in OpenInsight 10 as detailed below:
The SYSTEM object SHELLEXEC method
The RTI_ShellExecuteEx stored procedure
The MSWin_ShellExecute DLL Prototype stored procedure
The SYSTEM object SHELLEXEC method
If your program is running in “Event Context”, (i.e. it is executing in response to an event originating from the PS) then you may use the SYSTEM SHELLEXEC method which invokes ShellExecuteW internally.
Name of a form to use as a parent for displaying UI messages.
Operation
No
Operation to be performed; “open”, “edit”, “print” etc.
File
Yes
File to perform the operation on.
Parameters
No
If File is an executable file this argument should specify the command line parameters to pass to it.
WorkingDir
No
The default working directory for the operation. If null the current working directory is used.
ShowCmd
No
Determines how an application is displayed when it is opened (as per the normal VISIBLE property).
The return value is the value returned by ShellExecuteW.
The RTI_ShellExecuteEx method
This stored procedure is a wrapper around the Windows API ShellExecuteExW function (which is used internally by ShellExecuteW itself), and may be used outside of event context – it can also return the handle to any new process it starts as a result of executing the document. As you can see it’s quite similar to the SHELLEXEC method:
Whilst you are free to use one of the methods outlined above, this may not be optimal if you are still sharing code between your existing version 9 application and your new version 10 one. In this case there are a couple of options you could use:
Define your preferred DLL prototype in v10.
Use a wrapper procedure and conditional compilation.
Defining your own prototype
This is probably the easiest option – you simply use the same prototype in v10 that you did in version 9, with the same alias (if any), and this way the code that uses it doesn’t need to be changed. The only downside to this if you’ve used any 32-bit specific data types instead of 32/64-bit safe types like HANDLE (this could happen if you have a really old prototype) – you must ensure that you use types that are 64-bit compliant.
Using conditional compilation
This is a technique we used when writing the initial parts of v10 in a v9 system so our stored procedures would run the correct code depending on the platform they were executing on (it was actually first used to share code between ARev and OI many years ago!).
The v10 Basic+ compiler defines a token called “REVENG64” which is not present in the v9 compiler – this means that you can check for this in your source code with “#ifdef/#ifndef” directives and write code for the different compiler versions.
For example, you could write your own wrapper procedure for ShellExecute that looks something like this:
Compile Function My_ShellExecute( hwnd, verb, file, params, dir, nShow )

#ifdef REVENG64
   // V10 Compiler - use RTI function
   Declare Function RTI_ShellExecuteEx
   RetVal = RTI_ShellExecuteEx( hwnd, verb, file, params, dir, nShow, "" )
#endif

#ifndef REVENG64
   // V9 Compiler - use existing "raw" prototype
   Declare Function ShellExecute
   RetVal = ShellExecute( hwnd, verb, file, params, dir, nShow )
#endif

Return RetVal
And then call My_ShellExecute from your own code.
So, there ends the Saga of ShellExecute … at least for now.