Monthly Archives: September 2022

Migration tool updates in OpenInsight 10.2

Based on user feedback (and our own experience) version 10.2 includes the following new updates for the OpenInsight migration process that we think you’ll find invaluable when moving your applications:

  • The ability to choose individual migration tasks
  • The ability to select individual entities
  • The ability to migrate SYSPROG components

We’ll take a look at each of these features below, along with a small note on “migrating” your data.

Task Selection

In previous releases the Migration Tool had a fixed set of tasks to perform which it did in sequence. In this release you may now specify which tasks you wish to execute instead, which might save some time if you have to repeat the migration process more than once (a common requirement if needing to keep a version 9 application synchronized with version 10 during upgrade development).

Migration Tool Selection Page

By default all tasks are selected, but you may deselect any that you don’t wish to run.

TaskDescription
Migrate App SettingsMigrates information from the SYSAPPS record.
Migrates database environment settings.
Migrates custom event (CFG_EVENTS) settings.
Migrate UsersMigrates user details into the SYSUSERS table.
Migrate DLL PrototypesMigrates “DLL_” records in SYSPROCS to DLLPROTOTYPE entities.
Migrate C-StructuresMigrates “STRUCT_” records in SYSOBJ to DLLSTRUCT entities.
Migrate Promoted EventsMigrates promoted event records in SYSREPOSEVENTS/EXES to PROMOTEDEVENT/EXE entities.
Migrate RDK recordsMigrates SYSREPOSVIEWS/RELEASES records to REPVIEW/RELEASE entities.
Migrate EntitiesMigrates application entities. Note that these can now be specified individually if desired (see below).
Migrate Arev32 recordsMigrates Arev32-specific records in SYSENV.
Migrates Arev32 records from SYSPRINTERS.
Clean RelationshipsRemoves invalid relationships (Using/Used By).
Compile Stored ProceduresCompiles migrated stored procedures.
Compile Promoted EventsCompiles migrated promoted events.
Compile FormsCompiles migrated forms.
Migration Tool Tasks

Entity Selection

If you choose the “Migrate Entities” task then you now have the option to select individual entities to migrate (If you don’t select any then all entities in the v9 application will be migrated).

To select individual entities right-click on the “Selected Entities” control and choose “Select Entities” from the menu, or click the “…” options button in the top-right of the control’s header:

Selected Entities option button

You may now use the “Select Repository Entities” dialog to choose which entities you wish to migrate:

Select Repository Entities dialog

As you can see there are quite a few options you can use to find the entities you wish to migrate – these options make a “repository filter” that is used to create a list to choose from:

OptionDescription
Filter IDName of a saved filter (REPFILTER entity). Choosing a filter will load the other selection criteria controls in this dialog with the saved filter details.
View IDName of a saved Repository View (REPVIEW entity). If specified, the list of entities in this View is used as a starting point for the filter when it executes.
Entity IDIf specified only entities matching this name will be selected. The standard ‘[]’,’]’ and ‘[‘ RList-style syntax for “containing”, “starting with” and “ending with” is respected.
Date FromIf specified only entities updated from this date will be included. This option supports a “nD” syntax where “n” is the number of days since the current date. E.g. to select entities updated since the previous day specify “1D”, for entities updated in the last week specify “7D” and so on.
Date ToIf specified do not include entities after this date. This option supports the same “nD” syntax as the “Date From” option.
Updated ByIf specified then only entities updated by the specified user(s) are returned. This option may contain a “,” delimited list for matching against multiple users.
Filter OptionsOnly entities matching the checked options will be returned. Note that for a migration operation the “Show Inherited Entities” checkbox is always disabled (This dialog is used elsewhere in the system to select repository entities, so it can be enabled in such scenarios).
Filter By TypesAllows you to choose specific entity types and classes to include. If blank then all types and classes are included in the search. Click the “…” options button in the top right corner of the control, or right-click to use the context menu to launch a dialog to select the types and classes.
Filter By SELECTThis option allows you to enter an RLIST SELECT statement against the SYSREPOS table that will be used to filter the entities.
Save FilterClick this button to save the filter criteria for future re-use (stored as a REPFILTER entity in the repository).
Apply FilterClick this button to execute the filter criteria and load a list of matching entities into the “Available” controls below. If you have not entered any criteria then all entities in the v9 application will be selected.
Filter Options

Once you have applied your filter the “Available Types” control is populated – selecting a Type populates the “Available Entities” control where you can select the items that you wish to migrate. Use the “>” and “>>” buttons to add them to the “Selected Entities” control on the right, or the “<” and “<<” buttons to remove them.

Selecting Entities in the dialog

Things to note:

  • As items in the “Available Entities” control are selected, the list of items that they use is shown in the “Related (Used By) Entities” control below. These can also be selected if you wish.
  • Each of the “Available” and “Selected” controls have context menus and “…” options buttons (top-right corner).
  • If the “Auto-Add Executable” option is checked when you add entities to the “Selected Entities” control then any executable versions of the entity (e.g. STPROCEXE, OIWINEXE etc) are also added.
  • If the “Auto-Add Source” option is checked when you add entities to the “Selected Entities” control then any source versions of an executable entity (e.g. STPROC, OIWIN etc) are also added.

Clicking “OK” takes you back to the main migration form where you will see the list of entities selected. From there you may click the “Next” button to start the migration process.

(Note that the task and entity selections are saved automatically between migrations so that you may use them again if you wish.)

Migrating items from SYSPROG

Previous versions of the migration tool prevented migrating any entities from the SYSPROG application. This was to preserve the system from being damaged in case older v9 entities overwrote the v10 ones, thereby rendering it unusable.

With this release you may run the migration form from your SYSPROG application with the following restrictions:

  • You may only execute the following tasks:
    • Migrate RDK Records
    • Migrate Entities – You must specify the entities to migrate – you cannot migrate “All Entities”!
    • Migrate Arev32 Records
    • Clean Relationships
    • Compile Stored Procedures
    • Compile Forms
Migrating SYSPROG options

Bonus Trivia – a quick note on migrating data

The migration process begins with creating a new application in version 10 and then executing a form called RTI_MIGRATE_V9_TO_V10, which guides you through the steps necessary to move your application from version 9.

Migration Tool Start Page

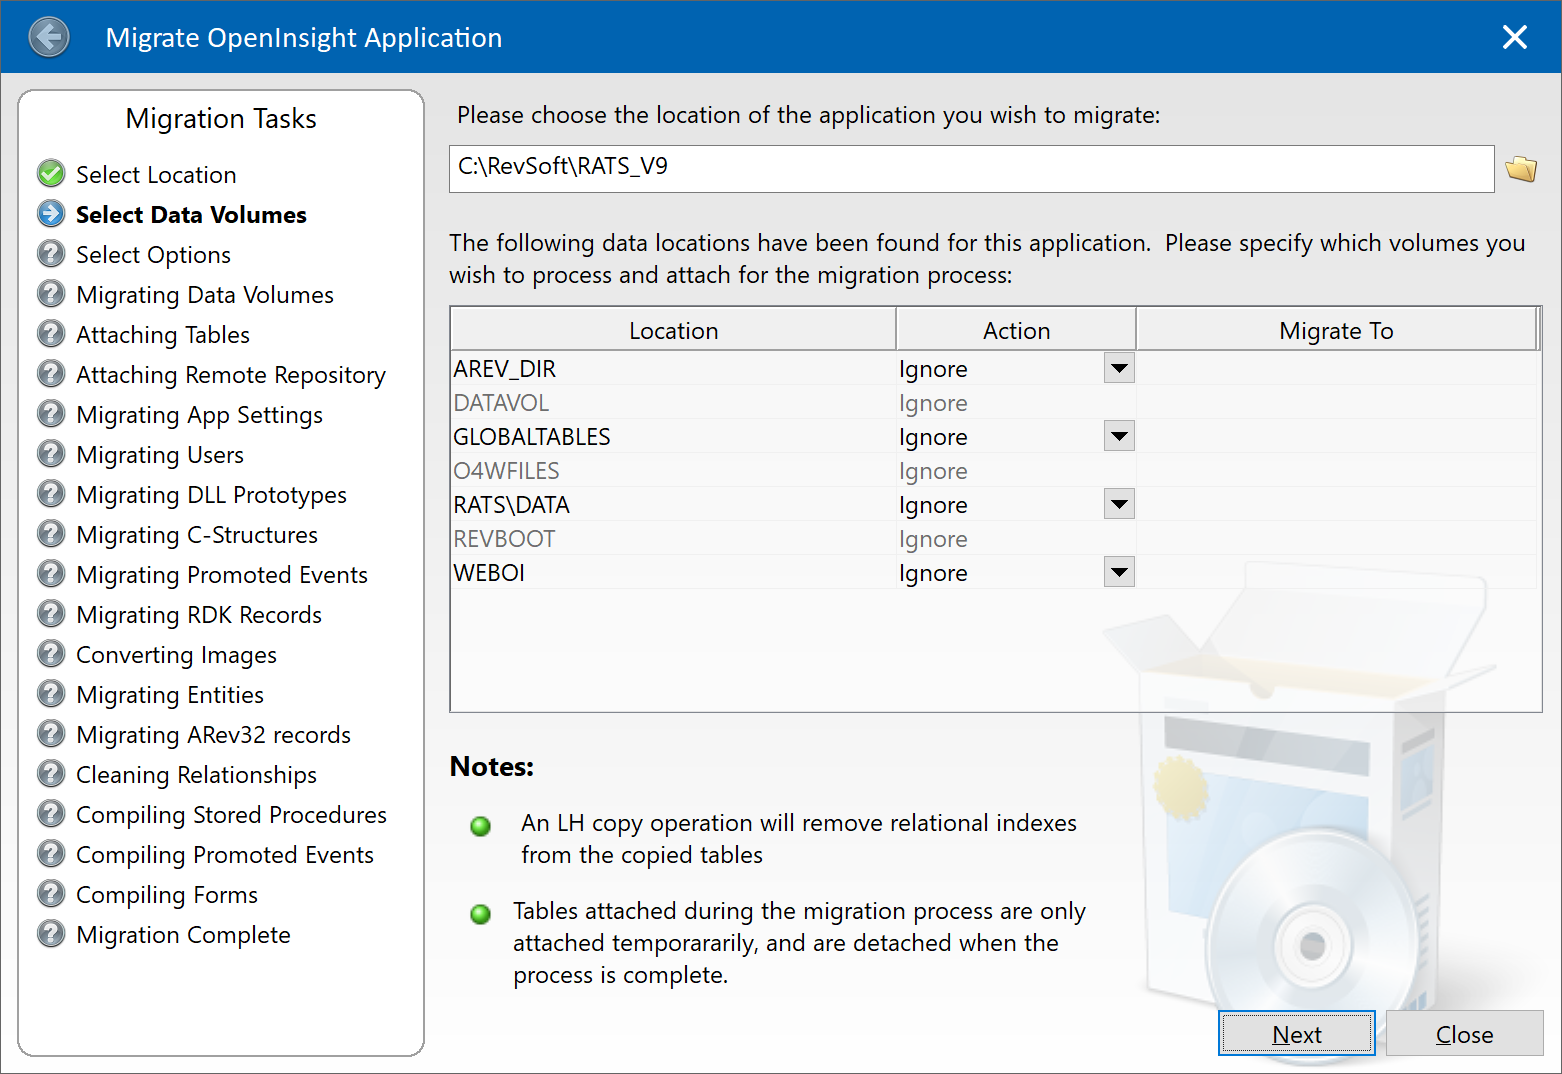
At this point you select the location of the application you are migrating from, after which you see the data volumes that are attached in it. There are options for the data to be “migrated”, but in my experience it is best to move and attach the data you want for your application before you attempt the migration rather than use the facility here. The migration process does not change your data at all so there is no real advantage to using this facility (it is basically provided as a convenience), and in fact, if you are moving tables containing relational indexes they will be removed. It is far easier to copy/move and attach the tables yourself using the Database ToolPanel before you get here.

More Bonus Trivia – Sharing index data between v9 and v10

While on the topic of migrating data it is also worth taking a look at the end of this blog post by Sprezzatura if you intend to share your tables between v9 and v10 systems – you must make sure that you run the indexing system in a v9 compatible format:

   Indexing Issues In Large Tables

Conclusion

The migration tool has been significantly improved for the version 10.2 release and we’re sure you will find it much more helpful when moving your older applications to the latest version of OpenInsight.

ListBoxes and TreeListBoxes – “in-place” editing

One of the new features that was added to the ListBox and TreeListBox controls in version 10 was the ability to use “in-place” editing on the items in the same manner as the Windows Explorer when you press “F2” or double-click an item. If you’ve done any work with the OpenInsight Menu Designers you will have seen this capability in action.

In-place editing for an item

The READONLY property

Enabling in-place editing is as simple as setting the READONLY property to False – once you’ve done that the user can press “F2” while using the control and edit the text of the currently selected item.  Pressing “Enter” when editing will update the item text (as will losing focus or selecting another item), while pressing “Esc” will abandon the changes.  Obviously that’s a very simple take on the topic and hardly worth a blog post in and of itself, so next we’ll take a look at some of the properties, methods and events that you can use to tailor the editing process.

The EDITING property

This is a simple boolean property that returns TRUE$ if an item is being edited.

The EDITORHANDLE property

This property returns the HANDLE of the editor control if an item is being edited.

The EDITKEY property

By default, hitting “F2” on an item puts the control into “edit mode”, just like the Windows Explorer.  However, if you wish to change this then you may use the EDITKEY property to select another key instead. The edit key is a Windows virtual key code and constants for these codes can be found in the MSWIN_VIRTUALKEY_EQUATES insert record.

The EDITOPTIONS property

This property allows you to fine-tune some of the validation options for the editor:

  • TextCase – Specifies if the text entered is lower-case only, upper-case only or mixed (See the EDITLINE TEXTCASE property for more details).
  • ValidChars – Specifies which characters may be entered into the editor (See the EDITLINE VALIDCHARS property for more details).
  • MaxLimit – Specifies the maximum number of characters that may be entered into the editor (See the EDITLINE LIMIT property for more details).

At runtime this property is an @fm-delimited array – constants for use with this property can be found in the PS_LISTBOX_EQUATES insert record.

The INCLUDEEDITORTEXT property

By default getting item text from the ListBox (e.g. via the LIST property) will include the text from an item currently being edited, even if that edited text has not yet been saved.  Setting this property to FALSE$ ensures that the returned item text ignores the value in the editor instead.

The BEGINEDIT method

This method allows you to programmatically put the ListBox into edit mode, as if the user had pressed “F2” (or whatever value the EDITKEY property is set to). You may specify the index of the item to edit, otherwise it will default to the current item.

RetVal = Exec_Method( CtrlEntID, "BEGINEDIT", itemIndex )

The ENDEDIT method

This method allows you to programmatically stop the item editing process, optionally allowing any changes to be accepted as if the “Enter” key had been pressed (the default is to reject any changes as if the “Esc” key had been pressed).

RetVal = Exec_Method( CtrlEntID, "ENDEDIT", bUpdate )

The ITEMEDITING event

This event is raised when an item it put into edit mode, and passes the index of the item as a parameter:

bForward = ITEMEDITING( CtrlEntID, CtrlClassID, ItemIndex )

The ITEMCHANGED event

This event is raised when the item is updated via the editor, i.e. the user hit the “Enter” key, the control lost the focus, or the EDITEDIT method was used with the bUpdate parameter set to TRUE$. The event passes the index of the item that has changed as well as the old and new data:

bForward = ITEMCHANGED( CtrlEntID, CtrlClassID, ItemIndex, |
                                                NewData,   |
                                                PrevData )

The ITEMUNCHANGED event

This event is raised when an item leaves edit mode without being updated, i.e. the user hit the “Esc” key or the EDITEDIT method was used with the bUpdate parameter set to FALSE$. The event passes the index of the item that was being edited:

bForward = ITEMUNCHANGED( CtrlEntID, CtrlClassID, ItemIndex )

So that wraps up this short post on ListBox editing – we’re sure that you’ll find many useful ways of implementing this new feature when expanding your application’s functionality.

The HTTPSERVER control

OpenInsight 10.2 introduces a new control type called HTTPSERVER, which provides a lightweight HTTP web-server control for use in your applications.

Using the control is a simple process:

  • Drop a “HTTP Server” control onto a form
  • Set the port number to listen on via the PORT property
  • Use the START method to start the server, or set the STARTUPMODE property to “Automatic” if you want the server to start when the form is created.
  • Listen for requests via the HTTPREQUEST event and respond to them using methods such as the SETRESPONSECONTENT and SETRESPONSEFILE methods
  • Return the response using the SENDRESPONSE method

So, if you set up a HTTPSERVER on port 8089 and execute the form you can use a browser to communicate with it via a URL something like this:

http://localhost:8089/path1/path2/test?arg1=this&arg2=that

The HTTPREQUEST event

As you can see, setting up the control is fairly easy, but the bulk of the work needs to be done in the HTTPREQUEST event where you examine the contents of the request and return the appropriate content.

The event has the following interface:

   bForward = HTTPREQUEST( CtrlEntID,     |
                           CtrlClassID,   |
                           RequestID,     |
                           RequestHeaders )

And the following parameters:

NameDESCRIPTION
CtrlEntIDID of the HTTP Server control firing the event
CtlrClassIDType of control firing the event – this is always “HTTPSERVER”
RequestIDUnique identifier for returning a response to the client – this is used with the various “SETRESPONSE” methods that set response data.
RequestHeadersAn @FM delimited dynamic array of data that describes the request. The format is similar to the HTTPRequest argument used in OECGI programming. The full format is described in the PS_HTTPSERVER_EQUATES insert record.

As mentioned above, the RequestHeaders parameter describes the details of the request using a format similar to the format used in OECGI programming. There are some differences that are worth highlighting however:

  • For a GET request the query values are already parsed into their own fields (<37> and <38>) as an associated multi-value pair. They are not found unparsed in field <1> as per OECGI.
  • For a POST or PUT request the content is obtained using the GETREQUESTCONTENT method (see below) – it is not passed in the RequestHeaders variable.
  • Cookies are already parsed into their own fields (<39> and <40>) as an associated multi-value pair.
  • Headers are already parsed into their own fields (<35> and <36>) as an associated multi-value pair.

Note that out of the box we do not enforce any restrictions or framework on how you handle the request – compare this to classic OECGI programming where the “PathInfo” field is used to determine which “INET_” procedure is executed to fulfill it (via the RUN_INET_REQUEST stored procedure) There is no such requirement with the HTTPSERVER control, and you may create your own framework if you wish (although see the note on RTI_RUN_HTTPSERVER_REQUEST below).

Returning a response

There are several methods described below that you may use to process the content that you return to the client.

  • GETREQUESTCONTENT
  • GETRESPONSECONTENT
  • GETRESPONSECOOKIE
  • GETRESPONSEFILE
  • GETRESPONSEHEADER
  • GETRESPONSESTATUS
  • ISPORTINUSE
  • SETRESPONSECONTENT
  • SETRESPONSECOOKIE
  • SETRESPONSEFILE
  • SETRESPONSEHEADER
  • SETRESPONSESTATUS
  • SENDRESPONSE

Note: With each of these you must use the unique RequestID parameter passed to you in the HTTPREQUEST event.

E.g. Returning HTML in the HTTPREQUEST event

ReposID = @AppID<1> : "*DOC*HTML*INDEX_PAGE" 
HTML = Repository( "ACCESS", ReposID )
Call Exec_Method( CtrlEntID, "SETRESPONSECONTENT", RequestID, HTML )
Call Exec_Method( CtrlEntID, "SENDRESPONSE" )

E.g. Returning a file in the HTTPREQUEST event

ReposID = @AppID<1> : "*DOC*HTML*INDEX_PAGE" 
FilePath = Repository( "GETSUBKEY", ReposID )
Call Exec_Method( CtrlEntID, "SETRESPONSEFILE", RequestID, FilePath )
Call Exec_Method( CtrlEntID, "SENDRESPONSE" )

The HTTPSERVER methods

GETREQUESTCONTENT method

Gets the raw content sent to the server by the client as part of a POST or PUT request.

 ReqContent = Exec_Method( CtrlEntID, "GETREQUESTCONTENT", RequestID )

GETRESPONSECONTENT method

Returns raw content for the response as set via a previous call to the SETRESPONSECONTENT method.

 RspContent= Exec_Method( CtrlEntID, "GETRESPONSECONTENT", RequestID )

GETRESPONSECOOKIE method

Returns details for a response cookie as set via a previous call to the SETRESPONSECOOKIE method (see below for the CookieVal format).

 CookieVal = Exec_Method( CtrlEntID, "GETRESPONSECOOKIE", RequestID, |
                                                          CookieName )

GETRESPONSEFILE method

Returns the name and path of the response content file set with a previous call to the SETRESPONSEFILE method.

 RspFile = Exec_Method( CtrlEntID, "GETRESPONSEFILE", RequestID )

GETRESPONSEHEADER method

Returns the details for a response header as set via a previous call to the SETRESPONSEHEADER method.

 HeaderVal = Exec_Method( CtrlEntID, "GETRESPONSEHEADER", RequestID, |
                                                          HeaderName )

GETRESPONSESTATUS method

Returns the HTTP status code of the response (defaults to 200).

 RspStatus = Exec_Method( CtrlEntID, "GETRESPONSESTATUS", RequestID )

ISPORTINUSE method

Returns TRUE$ if the specified port is in use on the local machine.

 InUse = Exec_Method( CtrlEntID, "ISPORTINUSE", Port, IPv6 )
  • Port – Identifies the port to check
  • IPv6 – if TRUE$ then check the IPv6 bindings, otherwise check the IPv4 bindings

SENDRESPONSE method

Sends the response back to the client. This method should be called when you have finished setting the response details (Note that this is called by the promoted system HTTPREQUEST handler in case you forgot to do it in your own code!).

 RspSent = Exec_Method( CtrlEntID, "SENDRESPONSE", RequestID )

SETRESPONSECONTENT method

Sets the content to return to the client, such as a string containing an HTML page.

 SetOK= Exec_Method( CtrlEntID, "SETRESPONSECONTENT", RequestID, |
                                                      Content )

SETRESPONSECOOKIE method

Sets a cookie that is returned to the client via the “Set-Cookie” header.

 SetOK = Exec_Method( CtrlEntID, "SETRESPONSECOOKIE", RequestID,  |
                                                      CookieName, |
                                                      CookieValue )

CookieValue is an @fm-delimited array formatted as follows:

    <1> Value
    <2> Path
    <3> Domain
    <4> Expires (internal date format)
    <5> Max Age (seconds)
    <6> Secure  (TRUE$/FALSE$)
    <7> HttpOnly (TRUE$/FALSE$)
    <8> SameSite

SETRESPONSEFILE method

If you have a file that contains the content you wish to return then you should use this method to let the server read the file and return it to the client itself. This offers better performance than reading the contents via Basic+ and using the SETRESPONSECONTENT method as it avoids any unnecessary copying of data.

 SetOK = Exec_Method( CtrlEntID, "SETRESPONSEFILE", RequestID,  |
                                                    FileNamePath )

SETRESPONSEHEADER method

Sets a response header and value to be returned to the client.

 SetOK = Exec_Method( CtrlEntID, "SETRESPONSEHEADER", RequestID,  |
                                                      HeaderName, |
                                                      HeaderValue )

SETRESPONSESTATUS method

Sets the HTTP status code for the response (200, 404, 500 etc).

 SetOK = Exec_Method( CtrlEntID, "SETRESPONSESTATUS", RequestID, |
                                                      StatusCode )

Example HTTPREQUEST handler

As part of version 10.2 we have included a sample HTTPREQUEST event handler called RTI_RUN_HTTPSERVER_REQUEST which you can examine and copy for your own applications if you wish. It emulates the core behavior of the OECGI RUN_INET_REQUEST handler in that it uses the “PathInfo” field to determine the stored procedure to fulfill the request. In this case it looks for a matching procedure that has the prefix “HTTPSVR_” and we have included a couple of example “HTTPSVR_” procedures for you to review as well.

Conclusion

With the addition of the HTTPSERVER control it is now possible to provide HTML content directly from your application, and also provide a means of web-development directly from your desktop without necessarily needing to install a dedicated web-server like IIS.

It is also a good solution for when you want to provide local HTML content in your application’s user-interface via an embedded browser control, because it can avoid the usual security restrictions that browsers enforce for such scenarios.

String comparison in OpenInsight – Part 4 – String-Only operators

Basic+ is a dynamically-typed language, and sometimes the system will attempt to change the type of a variable before using it in an operation. For example, if we have variable containing a numeric value as a string, and we attempt to compare it to a variable containing an actual numeric value, then the former will be coerced to a numeric format before the comparison, e.g.:

   StrVar = "3"  ; // String representing an integer
   NumVar = 7    ; // Integer

   Ans = ( StrVar = NumVar ) ; // Ans is FALSE$ and StrVar 
                             ; // is converted to an Integer

This works well in the vast majority of cases, but causes issues when attempting to compare strings that that could be numbers but really aren’t for the purposes of the comparison. For example, consider the following:

   Var1 = "12"    ; // String
   Var2 = "012"   ; // String

   Ans = ( VarA = VarB ) ; // Ans = TRUE$ - should be FALSE$!!

The system first attempts to coerce the operands to a numeric format, and of course it can because they both evaluate to the number 12, and are therefore treated as equal. If you wish to compare them both as strings, the usual solution has been to change them so that they cannot be converted to a number, usually by prefixing them with a letter or symbol like so:

   Var1 = "12"    ; // String
   Var2 = "012"   ; // String

   Ans = ( ( "X" : VarA ) = ( "X" : VarB ) ) ; // Ans = FALSE$

Although this works it hurts performance and can be a cumbersome solution.

OpenInsight 10.2 introduces a new set of extended comparison operators to Basic+ that ensure both operands are coerced to a string type (if needed) before being evaluated, and provides the following benefits:

  • Removes the need for any concatenation thereby avoiding unnecessary copying
  • Removes the need to check if a variable can be a number before the comparison
  • Makes it obvious that you are performing a “string-only” comparison so your code looks cleaner.

The new (case-sensitive) operators are:

OperatorDescription
_eqsEquals operator
_nesNot Equals operator
_ltsLess Than operator
_lesLess Than Or Equals operator
_gtsGreater Than operator
_gesGreater Than Or Equals operator

There is also matching set of case-insensitive operators too:

OperatorDescription
_eqscCase-Insensitive Equals operator
_nescCase-Insensitive Not Equals operator
_ltscCase-Insensitive Less Than operator
_lescCase-Insensitive Less Than Or Equals operator
_gtscCase-Insensitive Greater Than operator
_gescCase-Insensitive Greater Than Or Equals operator

So we could write the previous example like so:

   Var1 = "12"    ; // String
   Var2 = "012"   ; // String

   Ans = ( VarA _eqs VarB ) ; // Ans = FALSE$

Hopefully you’ll find this a useful addition when performing string-only comparisons in your own applications.

EditTables – Getting multi-select data the easy way

In previous versions of OpenInsight the usual way of accessing data from a multi-row select EditTable control was to get the SELPOS property and then iterate over the data pulling out the rows, e.g. something like this (not optimized, but you get the idea):

   SelPos   = Get_Property( CtrlEntID, "SELPOS" )
   DataList = Get_Property( CtrlEntID, "LIST" )
   SelList  = ""

   SelRows  = SelPos<2>
   SelCount = FieldCount( SelRows, @Vm )  
   For SelIdx = 1 To SelCount
      SelRow = SelRows<0,SelIdx>
      SelList<-1> = DataList<SelRow>
   Next

However, in OpenInsight 10 we added a couple of new properties that allow you to access data in a multi-row select EditTable in a faster and more efficient way. These are:

  • The SELLIST property
  • The SELARRAY property

Both of these return data in the familiar LIST and ARRAY formats, but they only return data from the selected rows, thereby saving you the step of accessing SELPOS and iterating over the data yourself. So, to rewrite the example above we can now do this:

   SelList = Get_Property( CtrlEntID, "SELLIST" )

Likewise, to return the data in ARRAY format we would use the SELARRAY property like so:

   SelArray = Get_Property( CtrlEntID, "SELARRAY" )

Ergo, when asked the other day “What’s the fastest way of getting data from a specific column from the selected rows”, the answer was:

   SelData = Get_Property( CtrlEntID, "SELARRAY" )<colNum>

(And this question is also what led me to write this post…)

Bonus Trivia

The LISTBOX control also supports the SELLIST property.