[NOTE: The information in this post has been superseded by the actual release version of OpenInsight 10, and developers should refer to the Image Object API documentation as found on the Documentation page of this site for more details]
As promised in our last post this time we’re going to cover the new properties we’ve added to the Presentation Server to support the enhanced image capability:
- IMAGEALIGN
- IMAGECOLORKEY
- IMAGEFRAMECOUNT
- IMAGEFRAMENUMBER
- IMAGESIZE
- IMAGESTYLE
- IMAGETRANSLUCENCY
We have also added the following new method:
IMAGEALIGN property
This property specifies how a clipped or scaled image is aligned within a client area. It can be one of the following values:
- “0” Top-Left
- “1” Top-Center
- “2” Top-Right
- “3” Middle-Left
- “4” Centered
- “5” Middle-Right
- “6” Bottom-Left
- “7” Bottom-Center
- “8” Bottom-Right
Examples:

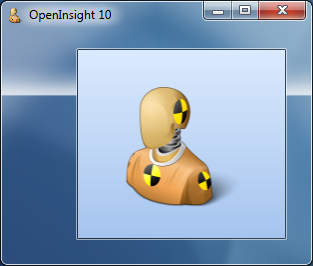
IMAGEALIGN 4 (Centered)

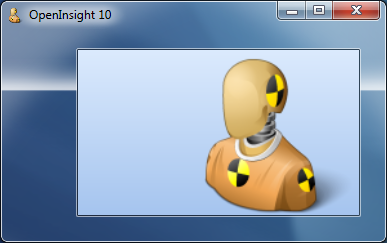
IMAGEALIGN 6 (Bottom-Left)
IMAGESTYLE property
This property specifies how the image is rendered onto the window’s client area. The following property values are supported:
- “0” Clip – the image is not resized and is simply rendered onto the client area according to the IMAGEALIGN property (Note that the IMAGEORIGIN property will override the image alignment).
- “1” Stretch – the image is resized to cover the entire client area of the window.
- “2” Tile – the image is tiled across the entire client area.
- “3” Scale – the image is resized but it’s proportions are kept constant: e.g. if the image is taller than it is wide the image height will be resized to the height of the client area, and it’s width scaled to keep the same proportions. It will also respect the IMAGEALIGN property.
Examples:

IMAGESTYLE 1 (Tiled)
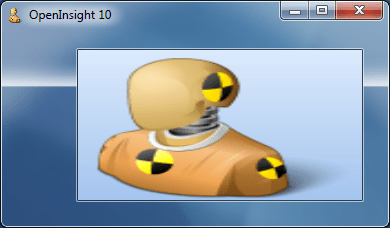
IMAGESTYLE 2 (Stretched)

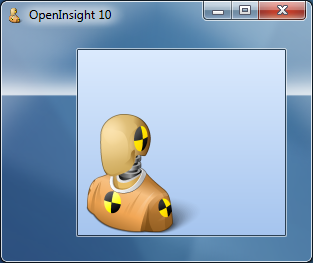
IMAGESTYLE 3 (Scaled), IMAGEALIGN 5 (Center-Right)
IMAGECOLORKEY property
This property specifies the color to use as the transparent color when rendering the image as described in this post. It basically replaces the current (and undocumented) IMAGETRANSPARENT and TRANSPARENTCOLOR properties, both of which have been deprecated with this release.
This property should be a valid RGB color value or one of the following special values:
- “-1” Use the color of the top left pixel as the color-key.
- “-2” Use the color of the top-right pixel as the color-key.
- “-3” Use the color of the bottom-left pixel as the color-key.
- “-4” Use the color of the bottom-right pixel as the color-key.
- “-5” Do not use any color-keying.
IMAGEFRAMECOUNT property
Some image formats such a GIF and TIFF files can contain more than one image, held in series of frames. This read-only property returns the number of frames in the image file. Note that this is not the same as the IMAGECOUNT property, which applies to a single frame only.
Example:

Animated GIF with 12 frames
IMAGEFRAMENUMBER property
This property gets or sets the current display frame for the image and could be used with a TIMER event to display an animated GIF file for example. Note that this property is not the same as the IMAGENUMBER property which applies to a single frame only.
Examples:

Animated GIF with IMAGEFRAMENUMBER of 2
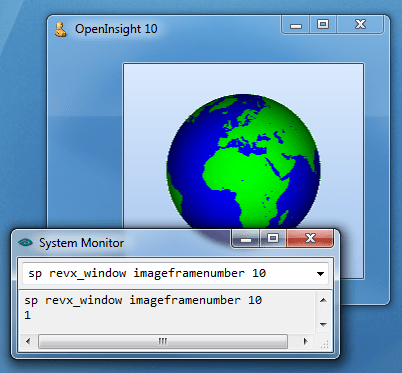
Animated GIF with IMAGEFRAMENUMBER of 10
IMAGESIZE property
This read-only property returns a dynamic array containing the size of the image in pixels:
<1> Width
<2> Height
Note that for a multi-frame image format it returns the size of a single frame, not all the frames combined.
IMAGETRANSLUCENCY property
This property specifies the transparency of the entire image as it is rendered onto the window. It is based on simple percentage amount, “0″ being fully opaque and “100″ being fully transparent (and therefore not visible).
Example:

IMAGETRANSLUCENCY of 70 with IMAGEORIGIN of 90,60
SETIMAGE method
This method supersedes the existing IMAGE property and allows a image to be set by passing the raw image data rather than by passing a file or resource name as per the BITMAP property. The OpenInsight property interface is text-based and does not support passing binary data with embedded null characters, whereas the method interface does, hence the reason for this change.
Other image-related properties
The following current image-related properties remain the same:
- BITMAP
- IMAGECOUNT
- IMAGENUMBER
- IMAGEOFFSET
- IMAGEORIGIN
Deprecated properties
The following properties have been deprecated or removed in OpenInsight 10:
- IMAGE – this property has been superseded by the SETIMAGE method. It is now a synonym for the BITMAP property.
- IMAGECLIP – this property has been superseded by the IMAGESTYLE property.
- IMAGETRANSPARENT – this property has been superseded by the IMAGECOLORKEY property.
- TRANSPARENTCOLOR – this property has been superseded by the IMAGECOLORKEY property.
(Disclaimer: This article is based on preliminary information and may be subject to change in the final release version of OpenInsight 10).