Category Archives: IDE

The new Scan Repository tool

OpenInsight 10.2.3 brings a much needed update to the venerable Scan Repository tool, providing an updated user interface, full support for new repository types, and some new methods for problem detection and repair. In this post we’ll take a look at each of these areas in more detail, and how the various options work when repairing your system.

A new user interface

The Scan Repository tool is accessed from the IDE main menu via the Tools\Repository menu item and then choosing the “Scan Repository For Errors” option (or alternatively by executing the RTI_IDE_SCAN_REP form via the System Monitor). Users of previous incarnations of the Scan Repository tool will notice an immediate change in the user interface as it is no longer a “wizard” style UI, but now shows all of the scanning options, progress information and results on a single form instead:

The new Scan Repository tool
The Scan Repository Tool

Using the scanner is a simple process:

  • Ensure the Scan Prerequisites are met.
  • Choose the Scan Options.
  • Click the “Analyze” button to begin the scan. Progress information will be shown at the top of the form and the scan can be cancelled at any point.
  • Review the results and, if necessary, select the appropriate repair action. These appear in dropdown lists in the “Action” column of the results table and can be one or more of the following options (depending on the error):
    • Add
    • Delete
    • Ignore
  • Make sure that the items you want to fix are highlighted (selected) in the list (Remember to use the context menu to help with the selection process!).
  • When ready click the “Process” button to begin the repair process.
  • Review the repair results.
    • Note that some repairs may not be able to be completed automatically. In this case the corresponding action item may change to an “Edit” button so that the problem item can be fixed manually.
    • Details of errors encountered during the repair process are shown in a tooltip when the mouse is hovered over a problem item.

Scan Prerequisites

Repairing errors in your repository involves possible changes to some fundamental system components, so the following requirements must be met before the scan can take place:

  • Ensure that you have backed up your system and check the “A recent backup is available” check box.
  • Ensure that all others users are logged out of your system, otherwise the scan cannot proceed. The details of other logged-in users will appear in the Users list to help identify them.

Scan Options

There are two categories of scanning options. The first, “Types and Classes”, scans the core repository records to ensure that they are all correct, while the second category, “Entities” scans the normal application components.

Scanning for Types and Classes

The functionality of the repository is based heavily on the information contained in the following three locations, so it is essential that these items are correct:

  • REPFAMILY entities (SYSREPOSTYPEFAMILIES records)
  • REPTYPE entities (SYSREPOSTYPES records)
  • REPCLASS entities (SYSREPOSCLASSES records)

These are referred to as FTC entities (Family/Type/Class). They can be one of two types:

  1. “Known” – these are the FTC entities are that are supplied by Revelation.
  2. “Custom” – these are non-Revelation FTC entities added by developers that have been marked as valid in a previous “Types and Classes” scan (When an “unknown” FTC entity is first encountered in a repository scan it can be flagged as “custom” so it is considered valid in subsequent scans – see the “Unknown” class of errors in the table below).

Verify Repository Types and Classes

The state of the FTC entities can be validated by checking the “Verify Repository Types and Classes” box which ensures that this process takes place before any other normal entities are checked.

Checks performed during this scan include:

  • All known FTC entities are present and not missing any critical information.
  • All custom FTC entities which have been flagged as valid are not missing any critical information.
  • All other FTC entities that are not flagged as custom are reported as “Unknown” so they can be reviewed.

The Verify Repository Types and Classes scan can produce the following errors:

ErrorDESCRIPTION
Missing Known Type Family,
Missing Known Type,
Missing Known Class
One of the known FTC entities is missing. The default version can be added back into the system using the “Add” action.
Unknown Type Family,
Unknown Type,
Unknown Class
An unknown FTC entity has been found. It can be added as a custom type using the “Add” action, or removed using the “Delete” action. Items that have been added are marked as custom and treated as a valid FTC type in future scans.
Missing Repository RecordThe raw FTC body record is missing a corresponding SYSREPOS header record. A default SYSREPOS record can be created using the “Add” action.

(Note: OpenInsight repository entities are usually comprised of two components: A “header” record in the SYSREPOS table, and a “body”. The latter can be a record in a table or an OS file depending on the type of entity).
Bad Repository Sub-keyThe SYSREPOS header record for the FTC entity has an invalid SUBKEY entry. The “Add” action may be used to correct this.
Missing Title,
Missing Icon,
Missing Image,
Missing Type Family,
Missing SCM Format,
Missing SCM Include,
Missing Storage Type,
Missing Location,
Missing RDK Extract Type,
Missing Key Format,
Missing Designer Tool
The FTC body record is missing some required information.

If this is a known FTC entity then the “Add” action may be used to reset the missing value to its default setting.

If this is a custom FTC entity the “Add” action will switch to an “Edit” button, which opens the entity for editing in the IDE.
Missing Event ClassA custom event (added via the Event Designer tool) is missing a corresponding SYSEPOSCLASSES record. The “Add” action may be used to add a default record.

Reset to default values

Selecting this option ensures that all known Revelation-supplied FTC entities are reset to their default values during the scan. This option can be used to ensure that your repository is always in a good state.

Scanning Entities

This part of the process scans the rest of the repository based on the options chosen:

OptionDescrIPTION
Scan for missing entity headersScans a set of core tables looking for missing repository header (SYSREPOS) records.

Due to the fact that it can allow “lost” entities to be readded to the repository it is recommended that this option be run before any others.

If this option is selected all of the other Entity scanning options will be disabled.
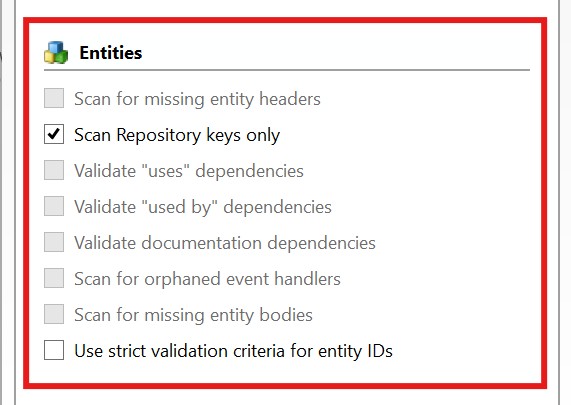
Scan repository keys onlyOnly checks the validity of repository header (SYSREPOS) keys and does not check the state of the entity itself.

The only other option allowed with this selection is “Use strict validation criteria for entity IDs”.
Validate “uses” dependenciesEnsures any entities flagged as “used” by the entity being scanned actually exist. If they don’t the link is automatically removed.
Validate “used by” dependenciesEnsures any entities flagged as “used-by” by the entity being scanned actually exist. If they don’t the link is automatically removed.
Validate “documentation” dependenciesEnsures any documentation entities linked to the entity being scanned actually exist. If they don’t the link is automatically removed.
Scan for orphaned event handlersEvent entities (source and executable) are checked to ensure that they are linked to their parent forms, and that the parent forms actually exist.
Scan for missing entity bodiesValidates that each repository entity has a corresponding body record or OS file as appropriate.
Use strict validation criteria for entity IDsValidates that keys in the SYSREPOS table conform to a limited set of characters.

When the “Scan for missing entity headers” box is checked the Entities scan can produce the following errors:

ErrorDescription
Orphan – Missing SYSREPOS [<id>]An entity body record is missing a corresponding SYSREPOS header record. The “Add” action may be used to add a default header record, the “Delete” action may be used to delete the orphaned body.
Orphan – Bad App [<id>]An entity body record is linked to a non-existent application ID. The “Delete” action may be used to delete the record (and any associated SYSREPOS header record).
Orphan – Suspected Bad App [<id>]Due to the polymorphic nature of the records in some tables (primarily SYSPROCS and SYSOBJ) it is not always possible to accurately determine what type of record is being checked.

This error can be raised in such circumstances, and the “Delete” action may be used to remove the record in question.

However, it is advised that you review the record in question before you delete it!
Orphan – Bad Key Format [<id>]A known type has a badly formatted key. The “Delete” action may be used to remove the record in question.

When the “Scan for missing entity headers” box is not checked the Entities scan can produce the following errors:

ERRORDescription
Bad KeyThe entity has a badly formatted SYSREPOS key. The “Delete” action may be used to remove the entity.
Bad AppThe APPID of the SYSREPOS key refers to an invalid application ID. The “Delete” action may be used to remove the entity.
Bad TypeThe TYPEID of the SYSREPOS key refers to an invalid SYSREPOSTYPES type ID. The “Delete” action may be used to remove the entity.
Bad ClassThe CLASSID of the SYSREPOS key refers to an invalid SYSREPOSCLASSES class ID. The “Delete” action may be used to remove the entity.
Deprecated EventAn entity has been found for a class of event that is no longer supported in version 10. The “Delete” action may be used to remove the event in question.
Strict TestThe SYSREPOS header key failed the “strict” test and is considered to be badly formatted. The “Delete” action may be used to remove the entity.
No locationThe SYSREPOS header record is missing a required location (e.g. an IMAGE type is missing the location of the OS image file). The “Delete” action may be used to remove the entity.
No BodyThe entity is missing a body record or OS File as determined by its type. This can happen if the body record exists but is null, or the ACCESS method returns null. The “Delete” action may be used to remove the SYSREPOS header record.
No Body <FSError>The entity’s body record cannot be accessed because of a filing system error. The “Delete” action may be used to remove the SYSREPOS header record.
Open ErrorA table open error occurred when checking a DBTABLE type entity. The “Delete” action may be used to remove the SYSREPOS header record.
Orphan – Missing FormAn event script entity is referring to a form entity that does not exist (i.e. there is no SYSREPOS header record for the form). The “Delete” action may be used to remove the event entity.
Orphan – Missing Form BodyAn event script entity is referring to a form entity whose body record does not exist (i.e. there is no SYSREPOSWINS or SYSREPOSWINEXES record for the form). The “Delete” action may be used to remove the event entity.
Orphan – Missing ControlAn event script entity is linked to a control that does not exist on the form. The “Delete” action may be used to remove the event entity.
Orphan – Event Not LinkedAn event script entity has been found for a control or form that does exist but it is not linked to it. The “Add” option may be used to create the link, or the “Delete” action may be used to remove the event.

(Note: Please review the control and event in question before you decide to add it as there may be a good reason that it is no longer linked!)
Orphan – Missing Script ExeAn event script debug-table entity has no corresponding event script executable entity. The “Delete” action may be used to remove the event script debug-table entity.
Orphan – Event Cannot Be LinkedAn executable event script entity cannot be dereferenced to an owner. The “Delete” action may be used to remove the executable event script.

The Scan Repository context menu

The results list of the Scan Repository tool includes a comprehensive context menu to help with selecting the items to repair along with an export option and an easy way to view the details of a specific entity:

Menu ItemDescription
Process all itemsExecutes the specified repair action (if appropriate) for all entities in the results list.
Process selected items onlyExecutes the specified repair action (if appropriate) for all selected entities in the results list.
Set all items to “Add”Sets the action option of all items in the results list to “Add” (but only if they have an “Add” option).
Set all items to “Delete”Sets the action option of all items in the results list to “Delete” (but only if they have a “Delete” option).
Set all items to “Ignore”Sets the action option of all items in the results list to “Ignore” (but only if they have an “Ignore” option).
Set all selected items to “Add”Sets the action option of all selected items in the results list to “Add” (but only if they have an “Add” option).
Set all selected items to “Delete”Sets the action option of all selected items in the results list to “Delete” (but only if they have a “Delete” option).
Set all selected items to “Ignore”Sets the action option of all selected items in the results list to “Ignore” (but only if they have an “Ignore” option).
Select all itemsSelects all of the items in the results list.
Clear all selectionsUnselects all of the items in the results list.
View <entity>Attempts to open both the SYSREPOS header record and body record (if possible) for the specified entity. These are opened as “raw” records in the IDE.
Export resultsExport the contents of the results list to a CSV file.

Conclusion

The new Scan Repository tool is available in OpenInsight v10.2.3 onwards. Hopefully it will allow you to keep your repository in good shape moving forwards!

Migration tool updates in OpenInsight 10.2.1

Due to a significant rise in OpenInsight migrations in the past few months and the resulting feedback, we’ve fixed several bugs in the migration tool for the next release and we’ve also made one major change which we’ll describe here.

The previous migration tool post had a small note at the end called “Bonus Trivia – a quick note on migrating data” in which we recommended ignoring the option to move or copy your data tables with the tool and do it manually instead. This is still the preferred course of action, but the tool has been updated to offer more useful functionality instead: it now has the ability attach the same list of tables as your v9 system but at a different location, which should save you time when migrating an application with a large number of tables.

Attaching tables in the migration tool

OpenInsight v10.2.1 Migration Tool showing new "attach tables" option
Migration Tool Start Page

If you are familiar with previous versions of the tool you will see the following changes have been made:

  • The Move and Copy Table actions have been removed from the list of Actions
  • The “Attach” action has been renamed to “Attach Original”. This attaches the tables at their existing location as defined in your v9 application DBT file.
  • An “Attach New” action has been added. This attaches the same list of tables as the v9 application but at a different location instead. When you select this option you must specify the location in the “New Location” column.
  • A “Save database definition” check box has been added. This is enabled when you have selected at least one of the “Attach Original” or “Attach New” actions.

So, the recommended course of action for handling your tables when migrating your application for the first time is to:

  1. Move or copy your existing data tables to a new location if you wish.
  2. If your tables have been moved/copied then specify the “Attach New” action for each affected data volume and enter the new location.
  3. If your tables have not been moved then choose the “Attach Original” action instead.
  4. Check the “Save database definition” check box.

On subsequent re-runs of the tool you may simply select the “Ignore” action for your data volumes.

Hopefully this update will make migrating systems with many tables much easier for you.

Profile logging updates in OpenInsight 10.2

Previous releases of OpenInsight have included a simple logging system that records all stored procedure calls and the time taken to execute them. This logging system is enabled by creating a blank file called “RevProfile.log” in the OpenInsight directory before the application is started. If this file is present when the system boots it creates a new log file (with a name based on the application’s Windows Process ID) and writes all stored procedure activity to it until the application is stopped.

Whilst this can be a useful tool it does suffer from a few issues:

  • The log file records all activity. This usually results in very large files that are difficult to navigate and process, making them very tedious to use.
  • There is no facility to annotate parts of the log, so it can be difficult to narrow down the actual section of code that needs to be profiled.
  • The profile timing uses the classic Windows “tick count” which has a granularity of 16ms. Many stored procedures take much less time to execute than this, so entries in the log can be wildly inaccurate, usually appearing as “0ms” or “16ms”.
  • There are no tools to actually parse the log so that it can be analyzed more easily.

With this release of OpenInsight we have provided some new functionality to address these issues, namely:

  • The “RevProfileLog” function, and
  • The “RevProfile Log Analyzer” form.

In this post we’ll take a look at these additions and examine how they can help in your application development.

The RevProfileLog function

This is a new stored procedure for version 10.2 that allows much greater control of the profile logging process and offers the following benefits:

  • It can be started and stopped as needed, allowing the scope of recording to be narrowed to a critical area (we call this “Dynamic Logging“, as opposed to the old way of profile logging mentioned above, which we call “Static Logging“).
  • The log file can be created using a custom name and location.
  • The file can be appended to each time it is started, or cleared.
  • The log can exclude specific stored procedures.
  • The log can record notes against a specific stored procedure to help identify a particular call in the log.
  • The log can record arbitrary text in the file to help with subsequent analysis.

All of this is controlled via the new RevProfileLog stored procedure (this is compiled as a subroutine so has no return value):

Call RevProfileLog( Method, Param1, Param2 )

The Method parameter is a numeric value that specifies the logging operation to perform; the Param1 and Param2 parameters depend on Method as described below:

MethodDescriptionParam1Param2
1Start Log: Starts the profile logging activity.The name of the log file to use or create.A boolean flag – if TRUE$ then the log file is cleared before use. Defaults to FALSE$.
2Stop Log: Stops the profile logging activity.N/a.N/a.
3Set Note: Appends text to the next stored procedure call written to the log. It is reset to null afterwards.The note text.N/a.
4Output Text: Outputs text to the log.The text to output.The indent to output to. Specify “-1” (the default) to output at the current indent, otherwise specify a value between 1 and 256 if desired.
5Exclude Proc: Prevents a stored procedure from being included in the log file.The name of the stored procedure (upper- case).N/a.
6Include Proc: Removes a stored procedure from the list of excluded stored procedures so that it may be written to the log again.The name of the stored procedure (upper-case).N/a.
7Clear Excluded: Clears the excluded stored procedure list.N/a.N/a.

Equates for these methods can be found in the RTI_REVPROFILE_EQUATES insert record.

Example: Profiling a call to Get_Property

Compile Subroutine Test_RevProfileLog( void )

   Declare Function Get_Property
   $Insert RTI_RevProfileLog_Equates
   $Insert Logical
   
   LogFile = "c:\temp\test_revprofile.log"
   
   // Create the log file and clear it before it is written to:
   Call RevProfileLog( RPL_STARTLOG$, logFile, TRUE$ )
   
   // Let's not see any RTP57/A calls (if any)
   Call RevProfileLog( RPL_EXCLUDEPROC$, "RTP57" )
   Call RevProfileLog( RPL_EXCLUDEPROC$, "RTP57A" )
   
   // Add a note so we can see why we are calling Get_Property
   Call RevProfileLog( RPL_SETNOTE$, "Getting SYSTEM VERSION" )
   Version = Get_Property( "SYSTEM", "VERSION" )
   
   // Add some text to the log, but don't indent it.
   Call RevProfileLog( RPL_OUTPUTTEXT$, "Done with this log now ***", 0 )
   
   // Stop the log
   Call RevProfileLog( RPL_STOPLOG$ )

Return

Produces the following log file:

		GET_PROPERTY 0.00 Getting SYSTEM VERSION
			PS_GET_PROPERTY 0.12
				OEREQINFO 0.15
				OEREQINFO 2.29 2.14
			PS_GET_PROPERTY 2.31 2.19
			PS_GET_PROPERTY 2.32
				OEREQINFO 2.32
				OEREQINFO 2.42 0.10
			PS_GET_PROPERTY 2.43 0.12
			PS_GET_PROPERTY 2.44
				OEREQINFO 2.44
				OEREQINFO 2.53 0.09
			PS_GET_PROPERTY 2.55 0.11
			PS_GET_PROPERTY 2.55
				OEREQINFO 2.56
				OEREQINFO 2.65 0.09
			PS_GET_PROPERTY 2.66 0.11
			RTP65 2.67
			RTP65 2.67 0.01
			PS_GET_PROPERTY 2.68
				OEREQINFO 2.69
				OEREQINFO 2.78 0.09
			PS_GET_PROPERTY 2.79 0.11
		GET_PROPERTY 2.80 2.80
>> Done with this log now ***

Things to note:

  • Text lines added with the “Output Text” method are prefixed with a “>>” string to denote that they are text.
  • The timings now use the Windows high resolution “QueryPerfomanceCounter” functions to record timings, so the results are far more accurate and we’re now reporting at a 100th of a millsecond.
  • The indenting does not begin at “level 1” because the system call stack was already several levels in before logging was started.
  • Calls to RevProfileLog itself are always excluded.
  • As we mentioned above we call the original method of profile logging “static logging” (i.e. create a file called “RevProfile.log” and record everything). This feature still works in the same way, but with the added bonus of using the improved timings and respecting all of the RevProfileLog function methods except for the “Start Log” and “Stop Log” methods. They are ignored during static logging.

The RevProfile Log Analyzer form

This is a new form (called RTI_IDE_ANALYZE_REVPROFILELOG) that can parse a RevProfile log file and present the information in a format that is easy to use.

For example, here is the small log file example shown above processed and loaded into the form:

An image of the RevProfile Log Analyzer form (RTI_IDE_ANALYZE_PROFILELOG).

Using this form is fairly simple: just select the log file you want to analyze and wait for the form to parse and process the information. Once this has been done the data from the log is presented in two sections:

  1. The Call Trace Log (on the left), and
  2. The Stored Procedure Call Details (on the right)

The Call Trace Log

This is a TreeListBox control that shows the sequence of calls along with the time taken for that call. It mirrors the structure of the actual log file and displays text notes using a different icon (a green globe), rather than the blue one used for stored procedure calls.

Double-clicking on a stored procedure call selects it in the Stored Procedure Call Details section on the right.

The Stored Procedure Call Details

This section comprises two EditTable controls:

  • The top one contains a list of all the stored procedures found in the log, along with the number of times each was was executed and the total time spent executing.
  • The bottom one details the individual calls to the selected stored procedure – each entry in the table shows the index of the call in the Call Trace Log, the line number in the actual log file where the call was recorded, and the time taken by that call. Double-clicking a call selects the matching entry in the Call Trace Log opposite.

Things to note

  • Both edit tables support sorting via double-clicking on the appropriate column header.
  • Annotated stored procedure calls (i.e those with a note added to them via the RevProfileLog “Set Note” method) are separated from calls to the same stored procedure that are not annotated. This is to ensure that it is easy to isolate and find them in the output.

Very large log files – a cautionary note

RevProfile log files can grow rather large, especially the “static” log files that record the entire lifetime of the application. Whilst these files can be easily read and parsed in smaller chunks, representing their call trace structure in a something like a TreeListBox control can be challenging due to the time taken to load items. For example, something like a 15MB log file with nearly 200,000 calls may take several seconds to appear in the control once the log has been parsed and we set the control’s LIST property (i.e. “Loading call trace list …” appears in the progress bar), and the UI may appear frozen. This is not the case – if you are loading a very large file be sure to exercise a little patience before you reach for the Task Manager!

Conclusion

The new RevProfileLog function provides much better and much-needed profile logging functionality to OpenInsight, making the information much easier to use, and we’re sure it will help you improve the performance of your applications.

(This functionality is available in OpenInsight 10.2 from the Beta 3 release onwards)

(Edit 26 Jun 24 – Corrected name of analyzer form)

Migration tool updates in OpenInsight 10.2

Based on user feedback (and our own experience) version 10.2 includes the following new updates for the OpenInsight migration process that we think you’ll find invaluable when moving your applications:

  • The ability to choose individual migration tasks
  • The ability to select individual entities
  • The ability to migrate SYSPROG components

We’ll take a look at each of these features below, along with a small note on “migrating” your data.

Task Selection

In previous releases the Migration Tool had a fixed set of tasks to perform which it did in sequence. In this release you may now specify which tasks you wish to execute instead, which might save some time if you have to repeat the migration process more than once (a common requirement if needing to keep a version 9 application synchronized with version 10 during upgrade development).

Migration Tool Selection Page

By default all tasks are selected, but you may deselect any that you don’t wish to run.

TaskDescription
Migrate App SettingsMigrates information from the SYSAPPS record.
Migrates database environment settings.
Migrates custom event (CFG_EVENTS) settings.
Migrate UsersMigrates user details into the SYSUSERS table.
Migrate DLL PrototypesMigrates “DLL_” records in SYSPROCS to DLLPROTOTYPE entities.
Migrate C-StructuresMigrates “STRUCT_” records in SYSOBJ to DLLSTRUCT entities.
Migrate Promoted EventsMigrates promoted event records in SYSREPOSEVENTS/EXES to PROMOTEDEVENT/EXE entities.
Migrate RDK recordsMigrates SYSREPOSVIEWS/RELEASES records to REPVIEW/RELEASE entities.
Migrate EntitiesMigrates application entities. Note that these can now be specified individually if desired (see below).
Migrate Arev32 recordsMigrates Arev32-specific records in SYSENV.
Migrates Arev32 records from SYSPRINTERS.
Clean RelationshipsRemoves invalid relationships (Using/Used By).
Compile Stored ProceduresCompiles migrated stored procedures.
Compile Promoted EventsCompiles migrated promoted events.
Compile FormsCompiles migrated forms.
Migration Tool Tasks

Entity Selection

If you choose the “Migrate Entities” task then you now have the option to select individual entities to migrate (If you don’t select any then all entities in the v9 application will be migrated).

To select individual entities right-click on the “Selected Entities” control and choose “Select Entities” from the menu, or click the “…” options button in the top-right of the control’s header:

Selected Entities option button

You may now use the “Select Repository Entities” dialog to choose which entities you wish to migrate:

Select Repository Entities dialog

As you can see there are quite a few options you can use to find the entities you wish to migrate – these options make a “repository filter” that is used to create a list to choose from:

OptionDescription
Filter IDName of a saved filter (REPFILTER entity). Choosing a filter will load the other selection criteria controls in this dialog with the saved filter details.
View IDName of a saved Repository View (REPVIEW entity). If specified, the list of entities in this View is used as a starting point for the filter when it executes.
Entity IDIf specified only entities matching this name will be selected. The standard ‘[]’,’]’ and ‘[‘ RList-style syntax for “containing”, “starting with” and “ending with” is respected.
Date FromIf specified only entities updated from this date will be included. This option supports a “nD” syntax where “n” is the number of days since the current date. E.g. to select entities updated since the previous day specify “1D”, for entities updated in the last week specify “7D” and so on.
Date ToIf specified do not include entities after this date. This option supports the same “nD” syntax as the “Date From” option.
Updated ByIf specified then only entities updated by the specified user(s) are returned. This option may contain a “,” delimited list for matching against multiple users.
Filter OptionsOnly entities matching the checked options will be returned. Note that for a migration operation the “Show Inherited Entities” checkbox is always disabled (This dialog is used elsewhere in the system to select repository entities, so it can be enabled in such scenarios).
Filter By TypesAllows you to choose specific entity types and classes to include. If blank then all types and classes are included in the search. Click the “…” options button in the top right corner of the control, or right-click to use the context menu to launch a dialog to select the types and classes.
Filter By SELECTThis option allows you to enter an RLIST SELECT statement against the SYSREPOS table that will be used to filter the entities.
Save FilterClick this button to save the filter criteria for future re-use (stored as a REPFILTER entity in the repository).
Apply FilterClick this button to execute the filter criteria and load a list of matching entities into the “Available” controls below. If you have not entered any criteria then all entities in the v9 application will be selected.
Filter Options

Once you have applied your filter the “Available Types” control is populated – selecting a Type populates the “Available Entities” control where you can select the items that you wish to migrate. Use the “>” and “>>” buttons to add them to the “Selected Entities” control on the right, or the “<” and “<<” buttons to remove them.

Selecting Entities in the dialog

Things to note:

  • As items in the “Available Entities” control are selected, the list of items that they use is shown in the “Related (Used By) Entities” control below. These can also be selected if you wish.
  • Each of the “Available” and “Selected” controls have context menus and “…” options buttons (top-right corner).
  • If the “Auto-Add Executable” option is checked when you add entities to the “Selected Entities” control then any executable versions of the entity (e.g. STPROCEXE, OIWINEXE etc) are also added.
  • If the “Auto-Add Source” option is checked when you add entities to the “Selected Entities” control then any source versions of an executable entity (e.g. STPROC, OIWIN etc) are also added.

Clicking “OK” takes you back to the main migration form where you will see the list of entities selected. From there you may click the “Next” button to start the migration process.

(Note that the task and entity selections are saved automatically between migrations so that you may use them again if you wish.)

Migrating items from SYSPROG

Previous versions of the migration tool prevented migrating any entities from the SYSPROG application. This was to preserve the system from being damaged in case older v9 entities overwrote the v10 ones, thereby rendering it unusable.

With this release you may run the migration form from your SYSPROG application with the following restrictions:

  • You may only execute the following tasks:
    • Migrate RDK Records
    • Migrate Entities – You must specify the entities to migrate – you cannot migrate “All Entities”!
    • Migrate Arev32 Records
    • Clean Relationships
    • Compile Stored Procedures
    • Compile Forms
Migrating SYSPROG options

Bonus Trivia – a quick note on migrating data

The migration process begins with creating a new application in version 10 and then executing a form called RTI_MIGRATE_V9_TO_V10, which guides you through the steps necessary to move your application from version 9.

Migration Tool Start Page

At this point you select the location of the application you are migrating from, after which you see the data volumes that are attached in it. There are options for the data to be “migrated”, but in my experience it is best to move and attach the data you want for your application before you attempt the migration rather than use the facility here. The migration process does not change your data at all so there is no real advantage to using this facility (it is basically provided as a convenience), and in fact, if you are moving tables containing relational indexes they will be removed. It is far easier to copy/move and attach the tables yourself using the Database ToolPanel before you get here.

More Bonus Trivia – Sharing index data between v9 and v10

While on the topic of migrating data it is also worth taking a look at the end of this blog post by Sprezzatura if you intend to share your tables between v9 and v10 systems – you must make sure that you run the indexing system in a v9 compatible format:

   Indexing Issues In Large Tables

Conclusion

The migration tool has been significantly improved for the version 10.2 release and we’re sure you will find it much more helpful when moving your older applications to the latest version of OpenInsight.

The Case of the Extra Pixel

In the current OpenInsight 10.1 Beta program, Martyn at RevSoft UK had reported a bug about the Height property creeping up by a pixel each time he opened a form. This was traced to the point when the menu structure was parsed and created: it was actually inserting an extra pixel, so this was fixed and the form Height now stayed the same between each opening.

However, a little more testing against a form without a menu revealed another issue – in some cases a pixel was added to the Height but it didn’t creep up on each subsequent opening:

E.g. when set to a Height of 400 and saved, the form would re-open with a Height of 401, but it would stay at the same value afterwards; not the same bug as before but it did need investigating

The Height and the ClientHeight properties

As some of you will know, Windows forms are split into two areas (1):

  1. The “Nonclient area” which contains items such as the borders, menus and title bars, and
  2. The “Client area”, which is the part that contains the controls.

When an OpenInsight form definition is saved the actual Width and Height properties are not used. Instead, the ClientWidth and ClientHeight properties (i.e. the dimensions of the Client area) are saved because Windows can change the size of the Nonclient parts when a form is run on different systems with different visual styles, and this can make the form’s Client area the wrong size when created from a saved Width and Height (as we all found out many years ago when Windows XP was released). In our particular case above, when the form was saved and reopened, the ClientWidth and ClientHeight properties were correct, but the Height had gained a pixel.

E.g. When set to a Height of 400, the saved form ClientHeight was 365. When the same form was reopened the ClientHeight was still 365, but the Height was now reported as 401.

Height, ClientHeight and High DPI

I run my primary and secondary monitors at different DPI settings to ensure that scaling works correctly, and in this case, at 192 DPI (i.e. scaled to 200%), it transpired that the integer rounding used during scaling was the issue because:

  • Setting the Height to 400 resulted in a ClientHeight of 365.
  • Setting the Height to 401 also resulted in a ClientHeight of 365.
  • Setting the ClientHeight to 365 resulted in a Height of 401.

I.e. setting the ClientHeight to a specific value, and then retrieving the form’s actual height in real pixels, and then scaling it back to 96 DPI (all values in the Form designer are shown and stored at 96 DPI), gave the extra pixel. Because we don’t record the Height in the form definition we have no way of knowing that the ClientHeight was set from a value of 400 rather than 401 when the form was reopened in the designer, so we have to go with the 401. Mystery solved!

Of course, this looks odd, but it’s just an artifact of the scaling calculations. The crucial value is the ClientHeight because this is the value that is recorded and used, and this is what needs to be preserved when forms are saved and reopened. To help put your mind at ease about this, the ClientWidth and ClientHeight properties have now been exposed (for forms only) in the Form Designer, so you can be confident that the correct size is always being maintained (ClientWidth and ClientHeight are normally runtime only properties).

E.g. In the following two images (saved and reopened) you can see that the pixel height has increased, but in both cases the ClientHeight (365) is preserved and is correct:

Image of form with a saved Height property of 400
Form saved with a Height of 400
Image of reopened form with a Height property of 401
Form reopened, now with a Height of 401

Conclusion

  • Windows XP taught us many years ago that the Width and Height properties are not reliable when creating a forms as they can produce inconsistent results on different systems, so we always rely on the ClientWidth and ClientHeight properties instead.
  • Don’t be concerned if you see a slightly different Height value when you reopen a form if you’re running at a high DPI setting – the crucial property is the ClientHeight value – as long as this is consistent there is no actual problem.
  • To make sure you can monitor this yourself the ClientWidth and ClientHeight properties have been exposed in the Form Designer, and you can edit these directly if you wish.

(Note: the ClientHeight and ClientWidth properties are only exposed after builds later than the current Beta 3 release)

(1) If you are not familiar with Client and Nonclient areas in Windows GUI programming you can find out more information here).

Reordering tabs with the AllowDragReorder property

The next release of OpenInsight includes a new TABCONTROL property called ALLOWDRAGREORDER, which allows you to drag a tab to a new position within the control. It’s a simple boolean property, and when set to True tabs may be dragged and reordered with the mouse – an image of the tab is moved with the cursor, and a pair of arrows are displayed to mark the potential insertion point.

Here’s an example of a tab being dragged in the IDE:

Shows a image of the IDE with a tab being dragged by a cursor, along with the drag0image and the insertion marker arrows.

Bonus trivia

  • The tabs may be scrolled while dragging by hovering outside either edge of the control.
  • This property is not supported for:
    • MultiLine tab controls
    • Vertically-aligned tab controls
  • The LISTBOX control also supports this property for reordering its items – see the “Order Tabs” dialog in the Form Designer for an example, or the list of types in the IDE’s “Open Entity” dialog.

Context Menu updates

The next release of OpenInsight sees a few updates to context menus and the ContextMenu Designer, so in this post we’ll take a brief look at these upcoming changes.

Moving the focus

One important aspect of standard Windows context menu behavior is that the focus is moved (if possible) to the control that the menu belongs to. Current versions of OpenInsight do not follow this pattern so the next release includes a fix for this, and this is something you should be aware of just in case it impacts your application (though to be honest, we’re not really expecting it to!).

Test-Run support

The Context-Menu Designer now supports the IDE “Test-Run” feature, so that you can see how your context menu will appear when you use it in your application.

When you test-run your context menu you will see a simple dialog box with an edit control (EDL_TEST) and and a static control (TXT_TEST) like so:

Test-run context menu dialog box

Right-clicking either of these controls displays your context menu:

Selecting an item displays it’s fully-qualified name, which has the standard format of:

<windowName> "." <controlName> ".CONTEXTMENU." <itemName>

So, for the test run dialog, it will be one of the following:

"RTI_DSN_CONTEXTMENU_TESTRUN.EDL_TEST.CONTEXTMENU." <itemName>
"RTI_DSN_CONTEXTMENU_TESTRUN.TXT_TEST.CONTEXTMENU." <itemName>

E.g.

Message box showing the name of the menu item that was clicked

Common menu support

The initial release of the ContextMenu Designer in v10.0.8 included check-boxes for two “common menu” options as shown in the screenshot below. Each of these options appends a set of standard menu items to your context menu, and both have been enhanced for the next release and include new artwork as well.

Shows the Content Menu designer with the  "Include OI Menu" and "Include Windows Menu" check-boxes highlighted.

The “OI Menu” appends the following items:

  • Options – Display options for the current control.
  • Help – Display help for the current control.
  • Data Binding – Display data-binding information for the current control.

Whilst the “Windows Menu” appends the following standard “Edit” items instead:

  • Undo
  • Cut
  • Copy
  • Paste
  • Delete
  • Select All

In both cases the default system CONTEXTMENU event (i.e. the event responsible for actually displaying the menu) synchronizes the items to the parent control by using the HELPFLAGS and EDITSTATEFLAGS properties respectively.

(The definition for these items can be found in the SYSPROG “OIMENU_” and “WINMENU_” ContextMenu entities respectively – you may adjust these if you wish, but be aware that they may be overwritten in future OpenInsight updates, so you should make copies in your own application).

The @MENUPARENT pseudo-control name

When using QuickEvents there are several pseudo-control names you can use, such as “@WINDOW”, “@FOCUS” and “@SELF”, that are resolved to a “real” control name at runtime.

However, in order to be able to reference the context menu’s parent control at runtime we’ve introduced a new pseudo-control name called “@MENUPARENT”. This resolves to the name of the control displaying the menu and should be used in place of “@FOCUS” because it is perfectly possible for controls that don’t accept the focus (like Static Text controls) to have a context menu, and @FOCUS would not resolve to the correct value. Note that @MENUPARENT can only be used with MENU QuickEvents for context menu items – it cannot be used with any other type or event.

Shows the @MENUPARENT pseudo-control name being used for a menu QuickEvent

Context menus are an essential part of modern user interface design and we encourage you to use them as much as possible in your own applications – hopefully you’ll find that the tools provided in OpenInsight 10 make this easy to achieve!

Resizing the RevEngine window

The RevEngine window can sometimes be a helpful tool during the development process, especially when you’re trying to determine just what commands the engine is actually executing, but unfortunately it’s always been a fairly small fixed-size window which can result in a lot of tedious horizontal scrolling when trying to view the contents.

As there’s only so much H-scrolling a person can take, we finally bit the bullet for the next release and made the window resizable instead, so now you can change it to something more comfortable to use as illustrated here:

The incredible resizable RevEngine window

(As an added bonus it’s also DPI-aware so will scale properly to different monitors as needed)

Of course, the RevEngine window is normally not a part of the system that we expose to our users because their usual reaction is to try and close it, and this generally tends to hang or crash the application. In order to mitigate this we also included one more change – if you click the close button the engine will not terminate – it will simply become hidden instead, so even if your users do see the RevEngine window and attempt to close it, they will not crash your application (they will just have to try harder – you know what they’re like… )

However, if you do need to show or hide the RevEngine window in your system it’s as easy as this:

Declare Function GetEngineWindow
$Insert msWin_ShowWindow_Equates

Call MsWin_ShowWindow( GetEngineWindow(), SW_SHOWNORMAL$ )

Hopefully this update should make your applications a little more user-proof and make some development tasks a little easier.

Databinding in the Form Designer

Still on the topic of UI updates in the next release we also took a look at the Databinding dialog in the Form Designer, which had been in need of a make-over for some time. Based on user feedback we wanted to provide much more information when selecting columns and so applied this to the redesign, which now looks like this:

Updated Form Designer Databinding dialog
Redesigned databinding dialog

As you can see, there’s quite a few changes so here’s a brief description of the new features:

  • Typing in the Table box uses AutoComplete to provide a matching list of tables
  • Typing in the Column box auto-selects the first match in the list below
  • The list of columns includes the field position as well as the name
  • The list of columns can be sorted from options on the context menu:
Databinding context menu
  • Columns can be filtered by type (F or S)
  • Columns can be filtered so that only multi-valued columns are shown (this is the default for columns bound to an EditTable control)
  • Use the “No Column Selected” option to clear Databinding information from a control
  • The dialog is resizable and remembers the size between calls.
  • Summary information for each column can be seen in the grid control on the right (This is view-only and cannot be used to edit the details – this may change in a future update, but not this one).
    • Description, Formula, Validation and Heading can be expanded to see their full details
Databinding dialog and formula details
Databinding and expanded formula details

Hopefully this will provide a welcome improvement to working with data-bound forms in the next release.

A tour around the updated IDE Database Toolpanel

Contrary to popular belief, or indeed the evidence of your own eyes, this blog is still actually alive, so in the next few posts we’ll try and look some of the work that’s been going on behind the scenes for the next release. In this post we’ll take a quick tour around the IDE Database Toolpanel that’s had a much-needed face-lift to improve it’s usability:

New Database Toolpanel
Updated IDE Database ToolPanel

As you can see it looks a little different now – we’ve updated the artwork, and you can see that different table types have different icons:

  • Dictionary tables have a purple book overlay marker
  • Index tables have a green book overlay marker
  • The different data-source types (RTP57, SysColumns, DSBFS etc) have their own icons

We’ve also changed the layout and size of the toolbar buttons so there are five that fit much better into the IDE. From left to right these are:

  • New table
  • Add table
  • Alias table
  • Save database definition
  • View options

The View options button loads a dialog as a “dropdown panel” that defines what you see in the table list:

Database Toolpanel View Options

Most of these are self evident, but the “Group by table name” option is new – it simply controls how tables are sorted in the list – when the box is checked the data, dictionary and index tables appear together, when unchecked they appear in proper ascending alphabetical order (Implementing this dialog as a “dropdown panel” is an interesting exercise in it’s own right and we covered this here).

The filter box remains the same – simply start typing to restrict the list to those table names starting with the same string:

Database Toolpanel Filter

We’ve also given the context menu an overhaul, both visually and in terms of making it more context aware based on the table that you right-click on (only enable index options for index tables, verify options for LH tables and so on):

Database Toolpanel Context-menu

Underneath the hood there are a few other changes – including how this toolpanel is updated based on changes to the database, and when warnings about saving the database definition are given. Hopefully you’ll find using this part of the IDE easier in the next release.