
A Technical Preview

A Technical Preview
One style of programming we generally try to avoid is placing executable code statements (*) in a “$insert” record (i.e. an STPROCINS entity) and using that in another program because it usually suffers from the following problems:
However, whilst working on the new Form Designer we found there was quite a bit of common code that was shared between the various modules used by the form parser and compiler, and we obviously didn’t want to duplicate this in each one. Normally we would just move the code into a separate stored procedure and call that from each module, but that just adds extra overhead in a process that we really wanted to keep as fast as possible, and so we looked at another option: moving it into an insert record instead. Sharing the code this way means that it runs “inline”, thereby removing the need to create another call-frame, move variables on and off the stack, and so on.
The shared code involved was fairly straightforward, well-tested, and limited to a few small subroutines, so the only real issue to overcome was: how can we easily update any “host” stored procedures in the event of the insert record being changed?
Well, one of the nice things about the OpenInsight repository is that it tracks the various relationships between entities in an application, and some types support a method called TCOMPILE (Tree-Compile) that allows an entity to compile any other entities they are using during the compilation process as well. However, in this case we needed to do the opposite and compile those entities that were using the insert record instead, and so we created a TCOMPILE method for the STPROCINS type that processes this list of “used-by” entities and executes their normal COMPILE method after the insert record has been saved. This results in a simple way to ensure that changes are implemented across any affected programs.
Whilst we wouldn’t say we exactly endorse embedding programs in this way, it does remain a useful technique for sharing code in some limited cases, and with the new TCOMPILE method it is now much easier to manage too.
(* e.g. code statements such as “x = y + z; call msg( @window, txt );” etc, as opposed to simple constant declarations like equate statements).
(Disclaimer: This article is based on preliminary information and may be subject to change in the final release version of OpenInsight 10).
As covered in our recent posts on scaling and High-DPI, OpenInsight now has the capability to dynamically alter the scale of a form at runtime, taking care of layout, fonts and images. However, there may be circumstances where this is not sufficient – perhaps you need to tweak the layout yourself, or perhaps you need to display a specific image rather than rely on a DPI Image List. In this case you will need to know when the scaling operation has taken place, and you can handle this in the new SCALED event:
This WINDOW event is triggered when the SCALEFACTOR property is changed or when the form is moved to another monitor with a different DPI.
bForward = SCALED( ctrlEntID, ctrlClassID, origDpiX, origDpiY, origScaleFactor, |
                                           newDpiX, newDpiY, newScaleFactor )
The event is passed the following event-specific arguments:
The system performs no default processing for this event.
Of course, this leads us to one of the main issues with handling scaling: how do you get and set layout properties like SIZE for a scaled form? What units are used?
There are basically two choices available:
Using DIPs may seem easiest at first, especially in terms of backwards compatibility with existing code, but it does have some drawbacks:
So, to keep things simple, OpenInsight operates in Pixel mode by default, which means it keeps a single and accurate coordinate system. Remember, scaling is an “opt-in” system, meaning that none of your existing forms will scale unless you specify otherwise (via the DPISCALING and SCALEFACTOR properties), so you can review your code before enabling it and ensure that you don’t encounter any problems.
However, even though the default coordinate system is Pixels we don’t want to remove the choice of using DIPs if you prefer, so forms now support a new SCALEUNITS property that allows properties like SIZE to operate in either DIP or Pixel mode.
This is a WINDOW property that defines the units used when accessing layout properties like SIZE, CLIENTSIZE, TRACKINGSIZE and so on. Note that it also affects events like BUTTONDOWN and methods like TEXTRECT too.
It accepts the following values:
Example: Scale a form and examine it’s SIZE using different SCALEUNITS
* // SCALEUNITS property equates - (from PS_WINDOW_EQUATES)
 equ PS_SCU_PIXELS$ to 0
 equ PS_SCU_DIPS$   to 1

* // Assume we are currently running with Pixel units
call set_Property_Only( @window, "SIZE", 10 : @fm: 10 : @fm : 400 : @fm : 300 )

* // Now scale the window to twice its normal size ( actual XY remains constant
* // for a form when setting SCALEFACTOR - only the width and height change)
call set_Property_Only( @window, "SCALEFACTOR", 2 )

* // SIZE returns 10x10x800x600
pxSize = get_Property( @window, "SIZE" )

* // Now set the scaling units to DIPS
call set_Property_Only( @window, "SCALEUNITS", PS_SCU_DIPS$ )

* // SIZE returns 5x5x400x300
dipSize = get_Property( @window, "SIZE" )

* // Note that the X and Y returned in the DIPs SIZE above have also been scaled.
* // The form hasn't moved, but the units of measurement have changed, so the
* // location is reported relative to a _theoretical_ scaled desktop size.
At first glance it may seem that the SCALEUNITS property should be a SYSTEM property rather than a WINDOW one, but bear in mind that OpenInsight applications may inherit from one another, and executing a form designed for one set of units while running in another application with a different “global” setting would undoubtedly cause problems. Of course there’s nothing to stop you setting the SCALEUNITS to DIPs in a promoted CREATE event for your own applications but that’s another story…
There are six new WINDOW methods you can use to help with manual scaling – they convert between Pixels and DIPs based on the form’s current DPI and SCALEFACTOR (They are not affected by the SCALEUNITS property):
The “SCALE” methods perform a DIPs to Pixel conversion.
The “UNSCALE” methods perform a Pixel to DIPs conversion.
(You only really need the SCALEVALUE and UNSCALEVALUE methods, but the other four have been added to make things a little more convenient for you).
This method takes an unscaled FONT property and scales it relative to the current scale factor of the form.
scaledFont = exec_Method( @window, "SCALEFONT", origFont )
This method takes an unscaled SIZE property and scales it relative to the current scale factor of the form.
scaledSize = exec_Method( @window, "SCALESIZE", origSize )
This method takes an unscaled value and scales it relative to the current scale factor of the form.
scaledVal = exec_Method( @window, "SCALEVALUE", origVal )
This method takes a scaled FONT property and unscales it relative to the current scale factor of the form.
unscaledFont = exec_Method( @window, "UNSCALEFONT", scaledFont )
This method takes a scaled SIZE property and unscales it relative to the current scale factor of the form.
unscaledSize = exec_Method( @window, "UNSCALESIZE", scaledSize )
This method takes a scaled value and unscales it relative to the current scale factor of the form.
unscaledVal = exec_Method( @window, "UNSCALEVALUE", scaledVal )
Example: Moving a control using DIP coordinates on a form with Pixel SCALEUNITS
* // Example - Move a control using DIP coordinates. We get the current pixel
* //           size, unscale it so we have the value as it _would_ be at
* //           96DPI/ScaleFactor 1 (i.e. DIPs), offset it by 10 DIPs, scale
* //           it back to Pixels and and then move it.
* // Get the current scaled size (pixels) - assume we have a SCALEFACTOR of 1.5
ctrlSize = get_Property( myCtrl, "SIZE" )

* // Unscale it back to 96DPI/ScaleFactor 1.0 - i.e. to DIPs
ctrlSize = exec_Method( @window, "UNSCALESIZE", ctrlSize )

* // Adjust it to whatever we need (assume we want to offset it by 10 DIPs
* // (10 pixels at 96 DPI)
ctrlSize<1> = ctrlSize<1> + 10
ctrlSize<2> = ctrlSize<2> + 10

* // And ask the parent form to calculate where it _should_ be using the
* // current scale factor
ctrlSize = exec_Method( @window, "SCALESIZE", ctrlSize )

* // And move it using pixels ...
call set_Property_Only( myCtrl, "SIZE", ctrlSize )
The previous example is rather contrived and is really only there to highlight how the methods can be used. Another way of doing this would be to switch to DIPs using the SCALEUNITS property like so:
* // SCALEUNITS property equates - (from PS_WINDOW_EQUATES)
equ PS_SCU_PIXELS$ to 0
equ PS_SCU_DIPS$   to 1

* // Set the scaling units to DIPS
scaleUnits = set_Property( @window, "SCALEUNITS", PS_SCU_DIPS$ )

ctrlSize = get_Property( myCtrl, "SIZE" )

* // Offset the control by 10 DIPs
ctrlSize<1> = ctrlSize<1> + 10
ctrlSize<2> = ctrlSize<2> + 10

call set_Property_Only( myCtrl, "SIZE", ctrlSize )

* // And restore the SCALEUNITS
call set_Property_Only( @window, "SCALEUNITS", scaleUnits )
By default OpenInsight maintains automatic scaling for all controls on a form, even after you’ve manually set a scaled property yourself. However, you can opt out of this behaviour by using the boolean AUTOSCALE property:
This property applies to all controls (but not to WINDOW objects for obvious reasons).
(Disclaimer: This article is based on preliminary information and may be subject to change in the final release version of OpenInsight 10).
As we mentioned in our last post on High-DPI, the work needed to accommodate per-monitor DPI scaling in Windows 8.1 has also created the ability to scale OpenInsight forms to an arbitrary value outside of any system DPI settings. This new functionality is exposed via the SCALEFACTOR property described below.
This WINDOW property is a dynamic array comprising four fields:
<1> ScaleFactor
<2> Minimum ScaleFactor
<3> Maximum ScaleFactor
<4> ScaleFactor Increment
<1> ScaleFactor
This is a number that specifies how much to scale the form by. A value of 1 means that the form has no scaling applied, a value of 1.5 scales the form to one-and-a-half times its normal size and so on.
Note that the scale factor is applied after any scaling applied for system DPI. So, if your form runs on a 144 DPI monitor (150%) and has a scalefactor of 2 applied the actual scalefactor used is 3.0 (1.5 x 2.0).
<2> Minimum ScaleFactor
This specifies the minimum value that the ScaleFactor can be set to. By default it is set to “0.1”. This value can be set at design time. See the note on “Scaling Restrictions” below.
<3> Maximum ScaleFactor
This specifies the maximum value that the ScaleFactor can be set to. By default it is set to “5.0”. This value can be set at design time. See the note on “Scaling Restrictions” below.
<4> ScaleFactor Increment
If this field is set to a value other than 0 it allows the ScaleFactor to be adjusted via the Mouse-wheel /Ctrl-key combination, or with a “pinch-zoom” gesture if running under a touch screen. The increment value controls the rate at which the form grows or shrinks. This value can be set at design time.
Example 1: Set a form’s scale to twice its designed size while allowing the user to adjust the scalefactor by the mouse or touchscreen:
* // Note that we ignore the min and max scalefactors, leaving them at their
* // defaults.
scaleFactor = ""
scaleFactor<1> = 2    ; * // twice normal size
scaleFactor<4> = 0.1  ; * // allow mousewheel/gesture - each wheel notch
                      ; * // adjusts the scalefactor by 0.1
Example 2: Comparing OpenInsight forms with a SCALEFACTOR of 0.5 and 1.0 respectively (both running on a 144 DPI desktop with DPISCALING disabled)

Comparing SCALEFACTOR 0.5 vs 1.0
Example 3: Comparing OpenInsight forms with a SCALEFACTOR of 1.0 and 1.7 respectively (both running on a 144 DPI desktop with DPISCALING disabled)

Comparing SCALEFACTOR 1.0 vs 1.7
In Example 3 above note the quality of the magnifying glass glyph on the buttons in the scaled form: it is much clearer and sharper on the Search button than it is on the Split button. This is because the Search button was designed using a “DPI Image List”, which means that an array of images, along with a corresponding array of DPI values, was specified for this glyph rather than just a single image. OpenInsight scans this DPI Image List looking for the closest match it can find when performing a scaling operation. By contrast the Split button is using a single image designed for 96 DPI and stretched to fit, resulting in a blurry appearance.
(Note: We first mentioned this functionality in the section “Supporting images under High-DPI” in our original High-DPI post).
Or course, you may also find yourself in the position of not wanting a particular image scaled, and in this case we’ve added a new property to the Image API called IMAGEAUTOSCALE. This is a simple boolean property that controls if an image is scaled by the system during the scaling process. It’s default value is TRUE.
(We’ve also added a similar property to other areas of the system that use images as well, so there is a GLYPHAUTOSCALE property, a SPLITGLYPHAUTOSCALE property and so on).
The minimum and maximum size that a form can be rescaled to can be restricted by the minimum and maximum window sizes as defined by the OS. As a general rule this size is usually slightly larger than the size of the entire desktop across all monitors (See the GetSystemMetrics() Windows API function along with the indexes SM_CXMAXTRACK, SM_CXMINTRACK, SM_CYMAXTRACK, and SM_CYMINTRACK for more details).
You can, however, override this behaviour if you set the TRACKINGSIZE property for a form, specifying values large enough to handle your desired scaling range.
 * // Example - Ensure the form will actually scale to the min and max factors
 * //           we've set

 winSize     = get_Property( @window, "SIZE" )
 scaleFactor = get_Property( @window, "SCALEFACTOR" )

 trackingSize    = ""
 trackingSize<1> = winSize<3> * scaleFactor<2>
 trackingSize<2> = winSize<4> * scaleFactor<2>
 trackingSize<3> = winSize<3> * scaleFactor<3>
 trackingSize<4> = winSize<4> * scaleFactor<3>

 call set_Property( @window, "TRACKINGSIZE", trackingSize )
In our next post we’ll take a look at the new SCALED event and discuss how to interact with the system during a scaling operation.
(Disclaimer: This article is based on preliminary information and may be subject to change in the final release version of OpenInsight 10).
In a previous post we looked at OpenInsight’s new features for running on High-DPI systems, and we described how forms can properly scale themselves to take advantage of better resolutions, thereby avoiding unnecessary blurring as the window manager tries to compensate when faced with a non-DPI-aware application:

High-DPI comparison between v9 and v10
In the example above both forms are running on a desktop set to 144 DPI (150%). The top form is running under OpenInsight v9 and, as you can see, has been stretched by the system resulting in blurry outlines, icons and text. In contrast, the bottom form is running under OpenInsight v10 and has been scaled correctly – the checkbox image and icon are sharp and the font has been scaled to the correct point size. (A word of caution – if your own system is set to use High-DPI don’t bother viewing this image on a Chrome-based browser unless you’ve set _it_ to use High-DPI as well – generally Chrome doesn’t handle automatic High DPI scaling like IE and FF, so the image above will still appear blurry, as will this text!).
However, with the release of Windows 8.1 Microsoft have made some significant changes in this area that has also led to changes in OpenInsight’s High-DPI handling as well. Until Windows 8.1 the DPI setting for the system was constant across all monitors and fixed during the login process – selecting another DPI setting required logging out and back in again, or even a full reboot in the case of Windows XP. Now, with the steady increase in monitor resolutions across different form factors, Microsoft have added the ability to set the DPI per monitor, which means that forms created on one monitor may look too small or too big when moved to another monitor with a different DPI.
In order to deal with this at runtime, top-level forms are now notified by a new Windows message called WM_DPICHANGED, which is sent when either of the following happens:
This message is used by OpenInsight to adjust the scale of a form dynamically as required, so if a form’s DPISCALING property is TRUE you will see this happen as you drag it across monitors with different DPIs. All the rules described in the original post still apply of course:
(We’ve also added a new property called DPI to the WINDOW object, which returns the DPI of the monitor that the window is currently displayed on).
The fact that scaling has moved from a static to a dynamic operation has also led to the implementation of a new OpenInsight WINDOW property called SCALEFACTOR, which allows you to set the scale of a form to an arbitrary value at runtime, regardless of any DPI setting. We’ll take a look at this property in the next post.
In the meantime, you can find more information on Windows 8.1 per-monitor DPI scaling here:
(Disclaimer: This article is based on preliminary information and may be subject to change in the final release version of OpenInsight 10).
As you may (or may not) know variables in Basic+ are passed to stored procedures “by reference”, meaning that if you change a passed variable in the called procedure, that change is reflected in the calling routine (a fuller explanation of how this works can be found here). This behavior is critical to the way many system functions work (such as iconv and oconv) and is very useful in returning more than one item of data from a called procedure.
However, one place where this rule breaks down is when calling stored procedures via a QuickEvent, such as routing an event to a commuter module like so:
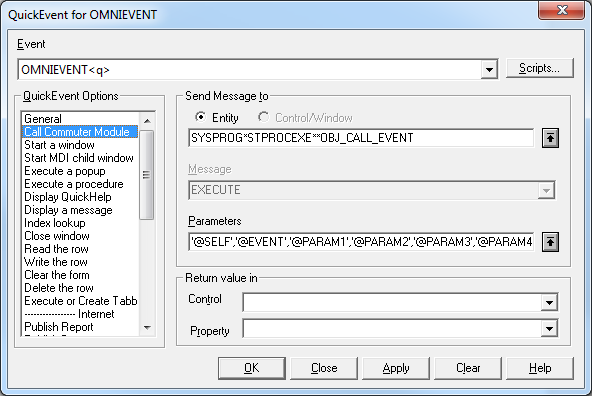
Example: Calling a Commuter Module from a QuickEvent
When you call a stored procedure in this way the system eventually passes your request to a routine called ExecNpHandler() which dispatches the event and its arguments to the desired target, However at this point the pass-by-reference chain gets broken because a copy of the argument is passed to the stored procedure rather than the original.
For example, if we used Send_Event() to trigger the OMNIEVENT event in the above example, and the commuter module changed Param2, the Send_Event() caller would not see the change (Note that if you use an Event Script handler then passing the event arguments by reference works as you would expect, and you will see changes made to your arguments by the Event Script handler).
While working on the v10 IDE this proved to be something of a problem because the framework relies on a series of OMNIEVENT calls to pass messages between various entities, and sometimes arguments are updated to let the caller know of things like state changes and suchlike. With something as complex as the IDE, writing the events as a series of Event Scripts was impractical so we took the opportunity to update ExecNpHandler() to respect the pass-by-reference paradigm instead – Now you get to see your changes in a consistent manner regardless of whether you prefer Event Scripts or QuickEvents.
So, is this change likely to impact you? In most cases the answer is no as ExecNpHandler() is normally the last handler to be called in the event chain, and any changes to passed arguments are usually ignored. Where this might be an issue is when:
In this set of circumstances you will probably see an effect, and you may have to modify your code accordingly.
(Disclaimer: This article is based on preliminary information and may be subject to change in the final release version of OpenInsight 10).
We’ve taken a look over the last few posts at some of the new features we’ve added to EditLine controls, but before we leave them we’ll mention a few miscellaneous new properties that you might find useful:
This is a simple boolean property. When set to TRUE all text in the control will be selected when the EditLine is given focus.
This is a string property that contains the text to display when an EditLine has no data. The text is normally displayed in a faded style to differentiate it from “real” text. It is intended primarily to give the user a simple hint on the purpose of the EditLine, or on the format of the data it should contain.
This property allows you to specify one or more characters as “Exit” characters, which means that if a user types any of them into the control the focus is automatically moved to the next control in tab-order as though they had hit the Tab key. This property is a simple string containing the Exit characters.
// Move to the next control if the user enters a "." or a space
exitChars = ". "
call set_Property( @window : ".EDL_IP1", "EXITCHARS", exitChars )
Note this property does not work if the PASSWORDSTYLE property is TRUE.
This property allows you to specify one or more characters that are “Valid” characters, which means that the user can only enter these characters into the control. This property is a simple string containing the characters that are allowed.
// Only allow numeric characters in EDL_NUMBER
validChars = "0123456789"
call set_Property( @window : ".EDL_NUMBER", "VALIDCHARS", validChars )
Note this property does not work if the EDITMASK property is set or the PASSWORDSTYLE property is TRUE.
(Disclaimer: This article is based on preliminary information and may be subject to change in the final release version of OpenInsight 10).
In a previous post we mentioned that the EditLine control now supports the Glyph API, we’ve also extended the Image API to both EditLines and EditBoxes, along with gradient background colors and translucency. Here are a few examples showing the results:

EDIT Control with Gradient BACKCOLOR

EDIT Control with TRANSLUCENCY of 50

EDIT Control with background image
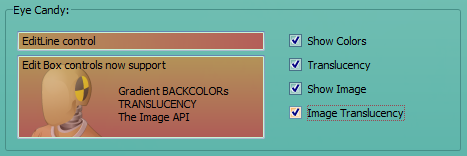
EDIT Control with translucent background image
(Disclaimer: This article is based on preliminary information and may be subject to change in the final release version of OpenInsight 10).
As you know some controls in OpenInsight support a set of properties called the Glyph API, and this has now been extended to EditLine controls as well. Of course it’s not the full API (see the supported properties below), as that wouldn’t make sense, but it does allow you to insert an image to the left or right of your text:

EditLine GLYPH with CueBanner
So now you can insert a handy search icon into your control, or perhaps a warning icon if the data in the control is invalid.
The following Glyph API properties are supported for EditLines:
(Disclaimer: This article is based on preliminary information and may be subject to change in the final release version of OpenInsight 10).
The ability to apply VALID and CONV properties to an EditLine control is a very powerful way to validate and format data entered in your applications, but this commonly relies on the user knowing how the data should be input without any visual clues being provided by the UI. Some formats like dates are fairly obvious, but others are not, and this can lead to user frustration when they are presented with a message box containing some cryptic and obscure error text from the depths of a custom Iconv() routine like this:

Cryptic IConv Message
In order to improve this situation the EditLine control now supports a new property called EDITMASK, which allows you to specify the input format of the data in a visual manner, along with the type of character that may be entered at each character position, thus reducing the probability of typing errors and thereby leading to a smoother user experience. For example here are two EditLine controls with an EDITMASK set for a phone number and a date respectively:
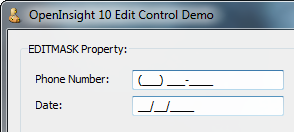
EDITMASK Phone and Date example
This property is a dynamic array composed of three fields:
<1> The Input Mask
<2> The Format Mask
<3> The Default Character
The Input Mask is what the user sees in the control when no data has been entered. The characters that they may edit are denoted by the “_” character, which is used as a placeholder. So, for a date the input mask could be “__/__/____”, meaning that they are allowed to edit the first two characters, the fourth and fifth character, and the last four characters. They will not be able to change either of the “\” characters.
The Format Mask controls the type of character that may be entered at each position where there is a placeholder “_” in the Input Mask. There should be one type specifier for each “_” character in the Input Mask, and a space character for the non-editable characters. The type specifiers are:
So, for our date example we could have “dd dd dddd”. Note that the Format Mask must always be the same length as the Input Mask, otherwise the EDITMASK property will not work.
The Default Character is the character used for each invalid character in the user input. This defaults to an underscore (“_”).
To create the phone and date examples shown above you would set the following EDITMASK properties like so:
phoneMask =       " ddd ddd dddd"    |
          : @fm : "(___) ___-____"   |
          : @fm : "_"

dateMask  =       "Dd Dd dddd"        |
          : @fm : "__/__/____"        |
          : @fm : "_"

objxArray =        @window : ".EDL_PHONE"
propArray =        "EDITMASK"
dataArray =        phoneMask

objxArray := @rm : @window : ".EDL_DATE"
propArray := @rm : "EDITMASK"
dataArray := @rm : dateMask

call set_Property( objxArray, propArray, dataArray )
There are also some other supporting properties that can be used with the EDITMASK property:
This is a boolean property that affects how the TEXT property works when an EDITMASK property is applied. When set to TRUE getting the TEXT property only returns the characters that can be entered by the user, ignoring any of the non-placeholder characters in the Format Mask. By default this property is FALSE.
This is a boolean property that affects how the TEXT property works when an EDITMASK property is applied. When set to TRUE setting the TEXT property only updates the characters that can be entered by the user, ignoring any of the non-placeholder characters in the Format Mask. By default this property is FALSE.
This property is essentially a wrapper around the normal TEXT property, behaves as if both GETMASKEDCHARSONLY and SETMASKEDCHARSONLY were set to TRUE, so in effect it is a “shorthand” way of accessing and updating the text that can be edited.
In the example below the EditLines on the right contain the MASKEDTEXT property of the EditLines on the left:
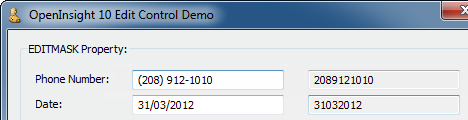
MASKEDTEXT example
(EDIT: 21 Aug 15 – Corrected EDITMASK member positions)
(Disclaimer: This article is based on preliminary information and may be subject to change in the final release version of OpenInsight 10).
