One of the goals for version 10 is better OLE control (OCX) integration and support. A major part of that objective is the ability to register OLE controls with the IDE and bind them to the database in a similar fashion to the standard controls such as Edit Lines, Edit Tables and so on. In this post we’ll be taking a brief look at how this new functionality is being implemented.
Registering OLE Controls
OpenInsight 10 supports a new repository type called “OLECONTROL”. This represents an OLE control “registration record” (stored in the new SYSREPOSOLECONTROLS table) which contains basic information, such as its CLSID and description, and the information needed for data binding, such as the name of the OLE property to use for the DEFPROP property.
The simple form below shows the information that can be held for an OLECONTROL entity (Note that this form isn’t final, right now it’s a “bare-bones” version that is being developed further to integrate with the new IDE, but it does allow full testing and validation).
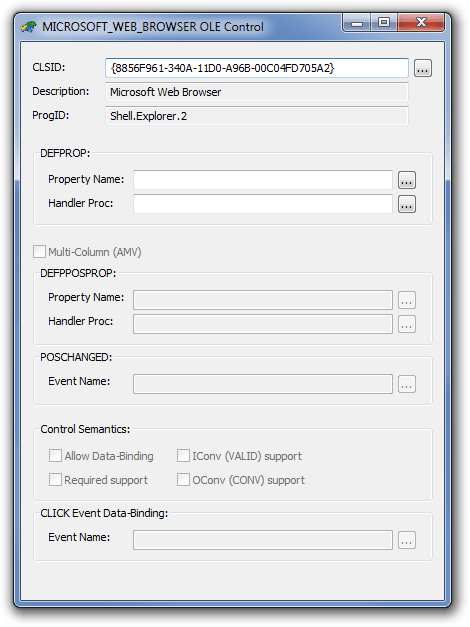
OLE Control Registration
The CLSID
The first, and most critical item of data, is the Class ID (CLSID) of the OLE control, which is a 128-bit number (called a GUID, or Globally Unique IDentifier) that uniquely identifies it. When you install an OLE control onto a system, the CLSID is used as a key in the registry where various bits of information about the control are stored.
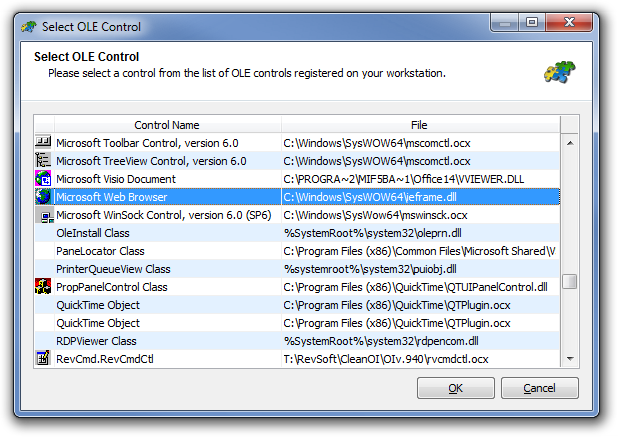
Older versions of OpenInsight have always required you to enter the CLSID manually when using OLE controls with the Form Designer, and this can be a tedious task if not provided with the control’s documentation, usually needing a good trawl through your Windows Registry or a special tool like Microsoft’s OLEView to find it. With version 10 we’ve included a new dialog that does the heavy lifting for you when you want a CLSID: It enumerates all the OLE controls that are installed on your system and presents them as a list for you to choose from, returning the CLSID when you click “OK”.

Select OLE Control
Once you have specified the CLSID you can save the record without any further input if you wish. The control won’t be data-bound but it will be added to the tool palette in the Form Designer as a new item so it is readily available for subsequent development purposes.
Data-binding OLE controls
If you wish to support data-binding the next item to specify is the DEFPROP property, which is a “synthetic” property that maps onto a “real” property (such as TEXT, VALUE, ARRAY etc.) at run-time. All data-binding in OpenInsight is handled through the DEFPROP property and it is the sole mechanism by which the form IO layer accesses data in the user interface.
For an OLE control DEFPROP can be mapped in one of two ways:
- By specifying an actual OLE property of the control (such as “Text” for example), or,
- By specifying the name of a Basic+ handler function that the form IO layer calls to handle the request. This latter method can be useful when dealing with a complex control such as a grid, that might need to insert/delete rows and set cells individually if it doesn’t have something like an intrinsic OpenInsight-style ARRAY property.
If you do specify a Basic+ DEFPROP handler function it must conform to the following interface:
   defPropVal = myDefPropHandler( ctrlEntID, flags, newValue, index )

      ctrlEntID -> ID of the control to get the value for
      flags     -> Denotes if this is a GET or SET/SETONLY request
      newValue  -> The new value if this is a SET/SETONLY operation
      index     -> Property index:
                       <1> Col
                       <2> Row
Note that the Option (“…”) buttons on the form present a popup of OLE properties and events, or matching Stored Procedures, as appropriate:
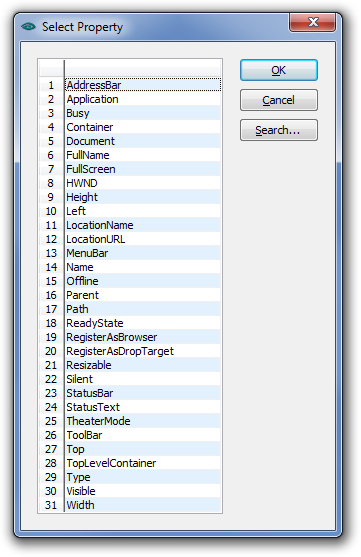
Selecting an OLE Property for the Web Browser control
Binding multi-column (AMV) controls
If your OLE control can support multiple data columns like the standard OpenInsight EditTable, there are two more items needed to allow the form IO layer to understand how to use your control:
- The new DEFPOSPROP property, and
- The name of an OLE event that maps to the equivalent of OpenInsight’s POSCHANGED event.
The DEFPOSPROP property is used to access the current column/row/cell position within the control, in a similar fashion to the standard SELPOS or CARETPOS properties. It can be mapped in one of three ways:
- By specifying a single actual OLE property of the control (such as “SelPos” for example) that implements an @fm-delimited column and row index format (like CARETPOS)
- By specifying a comma delimited pair of properties representing the column and row positions respectively, e.g. “CurrCol,CurrRow”
- By specifying the name of a Basic+ handler function that the form IO layer calls to handle the request in a similar fashion to the DEFPROP handler.
A Basic+ DEFPOSPROP handler should have the following interface:
   defPosPropVal = myDefPosPropHandler( ctrlEntID, flags, newPos )

      ctrlEntID -> ID of the control to get the value for
      flags     -> Denotes if this is a GET or SET/SETONLY request
      new       -> The new position if this is a SET/SETONLY operation
                       <1> Col
                       <2> Row

  defPosPropVal <- Returns the current position in the format:
                       <1> Col
                       <2> Row
The final item needed is the POSCHANGED event name so that the form IO layer can check when data has been entered into a cell for validation and update purposes.
Control Semantics
The next set of information is used by the Form Designer to indicate what extra features it needs to present when the OLE control is being edited:
- Allow Data-Binding: Checking this box tells the Form Designer to allow TABLE and COLUMN properties to be entered. This must be set if you wish to actually bind your control to the database at runtime.
- Required Support: Checking this box tells the Form Designer to allow the REQUIRED property to be specified.
- IConv Support: Checking this box tells the Form Designer to allow the VALID property to be specified.
- Oconv Support: Checking this box tells the Form Designer to allow the CONV property to be specified.
CLICK Event Data-Binding
Some controls, such as Checkboxes, update their data when clicked rather when they lose focus or change cell position. In this case the form IO layer needs to know the name of the OLE event to track if the control exhibits this behavior and this should be entered here.
(Disclaimer: This article is based on preliminary information and may be subject to change in the final release version of OpenInsight 10).