Image transparency – Color-keying and Alpha-blending

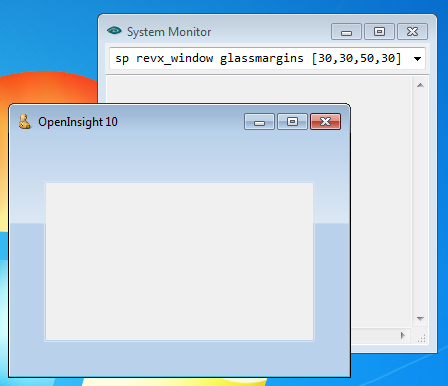
Earlier versions of OpenInsight have supported basic image transparency via a method called “color-keying”, where a specific color in the image is nominated as the transparent color (by default the color of the top-left pixel).  When the image is drawn to screen the pixels that match the transparent color are not rendered so the background pixels show through instead.  Whilst this can be effective in simple cases it is sub-optimal for images that have smooth curves and shadows as these tend to appear very pixelated: You can see this in the example from OpenInsight 9.3 below, where a bitmap with a white background and a slight shadow is rendered to a non-white background:

Orignal bitmap

Color-Keyed bitmap showing pixelated edges

Color-Keyed bitmap showing pixelated edges

A much better alternative is to use an image format that supports an “alpha channel” such as a PNG file*. Basically this means that each pixel in the image has an extra byte that describes it’s transparency – a value of 0 means that the pixel is totally transparent, while a value of 255 means that the pixel is totally opaque, Values in between are used to calculate how the image pixel is combined with the background pixel when drawn, so that it gives the appearance of being translucent, allowing the background pixel to show through to some degree.  This is a technique known as Alpha-blending.

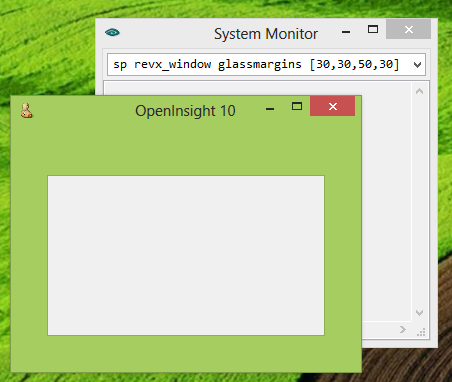
With version 10 we’ve taken the opportunity to re-visit OpenInsight’s image handling so it respects the alpha channel properly – you can see this in the example below, where the same image is loaded from a PNG file rather than a standard BMP file:

Alpha-blended source bitmap

Alpha-blended PNG bitmap with smooth edges and shadow

Alpha-blended PNG bitmap with smooth edges and shadow

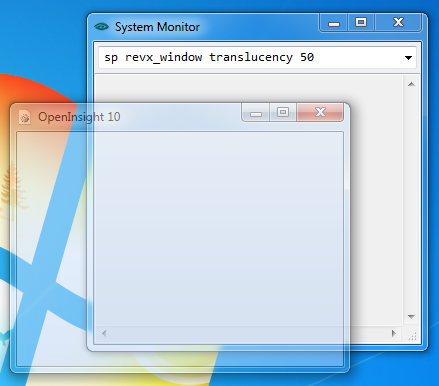
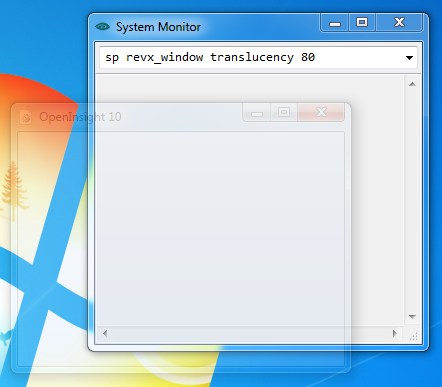
We have also take this one step further and provided the ability to specify a transparency setting for the entire image when it is rendered, so you can create an effect like a watermark:

Alpha-blended translucent image on a gradient background

Alpha-blended translucent image on a gradient background

Note that this effect also applies to color-keyed and non-transparent bitmaps too, which of course are still fully supported so you won’t need to change your existing applications unless you want to. In the next post we’ll take a look at some of the new image-specific properties that support this functionality.

* (PNG image files have always been supported in OpenInsight but the alpha-channel has never been respected, thereby limiting them to basic color-keying for transparency effects).

(Disclaimer: This article is based on preliminary information and may be subject to change in the final release version of OpenInsight 10).

Subject to change…

Those of you reading to the end of the posts in this blog may have noticed a small disclaimer we put at the bottom of each article explaining that things might change between now and the final release.  This post is just a small example of that in action as we’ve recently renamed a couple of properties in the interests of clarity and usability:

  • The WINDOW TRANSPARENCY property has been renamed to TRANSLUCENCY
  • The WINDOW APPUSERMODELID property has been renamed to TASKBARID (along with it’s switch in the RXI file)

More news as it happens …

(Disclaimer: This article is based on preliminary information and may be subject to change in the final release version of OpenInsight 10).

Image format support in OpenInsight 10

16-bit and 32-bit versions of OpenInsight have historically used a 3rd party library (ImageMan) for handling various image formats, mainly due to the lack of inbuilt support in Windows itself when the OpenInsight tool-set was first developed.

Unfortunately with the move to a 64-bit version of OpenInsight there is no 64-bit version of the ImageMan library available, but Windows itself now offers excellent image format support as part of the platform, so with version 10 we’ll be taking advantage of the WIC (Windows Imaging Component) libraries to provide support for the following popular formats:

      • BMP
      • GIF
      • ICO
      • JPG
      • PNG
      • TIFF

More information on the WIC can be found here.

(Disclaimer: This article is based on preliminary information and may be subject to change in the final release version of OpenInsight 10).

Taskbar Integration – The TASKBARID property

In a previous post on the RXI files we mentioned the taskBarID switch that could be applied when launching the Presentation Server to un-group instances of the same executable on the Windows Taskbar.  This same principle can also be applied to top-level application windows so they can have their own icon on the taskbar rather than being grouped together with other application windows owned by the same instance.

To support this feature OpenInsight 10 provides a new WINDOW property called TASKBARID, which should contains a unique value that differentiates the window from other windows running on the desktop.

For example, a fairly easy way to set a unique value would be to combine the window ID and handle like so:

taskBarID = @window : "." : get_Property( @window, "HANDLE" )
call set_Property( @window, "TASKBARID", taskBarID )

Here is an example of a window with a blank TASKBAR property – notice that it is grouped with the System Monitor window as they both belong to the same instance of OpenInsight:

TASKBARID not set

TASKBARID not set

Here is the same window with the TASKBARID set to “TEST” – the OpenInsight 10 window icon is now visible on the TaskBar:

TASKBARID set to “TEST”

TASKBARID set to “TEST”

Note that you can also give multiple windows the same TASKBARID if you wish to control how they are grouped together.

[Edit: 01 Feb 13 – property renamed to TASKBARID]

(Disclaimer: This article is based on preliminary information and may be subject to change in the final release version of OpenInsight 10).

Special FX – The SHOW and HIDE methods

These two new methods allow you to show or hide a form along with a simple fading or sliding animation.  Each method takes a single parameter which specifies the type of animation to apply:

Effect Value Description
-1 or null Use the default effect value as set in the Form Designer
0 No effect
1 Fade Effect (cannot be used with MDI Child forms)
2 Slide Down
3 Slide Up
4 Slide Right
5 Slide Left
6 Slide Down and Right
7 Slide Down and Left
8 Slide Up and Right
9 Slide Up and Left

E.g. For a “pop-up toast” style notification dialog you could use the following effects:

exec_Method( @window, "SHOW", 3 ); Slide open from bottom to top
exec_Method( @window, "HIDE", 2 ); Slide closed from top to bottom

[Edit: 24 Apr 13 – Call_Method renamed to Exec_Method]

(Disclaimer: This article is based on preliminary information and may be subject to change in the final release version of OpenInsight 10).


Special FX – The TRANSLUCENCY property

This new property applies to all top-level windows and dialog boxes (but not MDI child windows) and allows you to set the translucency of a form based on a simple percentage amount, “0” being fully opaque and “100” being fully transparent.

Form with TRANSLUCENCY of 20

Form with TRANSLUCENCY of 20

Form with a TRANSLUCENCY of 50

Form with a TRANSLUCENCY of 50

FORM with a TRANSLUCENCY of 80

FORM with a TRANSLUCENCY of 80

Check out the excellent PAINT.NET application for a good example of using this effect where supporting modeless dialog boxes are rendered translucent when not active.

[Edit: 01 Feb 13 – property renamed to TRANSLUCENCY from TRANSPARENCY]

(Disclaimer: This article is based on preliminary information and may be subject to change in the final release version of OpenInsight 10).

Special FX – Aero Glass

One of the new capabilities added to OpenInsight 10 forms is Aero Glass support, a feature that Microsoft introduced with Windows Vista and unfortunately removed in Windows 8 (in the interests of disclosure your author is not a great fan of the “improvements” to the desktop in Windows 8). Still, Windows 7 remains extremely popular and will be around for many years to come so it makes sense to provide an Aero Glass interface for developers who wish to use it.

Aero Glass is exposed via the following properties:

  • GLASSMARGINS
  • GLASSFRAME
  • GLASSDRAG

The GLASSMARGINS property

This property is a simple @fm-delimited dynamic array of margin values that specify the areas on the form that should be rendered using the glass effect.  Basically everything between the edge of a form and it’s appropriate margin value is rendered as glass.

<1> Left Margin
<2> Right Margin
<3> Top Margin
<4> Bottom Margin

RevX_Aero_Glass

Note that setting the margins to “-1” forces the entire client area of the form to be rendered as glass instead.

RevX_Aero_Glass_Sheet

The GLASSFRAME property

This is a boolean property (1/0) that enables or disables the Aero Glass effect for a form.  The GLASSMARGINS property must have been set before this property can be used to enable glass rendering.

The GLASSDRAG property

This is a boolean property (1/0) that specifies if the glass areas of a form can be used for dragging (normally only the form caption area can be used for this).

What happens when Aero Glass is not available?

Of course it’s entirely possible that your application may have to run in an environment where Aero Glass is not available, such as running under the Aero Basic theme or on Windows XP.  In these circumstances the OS would “give up” and your form would be rendered with a normal client area like so:

RevX_Aero_No_Glass

As you can see there’s no hint of the glass margins, so this will probably make your glass-based UI layout unsatisfactory.  In this case we’ve gone one step further and implemented a “Fake Glass” effect (much like Windows Explorer does under Aero Basic):

RevX_Aero_Fake_Glass

Fake Glass under Aero Basic

Fake Glass under Windows XP

Fake Glass under Windows XP

Of course, as Microsoft removed Aero Glass in Windows 8 they actually supply their own replacement, which simply paints the solid frame colors into the “glass” margins like so:

Win8_Glass

Fake Glass under Windows 8

(Disclaimer: This article is based on preliminary information and may be subject to change in the final release version of OpenInsight 10).

OpenInsight and Direct2D

As you may have noticed in a previous post on RXI files OpenInsight 10 provides the option to use Direct2D rendering when painting windows and controls on the screen.  If you’re not familiar with Direct2D it’s a new graphics engine Microsoft introduced with Windows 7 that aims to replace the traditional GDI graphics interface that has been a part of Windows since time began.  Essentially it’s a hardware-accelerated API that takes advantage of modern GPUs to provide high-performance rendering of 2D geometry, bitmaps and text.

(The official MSDN Direct2D documentation can be found here).

By default OpenInsight will use Direct2D if it is available on the platform (usually Windows 7, Windows 8 and Vista SP2) unless you override this via the aforementioned /2D switch or the UseD2D option to turn it off.  You can also disable it at runtime by using the SYSTEM object’s D2D property, which takes a simple boolean value of 1 or 0.

Of course you’re probably asking why you would want to disable this?  Well, to be honest you probably don’t, but it’s a sad fact that not all graphics cards are created equal (or at least their drivers aren’t) and it’s nice to have the option to drop back to standard GDI rendering in case you ever run across a problem.  We’ve also found it useful during our own development cycle here to see how the system behaves when Direct2D is not available, such as when running on an XP platform (of course we do actually test on XP itself, but switching platforms mid-development slows the entire process down, so initial testing of GDI rendering is done on Windows 7).

(Disclaimer: This article is based on preliminary information and may be subject to change in the final release version of OpenInsight 10).

The System Monitor

One of the most critical components of the Presentation Server is the System Monitor – as well as providing a simple command line interface to your forms and Basic+ Stored procedures, it is also responsible for a lot of hidden message processing and routing, such as providing the underlying framework that implements the IDLEPROC property and the POST_EVENT function.  It’s always there, even when you think you’ve closed it.

Needless to say it’s also the first part of the Presentation Server that gets written, and while the existing System Monitor is quite basic (it hasn’t been changed for many years) we’ve taken the opportunity with OI v10 to make it a bit more powerful and user-friendly.

Here’s a brief overview of the changes we’ve made:

  • It remembers it’s position and size between sessions.
  • It remembers a list of the last 100 executed commands between sessions.
  • Commands are no longer executed when scrolling through the dropdown – they are executed when the Enter key is pressed.
  • The font is set to “Consolas” with a fall-back to “Courier New”, which is hopefully easier on the eyes than the ugly “System Font” and allows more information to be seen.
  • The results editbox is read-only and results are only appended to existing text.
  • The command line supports the TCL-style “.number” syntax to execute a previously executed command (e.g. “.1”, “.2” etc).
  • Entering “RUN” before the name of a stored procedure is optional.
  • Any command entered that is not recognized is assumed to be the name of a stored procedure and is executed as such.
  • The command line parser has been improved – quotes and commas used to define arguments are now optional (like TCL).
  • The command line supports “AutoComplete” functionality.

We’ve also added the following commands:

  • ABOUT – Displays version information.
  • CFG – Displays the information parsed from the RXI file loaded at startup.
  • CLL – Clears the drop down list of previous commands.
  • CLS – Clears the results editbox.
  • EM – Shorthand for the “Exec_Method” stored procedure.
  • CMD – Opens the Windows command prompt window.
  • GC – Executes a Basic+ GarbageCollect operation.
  • GP – Shorthand for the “Get_Property” stored procedure.
  • LIST – Executes the command as an RLIST “LIST” statement.
  • LOGTO – Closes the current OpenInsight application and opens another one.
  • QUIT – Shuts down the Presentation Server
  • OFF – Same as QUIT (for TCL fans)
  • SHL – Executes an OS file/document via the Windows ShellExecute() function.
  • SP – Shorthand for the “Set_Property” stored procedure.

Be sure to let us know if there’s any features you’d like to see added to the System Monitor, but be advised that requests for full TCL compatibility will be ignored!

OI10 System Monitor

[Edit: 14 Jan 13 – Added CLL command and AutoComplete note]

[Edit: 24 Apr 13 – Call_Method renamed to Exec_Method]

(Disclaimer: This article is based on preliminary information and may be subject to change in the final release version of OpenInsight 10).

The Reflection API

From a tool-developers point of view one of the weaker areas in the Presentation Server has always been the lack of a “reflection API”, i.e. a way to discover what properties, methods and events an object actually supports at runtime.  This in turn has led to creating manual lists and records of object attributes, bringing with it with the inherent difficulty of keeping this information up-to-date as new features are added.

Primarily designed with the new PS-based Form Designer in mind, this shortcoming has been addressed in version 10 with the addition of the following new methods to the SYSTEM object:

  • REFLECTPROPERTIES
  • REFLECTMETHODS
  • REFLECTEVENTS

Each of these methods takes a single argument which is the type of object to query:

e.g.

buttonProperties = exec_Method( "SYSTEM", "REFLECTPROPERTIES", "PUSHBUTTON" )
buttonMethods    = exec_Method( "SYSTEM", "REFLECTMETHODS", "PUSHBUTTON")
buttonEvents     = exec_Method( "SYSTEM", "REFLECTEVENTS", "PUSHBUTTON" )

Each method in turn returns a dynamic array of information describing the requested attribute type:

  • REFLECTPROPERTIES returns the name of each property and the type of the data it represents.  It also identifies the context that the property is valid for (Devtime/Runtime/Get/Set).
  • REFLECTMETHODS returns the name of each method, along with a list of arguments the method accepts and the type of data each argument should contain.
  • REFLECTEVENTS returns the name of each event the object type can raise along with the names and data types of arguments passed to an event handler.

Note that when these methods return the type of data for a property or argument there are some cases where only a broad hint is given – Basic+ is an untyped language so it is not really feasible to accurately describe some types using a simple set of flags – e.g. in the case where an argument is a complex dynamic array containing a variety of other core data types such a strings and numbers.

Whilst aimed mainly at developers who write development tools for OpenInsight, this API may still be of interest for those of you who like to write your own diagnostic and debugging tools – when a new property, method or event is added to the Presentation Server it is clearly exposed thereby reducing the likelihood of it remaining hidden and undocumented.

[Edit: 09 Jun 22 – Corrected method names (removed underscores)]

[Edit: 24 Apr 13 – Call_Method renamed to Exec_Method]

(Disclaimer: This article is based on preliminary information and may be subject to change in the final release version of OpenInsight 10).